Do stains remain on things after washing? Does your laundry smell musty? Your machine probably washes with cold water. This happens when the tubular heater breaks down. How to replace the heating element in a washing machine so that the repair is quick and effective? We will reveal all the secrets of independently checking and replacing the heater.
Where is the heating element in the washing machine? Causes of failure
The location of the element may differ depending on the brand of washer. Presumably, in the Ariston, Ardo, Candy, Indesit, Electrolux, and Zanussi models, the part is hidden behind the rear panel. But in SMA AEG, Beko, Bosch, Siemens, Samsung, Whirlpool, the heating element is most often located behind the front cover.
In the Hansa machine you can get the heater through the base panel.
Not sure where to look for a part? Then inspect the SMA body. If the back cover is solid, then the heater is there. If it's small, you should look behind the front wall. The problem is that dismantling it is troublesome. Therefore, it is easier to look behind the back cover.

The service life of the heating element is influenced by the following factors:
- Hard water.
- Voltage fluctuations in the network.
A multimeter tester will help you accurately determine whether the heating element needs to be replaced. But there are also indirect signs that indicate a problem:
- The powder granules do not dissolve well, leaving traces of detergent on the laundry.
- When you place your palm on the glass of the sunroof 15–20 minutes after the start of the heating program, you will feel that it turns out to be cold.
An error code may appear on the machine's display.
Before changing a part, prepare a replacement element. Selected individually for each SM model. You will also need a socket wrench, a screwdriver and liquid soap.
Replacing the TENA spiral with your own hands
Did you find out where the element is? Now start disassembling the case. Before starting work, disconnect the equipment from the mains and close the inlet valve. It is advisable to drain the remaining water so that when the machine is tilted, it does not get on the parts.
- Open the bottom hatch (panel).
- Place the container.
- Unscrew the filter.

- Wait for the water to drain.
Before removing the heating element from the washing machine, remove the panel.
- Remove the mounting screws from the back to remove the top cover.
- Unscrew the bolts around the perimeter of the rear panel. Put it aside.
To remove the outer wall:
- Remove the dispenser tray from the housing.
- Open the loading door.
- Bend down the hatch cuffs.
- Use a screwdriver to hook the clamp and remove it.

- Remove the screws around the perimeter.
- Pull the wall up and remove.

Access is open. Now let's move on to how to remove and install the heating element in the washing machine.
- The part is located under the tank in a round-shaped mounting hole.
- Disconnect the power cables.
- To confirm if a part is broken, take a multimeter.
- Set the toggle switch to resistance measurement mode.
- Place the probes on the contacts.

- A working element will show values from 20 to 30 ohms.
- The product is fixed in the socket using a pressure plate. How to get it out? To do this, twist the central nut (not all the way). Push the bolt inward. Pry the base slightly with a screwdriver. Before pulling out and replacing the heating element, monitor the condition of the seal. It is advisable not to damage it when removing it.

- After dismantling is completed, inspect the mounting hole. Remove dirt and debris.
How to insert the heating element into place:
- Screw the nut onto the heater bolt.
- Insert it into the hole.

You can make installation of the heating element easier by lubricating the seal with liquid soap or detergent. Then the part will fit into the socket more easily and sit down.
After fixing the heater with a clamping nut, the wiring is connected to it. Connecting the heating element is carried out in the reverse order. Once the work is completed, run a test wash at at least 50 degrees. Make sure the water is heating and there are no seal leaks.
The work is shown in the video.
The washing machine has stopped heating water during washing. The malfunction in 99% of cases lies in the failure of the heating element - the heating element. The cause of the breakdown is deposits of scale, dirt, etc. on the heating element, due to which heat transfer deteriorates and the heating element coil burns out. So, how to replace the heating element in a lg washing machine?
The heating element in an automatic washing machine must always be in water during operation, therefore it is installed at the rear. To replace it you need:
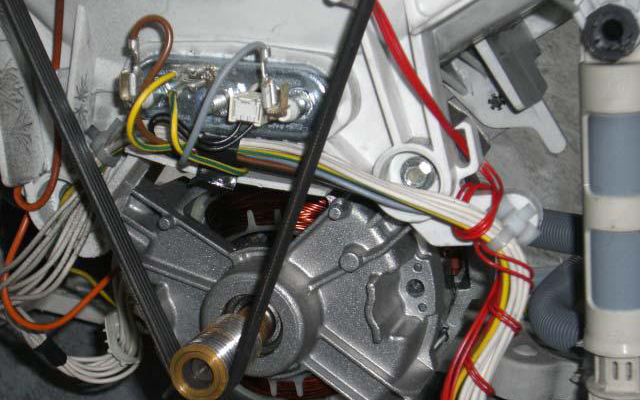
Make sure that the washing machine is disconnected from the electrical network. Then remove the back cover of the machine by unscrewing 4 or more screws. The heating element is observed under the drum pulley (or under the electric motor in LG machines with).
For ease of operation, you can remove the drive belt. Next, remove three wires from the heating element terminals: two supply and one, plus a connector from the temperature sensor, if it is installed on the heating element.
Loosen the nut on the central screw of the heating element by 5-6 turns and push the screw inward to this distance.
Using two flat screwdrivers, pry up and remove the heating element. This operation will require little effort, because... the sealing rubber of the heating element can be strongly compressed when installing the heating element and the resulting rim will not allow the heating element to be immediately removed (typical of SMA Atlant).
5 reasons why the washing machine does not heat the water
The washing machine does not heat the water
The water in the washing machine does not heat up at all or does it heat up, but very poorly and somehow weakly? Today we will look at this problem and you will find out what to do in this case.
Poor heating of water in the washing machine during the washing process is noticeable almost immediately. This can be determined by placing your hand against the glass of the closed door of the washing machine (Attention! Do this carefully, as carelessness can cause burns if the water is heated to very high temperatures). Also, such a malfunction is noticeable by the poor quality of the washed laundry.
If 20-30 minutes after the start of washing the water has not changed its temperature (did not become warmer or hotter), then this may be the first alarm signal. It is possible that the washing machine has stopped heating the water, and the cost of repair will depend on the reason specifically in your case.
Different models of washing machines behave differently in the event of problems with water heating. Most often, modern models of washing machines (you can read about the history of the development of washing machines here) stop the washing process at the moment when, according to the program, water heating should begin, and issue an error signal.
Simpler models can continue to wash clothes as if nothing had happened in cold water. As a result, the washing machine washes with cold water, finishing the wash with rinsing as usual. This behavior can be observed when the water heating in the washing machine does not work. By the way, about how and what works - we have a good article where you can find out how a dishwasher works. 
So, we give 5 reasons why a washing machine may refuse to heat water:
Incorrect connection of the washing machine. Sometimes, in cases where they skimp on the quality of the washing machine connection, the problem of unauthorized drainage of water into the sewer arises. In such a situation, the water in the tank simply does not have time to heat up to the required temperature, since warm water is constantly being drained into the sewer and a new cold portion is automatically added. It should be noted that another malfunction is associated with the unauthorized behavior of water, which is discussed in the article “Water collects in the washing machine. We are looking for the reason.”
Wrong choice of washing program. The washing machine does not heat up simply because this washing mode is currently selected. How is this possible? This may be simple inattention, which manifests itself in choosing the wrong program. Or it may be some feature of the choice of programs for a particular model. It’s just that in some models it happens that the choice of washing program and water temperature is carried out using different knobs/switches. For example, you set the temperature mode selection knob to 95 degrees. But the program selection knob was set to a mode that provided a temperature of only 60 degrees. Typically, the selected program has priority and the separately selected temperature mode of 95 degrees is simply ignored. Read the instructions for your washing machine if in any doubt.
The heating element (tubular electric heater) has burned out. It's simple - the water does not heat up because the heating element - the main character in this matter, so to speak - has failed:) There are several reasons for failure - power surges, short circuits, manufacturing defects, age (heating elements with our water quality last on average 3 -5 years). In this case, replacing the heating element with an experienced specialist will help.
The thermostat (water temperature control sensor) is faulty. Depending on the model of the washing machine, the thermostat can be located either in the heating element itself or separately on the surface of the tank. It monitors the water temperature and gives signals to heat the water if necessary.
The control module (programmer) is faulty. What could happen to him? Yes, anything, from bad contacts (for example, microcracks on the tracks) on the board and ending with a firmware crash. As a result, the module (the main brain center of the washing machine) begins to malfunction, and along with this, the entire operation of the washing machine is disrupted. In some cases, the module can be repaired (on site or at a service center), and in others it can only be replaced with a new one.
We looked at the 5 main reasons why the washing machine does not heat the water. This problem can be successfully resolved by our experienced washing machine repair specialists.
Of course, you can decide to fix the machine yourself, but is it worth spending your precious time on mastering the skills of repairing a washing machine? You don't study hairdressing when you want to get a haircut and don't turn into a dentist when you have a toothache? Our technicians will carry out diagnostics, accurately determine the cause of the breakdown, and then make high-quality repairs and provide a guarantee.
A simple operation to replace the heating element
Washing machine: LG WD-80154N Ag-nano (Argentum-nano) in home use since 01/08/2007 (5.5 years). Medium hard tap water.
Symptom of malfunction: no water heating.
Required: Phillips screwdriver, any combination device (tester) with an ohmmeter
Procedure: unplug from the socket and turn off the water supply, drain the remaining water from the system using a drain hose from the bottom of the machine, if there is one, remove the back cover of the washing machine (I had 4 cross-mounted screws around the perimeter). Carefully inspect the installation for burning contacts, suspicious changes in the color of the wires and darkening of the connectors, brittleness of the insulation (in places of poor contact).
Find in the lower part of the tank the elongated base of a heating element (tubular electric heater) with heating element tubes protruding from it and welded petals of detachable connections. In the center of the base of the heating element we see a tightening nut with a spanner size of 10. Depending on the manufacturer, a sensor can be installed in the base (on my model the sensor is installed directly in the tank next to the heating element.
slightly rocking to the sides, we disconnect 2 terminals from the terminals of the heating element and measure its resistance (should be about 30 ohms), as well as the insulation resistance between one of the terminals and the base of the heating element (hundreds of kilo-ohms or more)
If there is clearly a large resistance between the terminals of the heating element, and the insulation resistance is low, then the heating element spiral has burned out, the heating element shell is damaged and water has entered the tube.
Removing the heating element: carefully inspect the connector of the sensor installed in the base of the heating element, determine the presence of latches and how to disconnect the connector from the sensor (do not do this if the sensor is separate from the heating element); try not to pull the wires when disconnecting the sensor connector. On heating elements with a sensor, it is more convenient to unscrew the clamping nut with a 10mm head; if there is no sensor, an open-end wrench will do (the whole tool can be purchased separately for pennies) ![]()
The grounding wire is connected to the base of the heating element either to a terminal welded to the base or to a stud for a clamping nut using a washer with a petal at the end of the grounding wire
After unscrewing the clamping nut of the heating element, do not pry it with a flat screwdriver to avoid breaking the plastic tank. It is enough to slightly recess the central clamping pin into the inside of the tank and swing the heating element by the tubes protruding outward. When removing the heating element from the tank, be careful, since the heating element may be deformed, and excessive force will lead to damage to the sealing edge around the perimeter of the hole in the plastic tank or even to a crack in the tank. If the edge is partially damaged, the seal can still be ensured with silicone sealant.
After removing the heating element, place a table lamp in the drum on the loading side and inspect the condition of the tank, the outer wall of the washing drum, and the steel bracket for securing the heating element in the tank. There is a lot of dirt on the bracket.
Looking through the hole, I was pleased to find that the outside of my drum was clean and shiny after 5.5 years of continuous use. This means spending money on Calgon is, to put it mildly, not practical.
Using a piece of wire with a squiggle at the end, we pick out dirt and debris from the bottom of the tank, wipe the hole under the heating element and especially the sealing edge well with a clean rag.
When going to the store, you need to take an old heating element with you so as not to miss its length (the long one simply won’t fit, and the short one won’t reach the fixing bracket on the bottom of the tank)
As it turned out, the connecting size is the same for all types of heating elements. Price 600-800 rub. I have a heating element 230 V 1900 W without a sensor, but there weren’t any of those in stock, so I bought one that was the right size with a sensor of the same power, a little more expensive. Installing a heating element with a lower power can increase the washing time, and choosing a heating element with a higher power than was installed leads to an overload (failure) of the keys (relays) of the electronic control unit - an expensive pleasure.
When installing the heating element into the tank, move it forward, lightly pressing it against the bottom of the tank in order to get the heating element tubes into the fixing bracket. In models from other manufacturers it may be different, look locally. Firmly pressing the heating element to the socket in the tank, tighten the clamping nut on the central stud. The pressure plate on the inside will be attracted to the base of the heating element, the compressed rubber seal will rest against the edge of the hole and seal the connection. When tightening the nut, you should not use a screwdriver without knowing the factory tightening torque; it is better to do it manually, so as not to miss the moment of a significant increase in the resistance of the wrench. Next, tighten the nut a quarter turn. Next, lightly (just a little) tighten the terminals on the wires with pliers to ensure reliable contact and connect them to the petals of the heating element. depending on the model, we place the grounding wire with a washer at the end under the second nut on the central stud (we put the grounding wire terminal on the grounding petal at the base of the heating element).
Depending on the model, we connect the connector of the sensor built into the base of the heating element, paying attention to the slots (grooves, protrusions) of the connector. We put the back cover in place and test the washing machine, during the process we monitor the absence of water leakage until the end of the washing cycle (it is advisable not to leave the washing machine unattended for several more washes for reliability).
In any case, I succeeded and I am quite pleased.
2018-06-20 Evgeniy Fomenko
How to change the heating element
Before replacing the heating element in the washing machine yourself, you should determine exactly where it is located. The manufacturer sometimes changes the location of the heating element, depending on the model.
So, before replacing the heating element in the Atlant washing machine, you must first carefully examine its back wall. If the model has vertical loading of laundry, then it is probably located at the very bottom, under the tank. To remove the heating element in such a machine, it will have to be turned on its side to get to the desired part.
Before starting repairs, the machine should be disconnected from the electrical network so as not to work under voltage and to completely drain the water. If the heater is located below or behind, you will have to disconnect the unit from the water supply.
The front or rear wall of the machine must be removed, and if the model is vertical loading, then also turned on its side and the bottom removed.
As a rule, the old heating element can be removed without difficulty. The main task is to disconnect the wires and not forget how they were connected.
To replace the heater you will need:

When replacing a heating element, it is recommended to purchase a new one, not a used one. Otherwise, most likely, you will have to repair the car again and quite soon. It is better to buy a heater of the same power and brand and change it. After the preparatory work, you can begin replacing the heating element.
To remove the heater:

Sometimes, when replacing a heater, it is necessary to use a sealant to fix it more reliably. This may be necessary if the rubber gasket is deformed, or when a used heating element is installed.
To check the correctness of the repair, you need to run a test wash at a temperature of more than 50 degrees. After ten minutes, you need to touch the hatch with your hand and if it is warm, it means that the new heating element is working.
If you have certain skills and understand the process, replacing the heater can take about an hour.
Signs of a tena malfunction
A sign of a heater malfunction is washing in cold water. That is, the machine does not heat the water. At the same time, there are situations when it is not the heating element that is to blame, but the thermostat. Therefore, it would be correct to pre-check both parts.
The heating element is a tube, inside of which there is a spiral, which, when heated from the electrical network, transfers it to the heater tube. The heater then heats the water in the drum. Due to scale, the thermal conductivity of the heater decreases, which leads to its overheating and rapid failure. Scale is a consequence of using hard water, so special attention should be paid to water treatment. When washed in soft water, the machine lasts much longer.

To ensure that the washing machine works without breakdowns, you should:
- Do not overload the drum more than the volume specified in the instructions;
- Do not close the lid hatch after washing, and give the moisture a chance to evaporate;
- Do not use hard water;
- Clean the filter periodically;
- Make sure that the car was standing straight and always on a hard surface.
2018-05-30 Evgeniy Fomenko
Location of the heating element in washing machines
Before disassembling the washing machine to get the heater, you need to determine where the heater is located in the washing machine.
It's not difficult - you just need to look at the back of the car and see how big the back cover is. If it is large, covering the entire wall, then most likely the heating element is located right behind it. Usually down under the washing tub.
In this case, removing the heating element is quite simple, since you just have to unscrew the back wall.
If the cover is small, then most likely it is a hatch to provide access to the machine belt. In this case, the heating element should be looked for at the front of the machine, behind the front panel. Disassembling it takes much longer and is more difficult than removing the back cover.
If the instructions for the washing machine have not been preserved, then you can also be guided by the fact that for washing machines of the brands Zanussi (Zanussi), Kandy, Electrolux, Ariston, Indesit (Indesit), Virpul, Atlant, Beko (Veko), the heating element is usually located behind the back lid.
In Hans brand machines, in order to get the heating element, you need to remove the base panel. For this brand and for most machines that have a vertical principle of loading laundry, the heater is located on the side.

In washing machines of the Siemens, Samsung, Bosch, LG brands, in order to replace the heater, you will almost certainly have to remove the front decorative panel.
Before removing the heating element, it is necessary to drain the water from the machine, so you should prepare a rag and a container to collect the liquid in advance.
The algorithm for removing the heater is as follows:
- The wires leading to it are disconnected;
- The nut located in the middle of the heater is unscrewed;
- Threaded stud pushes inside– press it or hit it with a hammer (not too hard).
After this, by picking up the element with a knife or screwdriver, you can remove it. Sometimes this requires rocking it from side to side if the part is stuck.
Ariston, Electrolux, Zanussi, Kandy, Indesit, Atlant, Beko

In washing machines of these brands, the heating element is located at the back and to replace it, you need to remove the back cover of the machine:
- Unscrew the fixing screws of the plug on the rear wall;
- Remove the plug;
- Disconnect the wires leading to the heater, having previously memorized the connection diagram.
In order to avoid mixing up the wire connections when assembling the machine and breaking the washing machine, it is recommended to take a photograph of the wiring connected to the heating element. Typically, phase and zero are located at the edges (usually blue and red). In the middle there is a grounding wire - green and yellow.
On the heater itself, between the power supply and the housing, there is a temperature sensor - a plastic connector with a latch. To remove the heating element, you need to carefully disconnect all the wires.
There is a nut in the center of the heating element. It should be loosened without unscrewing completely. It serves to tension the rubber seal, which seals the connection. After unscrewing the nut, it must be pushed inward along with the bolt, as a result the seal will finally loosen and the heating element can be pulled out of the tank.

This is in theory, although in practice, most often the rubber takes on the configuration of the tank over time and prevents the heater from freely exiting the tank. You will have to pry the heater around to remove it.
When replacing the heater, the temperature sensor removed from the old heating element is replaced with a new one. As a rule, these sensors do not break and there is no point in buying a new one. Sometimes, in some washing machines of the Electrolux brand, the case consists of a pair of monolithic parts, however, in this case, you will have to unscrew the back cover of the case.
Whirlpool
In order to remove the heater from a Whirlpool washing machine, you also need to remove the back panel.
But there are some differences from standard actions:

Important: There is also a latch on each side of the bracket that is inserted into the decorative panel. The bracket just needs to be lifted to remove it.

Siemens, Samsung, Bosch, LG
When disassembling a Samsung washing machine, difficulties may arise, since its heating element is located in the front decorative wall of the tank. However, this design also has its advantages, since in order to remove the heater it is not necessary to remove the machine from the furniture and disconnect it from the water supply and sewerage.
To remove the front wall of a Samsung washing machine you need to:

Important: When dismantling the front panel, the main thing is not to break the electrical wiring, since they are of small cross-section and not reliably soldered. In order not to create unnecessary problems, it is better to tear it off carefully.
The machine panel is now held in place by only two hooks. You should take it by both lower edges and pull it up, carefully remove it and place it next to it. At the same time, there is no need to use too much force, since there are wires from the UBL (hatch blocking device) behind it. It is better not to disconnect them, but to move the wall to the side.
Now the panel can be lowered lower so that when removing the heating element it does not interfere and the wires do not accidentally break. Once the panel is removed, the heater terminals will be exposed. Before changing the element, it is recommended to check it for serviceability, since a new heating element costs a lot and if it is possible to do without replacing it, this will help to save a lot.
Bosch
In a Bosch washing machine, the heating element is located behind the front panel and there are differences when performing work to remove it.
To get the heater you will need:

Operating procedure:

After completing these steps, access to the heating element will open and it can be removed.
Lji
In order to remove the heating element in a Lji brand washing machine, you will have to disassemble the machine, and in particular, remove the top cover. Otherwise, the back cover cannot be removed. Typically the top cover is secured with two or four screws located at the back.
After removing the top cover, you need to unscrew the screws holding the back surface and then carefully remove it. After this, it is extremely important not to forget how the wires are connected to the heater. Otherwise, you can easily confuse the connection and damage the machine.
After the connection diagram is securely fixed, you should disconnect the wires leading to them from the heating element and thermistor.
Siemens
In Siemens washing machines, as a rule, heating elements are located behind the front cover.

To remove it you should:


How to remove it? - you ask. I'm telling you. It is necessary to release the central pin ( click on the picture - it shows schematically), which is located on the heating element itself, between the contacts. To do this, you will have to unscrew two nuts, located one on top of the other and securing the ground wire. This is a clever design. The heating element is held in place by compressing the rubber seal. The elastic band is compressed by this very pin and increases in width, covering all the cracks.
Unscrew both nuts and push the stud a little inward. Now we take pliers and pull strongly on the contacts (electrodes) of the heating element. They are strong and we don’t feel sorry for them anymore. We pull one by one and swing from side to side. We remove the heating element.
3. Clean the place where the heating element sits
We remove the heating element and all the dirt from under the drum of the machine. The dirt was the cause of the problem. There will be a lot of dirt. It is important to pull it all out so that it does not interfere with the operation of the new heating element. In order to wash away all the dirt, you can first pick everything out with your long fingers, then take a bottle brush and continue with it. Then pour some water into the drum, after placing a basin in the place where the heater is removed. In short, you need to wash away everything that has accumulated there over many years.
4. Buy a new working heating element
The heater itself could also use some cleaning. With it you will go to the workshop to buy a replacement.
Finding a suitable heating element was not difficult. Take an old copy and go to the nearest washing machine repair shop. If possible, it is better to buy an original heating element rather than an analogue from China. In my case, the heating element cost 1,100 rubles.
Particular attention should be paid to:
- heating element length. It should match the length of the old one;
- electrical power. It should match the markings on the old one;
- elastic band width. This is more important than it might seem at first glance! This is especially important when selecting an analogue. If the elastic band is 1 millimeter wider, you will try to fit in something that cannot be squeezed in. If at However, then after you install it, during a hot wash, the heating element can be “spitted out” by the washing machine, no matter how hard you twist it.
Yes, little things, but our whole life consists of little things. By the way, if you find an error, highlight the word with the error and press Ctrl+Enter on your keyboard. Thank you in advance!
5. Install the heating element
Perhaps the most interesting and concise part. Installation is in the reverse order. Insert the heating element all the way, you can knock it a little. Place the nut on the stud and tighten it. Fasten the grounding, screw on the second nut. Pull the terminals onto the contacts of the heating element. Close the back cover.
That's it, you can call the washing machine testers and carry out an inspection.
Perhaps this could be the end of the description. However, I would like to note that it would not hurt to regularly clean the built-in filter. When cleaning the filter, it is a good idea to disconnect the rubber hose from the drum drain hole and rinse it thoroughly. Scale pebbles accumulate there.
This concludes my long story about quick and easy self-repair of a washing machine. I wish you pleasant and trouble-free operation of your reliable assistant in the fight against clothing stains!
In the end, I found a video with a good demonstration of the process of replacing the heating element on a washing machine. Here is a heating element with a temperature sensor.