A country holiday at the dacha is, first of all, an opportunity to breathe the fresh air of a garden or forest twenty hours a day. It is impossible to relax and at the same time be in the stuffy box of a country house, so a summer resident who values his health sooner or later arranges with his own hands a full-fledged summer terrace with an awning or a roof. Building a terrace with your own hands is much simpler than a gazebo or veranda, so arranging a special area for a table and garden furniture, as a rule, does not require large investments, although the effect will be quite impressive.
What is the secret of the terrace
Despite a certain external similarity between the veranda and the terrace, the purpose of these buildings is different, as are the actual sizes and designs. A veranda is a part of a house with closed walls, windows and a full roof. The terrace is a landscaped outdoor area for relaxing on a sunny day with a canopy, canopy or awning. It’s easier to understand the difference if you look at photos or drawings of a classic terrace.

When choosing a place and method for building a terrace with your own hands, you can use classic techniques for arranging a recreation area:
- In close proximity to the house, using the platform and steps as a porch and platform in front of the entrance to the house;
- Take it out as a separate area and place it in a cozy, sunny and less windy place in the summer cottage. In this case, a prerequisite is the arrangement of a path, stairs or steps, with the help of which you can quickly get inside the house;
- Build a special type of roof or ceiling for a country house with your own hands, on which the recreation area will be located.
Important! It is clear that verandas and gazebos are not built this way, so any drawings and recommendations for the construction of terraces can be creatively processed, changing the dimensions to suit your wishes. The main thing is that the design is comfortable, durable and safe to use.
The dimensions of terraced areas, as a rule, can be several times larger than the dimensions of gazebo buildings, and even more so, verandas. Almost always, the base of the deck is built from wood or composite, raising the structure above the ground so that moisture and dampness do not affect the condition of the boardwalk.

Selecting the device, design and dimensions
The terrace is a one-of-a-kind building, designed not to create shade, but, on the contrary, aimed at providing the possibility of a comfortable and safe stay in the sun. Therefore, when choosing a project and site for constructing a terrace with your own hands, drawings and dimensions, you must take into account the following features:
- The design of a platform of any size, raised above the ground by more than 18-20 cm, must include fencing and railings for the terrace. For buildings that include several platforms located at different heights, intermediate steps and handrails are provided;
- The floor, railings and fences must be made of wood or a material with similar properties, for example, a polymer composite. The drawing must indicate the quality of wood processing and the type of coating applied - varnish or a protective composition based on epoxy resins;
- If there is a canopy or awning, one edge of the roof must be attached to the main wall of the house, the second rests on stationary supports embedded in the ground to a depth of at least 40 cm with a concrete blind area poured.
Important! Before choosing a diagram of how to make a terrace, it is important to choose the right material that best matches the design in the drawing.
The easiest way is to build a terrace at the corner junction of two walls of the house, as in the photo. In this case, we build a terrace and automatically get a platform in front of the entrance to the house.
Corner terrace design
The simplest option for a terrace would be to build a platform made of wood on a primitive foundation of concrete blocks or slabs, as in the drawing. The angular arrangement provides protection of the terrace area from wind and rain on both sides, so there is no need to install wind protection with polycarbonate sheets or wood panels.
If necessary, you can install a fabric awning, curtain or canopy over the terrace, the dimensions of which will be limited only by the dimensions of the walls of the house. The disadvantages of the design include the fact that if the slope is incorrect, the wooden platform can affect the distribution of rainwater, therefore the calculation and size of the slope of 3-4 degrees must be immediately recorded on the terrace drawing. The size of the foundation supports for the flooring must be calculated from a sketch or drawing, based on measurements of the entrance opening above the ground level.
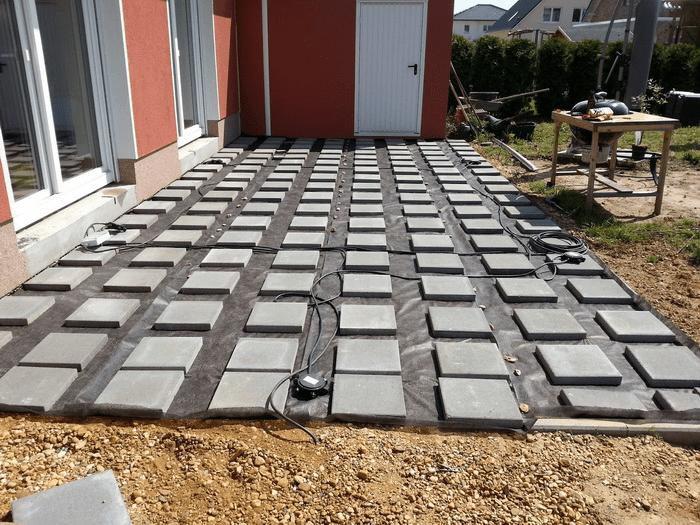
For a lightweight frame structure of a terraced area, it will be enough to lay 12-15 concrete blocks or several dozen clinker tiles as a foundation. You will first need to remove the top layer of soil, fill it with fine gravel, compact it and lay a sand cushion. The most difficult thing will be to maintain the size and thickness of the sand base so that the height of the foundation columnar or slab supports does not exceed the calculated value according to the drawing.

Geotextiles can be laid on the sand, which effectively prevents the growth of weeds and grass. To fill the floor of the terrace, experts recommend first tying the supports with timber and laying joists made of wood. But in this case, you have to increase the vertical size of the terrace in height by 20-30 cm, which is not always convenient. In the simplest case, a beam measuring 60x60 mm is laid directly on the tile and fixed with pieces of reinforcement, driving it directly into the ground.
The most difficult stage of assembling a budget terrace structure will be covering the decking with boards. An oak or special decking board made of polypropylene and sawdust, 200x30 mm in size, is best suited.
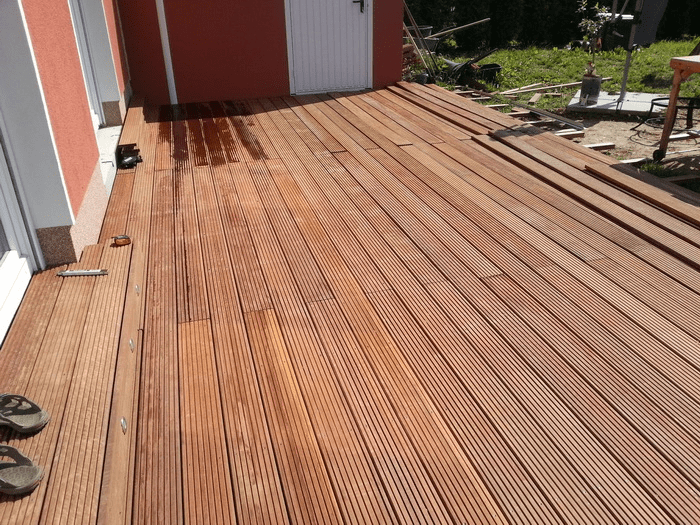
For your information! The appearance and dimensions of the composite material are practically no different from processed natural boards. High resistance to moisture and absolute insensitivity to insects and pathogenic microorganisms make decking an excellent substitute for expensive oak wood.
When covering the platform frame, you must carefully follow the recommendations for installing decking boards given in the drawing. In a similar way, flooring can be made from ordinary boards pre-treated with an antiseptic.
Building a simple terrace on your own
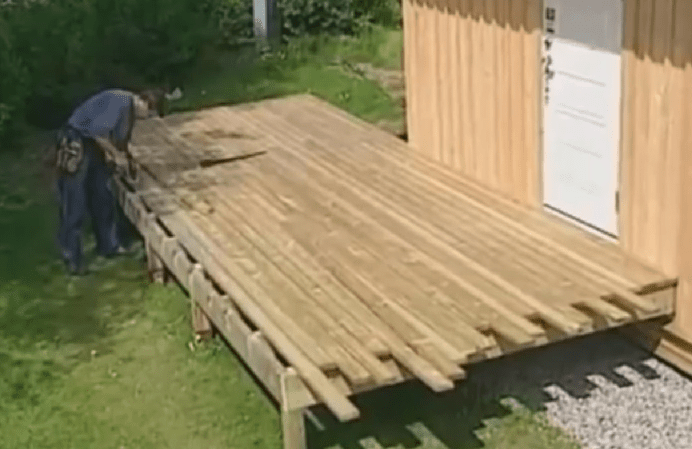
The average size of the site is 4x2 m. We will install the wooden structure on wooden supports in a swinging pattern. Part of the terrace area will rest on pillars made of paired timber 120 cm long and 100x100 mm in size, the second part of the terrace will rest on the plank wall of the country house. To install the timber, we will drill holes in the ground with a diameter of 90 mm and hammer the supports with a sledgehammer.

Next, the supports driven into the ground must be tied with a flat board or a sheet of thick plywood with a section size of 350x40 mm. When attaching boards, it is necessary to additionally control the horizontal position of the strapping sheet.
We attach the side trim boards directly to the walls of the wooden house; in the supports, you will need to cut down for installation of the longitudinal trim board.
After assembling the frame, transverse joists are installed, measuring 2.5 m with a cross-section of 100x40 mm, which will increase the rigidity of the base of the terrace platform and at the same time serve as a support for the floorboards.

At the next stage, the terrace fencing is assembled. Along the outer contour of the platform, grooves are cut out in the floorboards, after which, as in the drawing, supports are nailed under the railings. A vertical beam or board measuring 100x50 mm, 120 cm high is attached to the bottom board of the trim using self-tapping screws. A groove for the crossbars is filed on the inside of the racks, after which the lower bar and railings for the terrace area are installed.

Diagonal spacers are placed between the posts, increasing the strength of the entire fence structure.
Conclusion
The above terrace design is simple and easy to build with your own hands. If desired, you can install a small fabric awning or a full-fledged canopy made of polycarbonate or light ondulin over the terrace area. The wooden structure must be treated with protective antiseptics, and the floor must be periodically treated with wax or paraffin mastics.
Veranda for the house: projects, do-it-yourself photos at the dacha, videos and useful information - you will find all this in this article. A veranda is an open or closed extension that serves as a living room, a place to relax or a room for clothing. The name comes from the Portuguese word varanda, which translates as glass terrace.
The presented material is divided into four parts:
- In the first part we will tell you what a closed and open veranda attached to a house is, as well as their characteristic features. We will select the optimal materials for the construction of the frame and roof decking. We will also touch on the topic of foundation.
- The second chapter presents a do-it-yourself veranda project for a house made of timber with a polycarbonate roof, in the form of an open-type building.
- The third chapter tells how to make a veranda in a closed country house from expanded clay blocks with a roof made of metal profiles.
- In conclusion, a couple more tips - let's talk about possible construction defects, insulation, flooring and inserting windows into the building.
You can use the navigation bar and move to the overview chapter you are interested in or immediately learn how to build a veranda with your own hands. Let's get started with the review part!
Closed or open veranda attached to the house?
Open and closed types of verandas have their pros and cons, which you need to think about before starting construction.
The difference in a closed and open veranda attached to a house is based on the following principles:
- quantity of materials;
- protection from weather conditions;
- storage space;
- availability of review.
First of all, adding a veranda to a house spends much more resources on its construction than an open one. It requires fully built walls with window openings, the insertion of window frames and a more solid foundation that can support the mass of the walls. 
Weather protection and storage space go hand in hand. On a closed veranda with a door, it is quite possible to take shelter during a storm and calmly drink tea, while your neighbors from the house watch how their terrace board in the open place is flooded with rain. The same goes for storage - you can easily leave your bike on a closed veranda for the winter without worrying about the fact that someone might steal it.
On the other hand, an open veranda to the house gives an excellent view without requiring the installation of large and expensive windows. On a sunny day, it is quite possible to have an afternoon siesta on it, relaxing under the light breeze from the midday heat.
Once the decision has been made on what type of veranda is needed, try to develop a future layout for it on paper. This doesn’t require any special skill, but even the most banal sketches will help you decide on the amount of materials and their type. It would be a good idea to mark the territory on the site so as not to make mistakes in the calculations.

Choosing material for constructing the veranda frame
This chapter discusses the most practical and popular materials for creating a frame. The best options for building a veranda are:
- beam;
- brick;
- profile pipe;
- expanded clay concrete blocks.
Before talking about them, it is worth making a small digression. The frame is a very important thing, and how strong the veranda will be will depend on its strength, so you should not choose only based on the cost of materials.

When building a veranda at the dacha with your own hands, all types of materials for the frame can be combined with each other. Brick will be an excellent support for the facade, and beams and metal profiles will help to continue the walls or supports.
timber
The veranda to the house, the projects, photos of which are presented in this article, are classics. Timber is lumber larger than 100mm. It is made either from solid wood or by gluing individual boards together. The first option for creating timber is much more reliable, although somewhat more expensive.

The shape of the timber is usually square or rectangular - round ones are already logs. It differs from each other in the processed, edging, sides. Bars are produced:
- double-edged;
- three-edged;
- four-edged.
Separately, it is worth highlighting rounded timber - this type of lumber is made from solid wood, the sides of which lead to strict conformity of dimensions relative to the center. Such beams have special strength and structure: their tension is the same on all sides, which allows the beams to retain their shape when drying up to a deviation of half a millimeter.

The main physical quality of a timber veranda is its great elasticity and strength. Unfortunately, the structure of wood can sometimes have negative consequences - over time it dries out and expands due to temperature changes. Therefore, when planning the frame, you should take this into account, giving the tree a few millimeters of margin for expansion. In addition, we can highlight greater resistance to temperature and weather conditions, which are especially evident in dried and treated wood. 
The cost of timber for a veranda in a private house depends on its quality and the type of wood used. Each type of wood has its own appearance and properties. Beams made of spruce and pine are cheaper than their counterparts made of ash, beech or oak, but do not have such an intricate pattern.
A little later, in the second chapter of this article, we will look at how to make an open veranda out of wood with your own hands step by step in 35 steps.
A brick is a product with regular sides, made from mineral substances - clay, sand and other materials. With skillful work, you can create a very strong and beautiful brick veranda attached to your house with your own hands. All bricks nowadays are standardized, which makes it possible to work with them very quickly. 
Brickwork has a number of unique properties:
- resistance to all types of weather conditions;
- fire resistance;
- durability.
In addition, brick does not require any special treatment - it does not fade over time, which allows you not to think about painting. The main disadvantage is the low resistance of the masonry to various impacts - over time it can crumble, and cracks can appear in the masonry.

Brick production is very well developed - you can find goods of any color and shape on the market. In the construction of brick verandas in a village, country house or private house, red bricks, which are made mainly from clay, and silicate, white bricks, made from sand and lime, are most often used.
Building with brick can cost a lot of money - a closed veranda can take a couple of dozen stacks, which will cost a lot of money, however, this pays off in the durability and strength of the masonry.
Profile pipe
The metal frame veranda has also become widespread among builders. A profile pipe is a solid or welded metal product with any cross-section that differs from the standard round one. It is made from rolled low-alloy steel (although there are also stainless steel specimens), with a thickness of 1mm to 22mm. The cross-section can be very different, from 10mm to 500mm. 
The main properties of a profile pipe for a veranda include:
- ease;
- flexibility;
- no need for post-processing.
Such a pipe is ideal for creating veranda frames and posts, which are subsequently sheathed with various finishing materials. Working with it is quite simple - the pipes are cut with a grinder or iron scissors to the required height, after which they are twisted together with screws. 
The design of a veranda made from a profile pipe is easy to manufacture and will not require you to spend a lot of money, but it definitely requires subsequent processing with finishing materials. It is precisely the “frame” that is obtained from it, when almost completed structures emerge from other materials.
Expanded clay concrete blocks
Expanded clay concrete is one of the most convenient materials. The block is a kind of large-sized “brick” that is light and has heat capacity. Installing a veranda made of blocks does not take long - the blocks are lubricated with the mixture and stacked on top of each other. 
The difference between the blocks lies in their formulation - expanded clay concrete with a high cement content is more durable and stable, but conducts heat better and, as a result, cools faster. Clay, on the contrary, gives softness to the material and better insulates temperature.
The greatest difficulty in their use for these types of verandas is the connection - expanded clay concrete glue, which is necessary for masonry, is quite difficult to use. The cost of such material is low - this allows you to not spend too much on the construction of the frame. 
Choosing roofing material
When deciding what your veranda will look like for your house (projects, do-it-yourself photos at the dacha below), you should turn to the roof, but only after you decide what the frame will be made of. A house with a veranda under one roof will look better, but it is not always possible to plan a veranda at the stage of designing a house.
The article will cover:
- corrugated sheeting;
- metal tiles;
- soft tiles.

All materials are great for a veranda, however, the best solution would be to continue the same type of roofing that is already on the roof of the house. Such a solution will make the veranda part of a single whole, which will create a complete design of the building.
On average, not too much money is spent on the roof of a veranda attached to a country house - 7-8 sq.m. corrugated sheets, for example, will cost a fairly modest amount, which allows you not to think about saving at this stage of work.
Polycarbonate
Polycarbonate sheets are a real “savior” for anyone who is planning to add a veranda to their house with their own hands. Their main advantage is considered to be transparency like glass without the latter's disadvantages - fragility and heaviness.
 Polycarbonate veranda attached to the house - photo at the dacha
 In addition, polycarbonate sheets:
- easily attach to any surface;
- have a large number of colors;
- protected from humidity and temperature changes.
The main vulnerability of polycarbonate is its poor resistance to impacts - large hail can easily pierce the sheet and ruin the roof. This is especially offensive when the sheet is thoroughly screwed in - to avoid various patches it is necessary to completely change the area.

Now it is produced in the format of solid, monolithic sheets and honeycomb panels. To work with it, it is enough to build a wooden frame, onto which sheets will be glued or screwed on top with screws and thermal washers. The screwdriver should be used at low speed - otherwise you risk leaving a crack on the sheet.
Polycarbonate can help create a beautiful veranda for your home, completely filled with sunlight, from which no lighting will be required during the daytime. 
Corrugated sheet
Corrugated sheet is a sheet of thin-rolled stainless steel with a wavy relief. The material is the fastest and most versatile when installing veranda roofing. On sale you can find a fairly wide range of profiled sheets - different in color, thickness (which varies from 1mm to 4mm), wave size and other factors. 
Profiled sheeting is credited with:
- ease of operation due to quick coverage of a large area;
- resistance to weather changes;
- flexibility.
The disadvantages of a thin profiled sheet can be considered softness - it can be easily pressed through, carelessly leaning on your elbow or stepping on it. Dents are quite difficult to straighten, so it is better to be careful when working. 
Attaching corrugated sheeting during the construction of a veranda in a private house is quite simple - the sheet is laid on transverse flat joists and screwed with screws with drills and a pressing rubberized washer. At the top of the sheet it is fixed at each interval between the waves, in the middle and end - after 1-2 intervals. The next sheet is laid overlapping the previous one.
It is better to work with a screwdriver in the same way as with polycarbonate - carefully screwing in the fastener at low speed, since excessive tension can deform the sheet, and the screw will leave a hole that is too wide, through which water will then flow.

Metal tiles
It can be given first place in popularity when building a covered veranda. Metal tiles are thin sheets of steel, stainless steel or aluminum, which are shaped like regular tiles. They are covered with a special protective layer on top, which, in addition to protecting against rust, provides a variety of colors and textures.

The material is well protected from corrosion, is lightweight and easy to install. A square meter of tile costs, relative to other materials, average. The price depends on the thickness, composition of the protective coating and the metal used. It is higher for aluminum and stainless steel, however, compared to them, steel provides less durability.
Creating a veranda roof in a country house from metal tiles is a very pleasant job, but its features depend on the characteristics of the sheet. For sheets without special fastenings in the form of a “loop-hook” system, it is necessary to firmly twist the sheets together with screws. The first sheet is scrolled in each wave, the middle - with an interval of several waves. Connections between two sheets are also scrolled into each wave.

With special fastenings, you can do without a large number of screws - the first sheet is most firmly attached with screws, the rest are held on the first sheet and are attached only through a section. The screwdriver should also be used as slowly as possible so as not to bend the texture.
If the roof of your house is made of metal tiles, then the roof of the veranda at the dacha can either be continued with it or covered with corrugated sheeting. From the same manufacturer, they are likely to have the same shade, which will give integrity between both buildings.

Soft tiles
 Do-it-yourself veranda for your house – projects and photos made from timber
 This type of tile is made from bitumen and fiberglass. In appearance, it rather resembles a flexible sheet of plastic material. By using synthetic materials, it can be given any appearance that will fit perfectly into the exterior interior of the veranda.
It is durable and does not require special handling. Flexible tiles are quite resistant to external aggressive environments, but at high temperatures the bitumen heats up and can become deformed over time.
At the moment it is mainly produced in the form of:
- rectangular sheets;
- diamonds;
- hexagons;
- “beaver tails” and other forms.
 Working with it is quite simple - the material is placed from bottom to top so that the top sheet overlaps the previous one. The upper edge of the sheet is nailed or screwed with a screw with a hidden head. To place tiles on the veranda roof, a flat surface over the entire area is required, which can be made using a monolithic sheet of various materials.
When using wood materials, it is advisable to lay a waterproof lining between the tiles and the wood. These are sold in stores, however, thick plastic film will do just fine instead. You shouldn’t pull it tightly in advance - when driving in, the excess areas will go under the nail, and the film will straighten out on its own. This approach is very useful when using MDF or fiberboard panels.

Choosing material for the foundation for the veranda of the house
The foundation for the veranda of the house depends on the materials chosen for the frame. Different frames require different rigidity from the foundation, which imposes certain restrictions on its construction. Next, two foundation options will be considered:
- Columnar foundation for the veranda;
- Tape base.
The cost of a veranda base depends directly on its size. If you decide to design a house with a veranda, then a single foundation would be a good option. This allows for better distribution of air movement underground. Otherwise, already laid communications may interfere with the correct placement of foundation sections.

You should not save on the foundation - in the future it can do you a very disservice. The destruction will lead to the entire structure being mowed down and its destruction. It is very difficult to fix this - to do this you will have to either raise the foundation with a jack, or completely dismantle the veranda and build it anew. This will lead to damage to the materials used and to unnecessary financial costs.
The main essence of the columnar foundation for the veranda is hidden in the name. It consists of concrete columns on which various materials are already placed. The design is easy to create and does not require the purchase of special materials - for the usual version you only need cement and sand. 
Columns can be made:
- made of brick;
- by casting from concrete;
- from foam concrete blocks;
- from parts of concrete pillars and so on.
The simplest method is cast concrete bases, on top of which there are pillars for a brick veranda. Conventional concrete is used - a mixture of cement with sand and gravel in a ratio of 1: 2: 2.5. A hole with a diameter of about 600 mm is dug in the ground, into which a wooden box with sides of 500 mm and a height of 600-700 mm is immersed. To strengthen the base, you can place a metal mesh inside the casting, making reinforced concrete out of it, or throw in any unnecessary debris made of durable metal. It is advisable to lay a horizontal mesh every 50-100mm, which will provide the necessary pressure strength, and every 100mm vertically, which will prevent the post from falling apart. 
The quality of the brick does not play a special role - you can also use old brick, which has been cleaned of the remains of the dried mixture, but in this case it is advisable to additionally cover it with finishing material. The masonry is made in three rows of bricks, each level changing direction. The posts are placed at a distance of 500-1000mm from each other, be sure to add additional support at each corner.
On such light foundations for a veranda, a framework of boards is usually created. You can choose almost any timber - for a solid foundation, a 100mm by 60mm timber is sufficient. The beams are screwed to the brickwork using metal corners on dowels on both sides of the board. 
The main advantage of a columnar foundation for a veranda to a house with your own hands is the speed of construction - most of the time is spent on hardening the mixture and, in the case of adding brick supports, the speed of collecting the masonry. It depends on the skill of the master, but in general, it also goes quickly.
Despite the fact that the masonry itself is strong, the beams will not be able to support the weight of closed brick or expanded clay concrete masonry, so it is only suitable for light frames made of wood or metal profiles. Increased strength can be achieved by using iron joists, but they are expensive and very massive. 
Strip foundation
This type of veranda foundation is a completely poured concrete foundation. It is made by pouring a mixture of cement, sand and fine gravel into pre-prepared trenches with a wooden box, formwork. The operating time increases depending on the height of the foundation and the size of the veranda. 
Such a foundation is much stronger than a columnar one, so you can safely place brickwork and expanded clay concrete blocks on it - it will be able to withstand their weight and will not sag over time.
Do-it-yourself work with a strip foundation for a veranda begins with digging a trench. Its depth should be approximately 400-500mm. The formwork is assembled over this trench. In general, the depth of the foundation should correspond to the frost depth in your area. After completing the collection of the box, pouring the mixture begins.
The mixture is made in a ratio of 1:2:2.5 from cement, sand and concrete, respectively. For greater strength, it is worth laying it with a reinforced mesh both horizontally and vertically, with a pitch of each mesh of 100-200mm. 
It must be taken into account that the strongest foundation will be with a one-time pour, since with different hardening times the concrete forms separate pieces, which in the future may sag, causing cracks throughout the building. It is advisable to work as quickly as possible - a concrete mixer or custom-made concrete will be a good help.
The same problem will occur when adding a veranda to an already finished house with a foundation. A good idea would be to place metal rods with reinforced mesh welded to them in the finished foundation. This will save you from problems in the future. 
After hardening, the boxes are removed, and the ground next to the foundation is leveled. To make the area more beautiful, you can fill the area next to such a foundation with pebbles, or place flower beds on it. In the third chapter of the material, we will look in more detail at how to make the correct foundation for a veranda in the form of a strip.
Veranda to the house: projects, do-it-yourself photos at the dacha and how to plan an event correctly
Of course, the best option is when the veranda to the house with your own hands in the country (projects, photos below) is planned before the house is built, so that they have a common foundation and a more complete overall design. This avoids:
- collapse of individual parts of the foundation;
- differences in materials and their shades;
- the presence of unnecessary elements that may interfere with the veranda - windows, doors, etc.

However, sometimes the idea of building a veranda for a house appears already during the operation of a residential building. In this case, you need to immediately decide:
- what kind of foundation is required;
- Will the materials of the veranda and the house match?
A column foundation is much more convenient for adding a veranda to a house, especially when the height of the house allows it. In this case, additional pillars are also placed along the perimeter of the house wall so that the floor of the future veranda does not sag due to constant or dynamic pressure.
If your plans include creating a closed veranda, or using brick or expanded clay concrete masonry, it is better to use a more durable strip foundation. Additional strength can be given to the connection either with special adapters, which are mounted into the foundation of the house and filled with the mixture, or with improvised materials. As practice shows, you can do without them. 
The location of the veranda relative to the doors and windows is also important. An open veranda will not interfere with the windows in any way - the level of light passing through the opening will also be sufficient, but on hot days the roof can save you from the scorching sun.
You should not place the veranda next to the windows of personal rooms - people who will be on the veranda can violate the owner’s privacy and make his life much less comfortable.
A closed veranda and windows in a house are incompatible things. Even with large window openings, this can interfere with the overall design of the room and render the window useless for the home. However, there are exceptions to any rule.
 Incredibly cozy
 The location of the door is also quite important. If your house has two doors - a front door, the entrance from the front side, and a spare one, for example, leading from the living room to the garden, it would be more logical to place a veranda near the second one. Of course, if you want to radically change the layout of the house, you can add an additional exit to the veranda, which will become an additional highlight.
When planning, you should take into account the direction of the door opening - it can become a problem for the future interior and interfere with the arrangement of furniture. Problems with this can be avoided by using sliding entrance doors, or by making the veranda part of the house, insulating it and eliminating the entrance door on the wall of the main building. 
The difference in the time of construction of the veranda and the house can also affect the materials. When selecting similar material, you may come across:
- differences in shades that change from batch to batch;
- lack of the required range of material in stock;
- disappearance of a material from sale due to its discontinuation from production.
Of course, a veranda and a house made of the same materials look much better, but if you could not find a completely matching roof or brick, the ideal solution would be to select contrasts, both in color and texture. The only thing you shouldn’t experiment with is the roof. Different roofs (with the exception of polycarbonate) rarely look good. 
Polycarbonate veranda attached to the house - photo instructions for the project
This master class looks at how to make a veranda for a house (project and photo below) of the classic open type. This combination of materials allows you to quickly build a summer veranda made of wood, open to the sun, with your own hands, on which you can rest on a hot day. The dimensions of the finished building are 3000mm in length and 6000mm in width.
Selection of wood and its properties
When choosing wood for a summer veranda, you need to take into account that it will be under the constant influence of the environment, which negatively affects the tree.
There are two main types of wood on the market.
1. Coniferous trees - spruce, pine, larch, fir;
The most accessible is pine, which is used both in carpentry and for the construction of buildings. It is cheaper than other types of wood, which allows you to save money during construction.
Another good option for an attached polycarbonate veranda to the house (photo below) is spruce. It can withstand loads well and does not bend, and is also not subject to seasonal fluctuations in humidity, which can be important for construction in coastal areas of the seas and in rainy areas. The properties of coniferous wood are presented in the table.
Physical properties of softwood (average value)
| Wood type | Density, kg/m3 | |||||
|---|---|---|---|---|---|---|
| at 12% humidity | completely dry | conditional | volumetric | radial | tangential | |
| spruce | 445 | 420 | 360 | 0,43/0,50 | 0,16/0,17 | 0,28/0,31 |
| larch | 660 | 630 | 520 | 0,52/0,61 | 0,19/0,20 | 0,35/0,39 |
| cedar pine | 435 | 410 | 350 | 0,37/0,42 | 0,12/0,12 | 0,26/0,28 |
| Scots pine | 500 | 470 | 400 | 0,44/0,51 | 0,17/0,18 | 0,28/0,31 |
| Caucasian fir | 435 | 410 | 350 | 0,46/0,54 | 0,17/0,18 | 0,31/0,34 |
| Siberian fir | 373 | 350 | 300 | 0,39/0,44 | 0,11/0,11 | 0,28/0,31 |
A cut of softwood in the photographs below.


2. Deciduous trees - linden, birch, aspen, beech, oak.
Larch and cedar are opposite to each other. Larch is very difficult to process - the density of its core is twice as high as that of other trees, which makes the timber highly susceptible to any impact, while cedar, on the contrary, is quite soft to work with. Both are excellent at resisting moisture accumulation.
Among deciduous trees, you can take a closer look at oak - it is incredibly durable and protected from all types of damage that can overtake a tree. The main disadvantage is its cost. Ash and beech are also good for porches, but they are very susceptible to infestation. The properties of hardwood are presented in the table.
Physical properties of hardwood (average value)
| Wood type | Density, kg/m3 | Coefficients of shrinkage (numerator) and swelling (denominator), % | ||||
|---|---|---|---|---|---|---|
| at 12% humidity | completely dry | conditional | volumetric | radial | tangential | |
| Linden | 495 | 470 | 400 | 0,49/0,58 | 0,22/0,23 | 0,30/0,33 |
| birch | 630 | 600 | 500 | 0,54/0,64 | 0,26/0,28 | 0,31/0,34 |
| beech | 670 | 640 | 530 | 0,47/0,55 | 0,17/0,18 | 0,32/0,35 |
| English oak | 690 | 650 | 550 | 0,43/0,50 | 0,18/0,19 | 0,27/0,29 |
| alder | 520 | 490 | 420 | 0,43/0,49 | 0,16/0,17 | 0,28/0,30 |
| aspen | 495 | 470 | 400 | 0,41/0,47 | 0,14/0,15 | 0,28/0,30 |
See the cut of the presented deciduous trees in the photographs provided.


The choice of polycarbonate and its characteristics
Choosing polycarbonate for a veranda is not difficult, especially when you know what characteristics are needed from it. Polycarbonate sheet nowadays consists of several layers:
- protective layer that filters ultraviolet radiation;
- a coating added to selectively transmit light;
- polycarbonate plate.
Changing these characteristics allows you to achieve any appearance and transmitted light from polycarbonate. The color can be any - everything is limited only by the imagination of the master, however, in this work the choice was made in favor of ordinary, transparent polycarbonate. 
The sizes of the sheets also vary - from small panels 1000x1500mm to huge sheets 5000x10000mm, however, polycarbonate sheets can be easily cut with a construction knife. The thickness of the sheet affects its strength and wind resistance, but as the thickness increases, the price of each sheet also increases.
It is worth remembering that the polycarbonate sheet on the veranda roof can crack very quickly under high pressure. This imposes restrictions on the creation of various roofs - large gaps between the rafters can lead to breakage of the sheet at the first serious snowdrifts.
In this project, we made only one row of beams, which went in increments of 866 mm, since it was done in the Crimea, where very little snow falls in winter. You can see the main properties of monolithic and honeycomb panels in the table below.
Veranda drawing
A drawing of a veranda helps to avoid various design mistakes, and you don’t need to have any special drawing skills; a regular sketch will do. 
The image shows a schematic drawing of a veranda for a house 3 by 6 meters. The total width of the veranda - 6000 mm is achieved due to the width of the roof. For the first beam, an indent of 300 mm is made from the corners. The height of the vertical beams is 2000mm, they are installed with a gap of 1750mm. Front roof crossbar – 6000mm. 
The drawing of the veranda shows the roof. For it, longitudinal logs 3000 mm long are used, which are located at a distance of 866 mm from each other.
This arrangement of the beams allows for maximum sun transmission from the roofing - a small number of joists guarantees a greater amount of rays.
To strengthen the structure, you can put 816mm long bars between each longitudinal joist with a step of 1000mm from the beginning of the roof. This will firmly strengthen the polycarbonate sheets.
By the way, if you want to do this, look for the relevant material on our website.
Based on the measurements, we will need:
- 1 beam 6000mm long;
- 7 beams 3000mm long;
- 4 beams 2000mm long.
The total roof area is equal to 18 sq.m.
To strengthen the pillars, special metal legs with pins will be made, which are attached to the lower end of the beam and recessed into the concrete pillar during its pouring. You will need 4 of them.
Preparatory activities
This veranda for the house (project, photo below) provides for the preparatory activities described in the table.
 | 1. 7 beams with a section of 50x150mm. All the main elements will be sawn from it, and the corners will be cut from the remains, which will serve for additional fastening of the vertical supports. |
 | 2. 4 metal supports that will be laid with concrete and provide stability to the wooden beams |
 | 3. They can be made from leftover metal corners. They were pre-cut to a length of 100mm, and then welded to each other with an exact fit to 50mm. |
 | 4. A metal pin 500-600 mm long is welded to them from below. The length is not very critical - the reinforcement will be inserted into future holes and filled with concrete. 4 holes are pre-drilled in each wall, into which self-tapping screws will then be screwed in to secure the post in the support. |
 | 5. Cellular polycarbonate with a total area of 18 sq.m. A sheet measuring 2100x9000mm and 8mm thick was purchased. The sheet was cut for the future roof into pieces measuring 3000x2100, a total of 3 such pieces were required. The remaining 300mm can either be reduced by cutting from the last sheet, or left. When cutting, it is better to leave a margin of 10-20mm to avoid shortages - this will insure you in case of an error in the calculations. |
 | 6. You will also need steel blanks 450mm long and 10-15mm wide. |
 | 7. They are marked into three parts of 150mm each. 3-4 holes are drilled in the extreme parts, which will serve for screwing in self-tapping screws and subsequently securing the upper frame trim to the crossbars of the house. |
 | 8. We receive the material ready for installation. |
 | 9. Stripes must be painted in any color. The most convenient way to do this is with regular iron enamel. You can also read in a special article on our website (point 5). |
A mixture is also required. Cement “200” is suitable. For 4 concrete columns you will need approximately 1 bag of cement, 2 bags of coarse sand and approximately 2 volumes of gravel, which is necessary for strength.
Tools needed:
- hand circular saw;
- grinder with grinding wheel, grain size – 150;
- electric plane;
- sandpaper for finishing minor polishing imperfections;
- a drill with a long drill for preparing holes in corners and crossbars, as well as a nozzle for mixing the cementitious mixture;
- screwdriver;
- rubber mallet;
- corner;
- level.
The indicated list of tools will give you the opportunity to work calmly without spending a lot of time preparing the material. By the way, a circular saw can be completely replaced with a regular hand saw, and an electric plane can be replaced with a hand plane for wood.
You definitely shouldn’t give up on a screwdriver - it will help you twist the structure and drill all the holes. Nails don't always perform well, especially when it involves nailing wood and metal together through a hole in the latter.
Columnar foundation
The discussed do-it-yourself veranda project for a house involves the use of timber as a support with reinforcing pins screwed to them with a stand for connection (mortgage).
The bottom trim is not used; the role of the floor is played by already laid tiles. This is a good option to save on flooring without losing quality.
Step 10. For the future foundation, some of the tiles are disassembled and holes are dug in them. 
Depth - approximately 300-400mm, diameter - about 200mm. This veranda is quite light, so it is not necessary to assemble a box for the post and fill it with reinforced mesh. If you plan to install the lower trim using more materials, it is necessary to strengthen the posts. Let's move on to the next stage - assembling the frame - which will bring us closer to answering the question of how to make a veranda for your home!
Frame assembly
The frame of the veranda will be assembled from timber. To do this, you must first saw it into blanks and bring it into a pleasant form by grinding. You should start by sawing 6000mm timber.
First, you should mark the required dimensions using a tape measure. On four beams we mark sections of 3000mm, on two more – 2000mm, after which we begin sawing. It is advisable to do this before sanding, since cutting already sanded wood may leave burrs and unsightly edges.
To create this veranda, it is very important to monitor the angle of the supports - they must go exactly 90 degrees, otherwise the 6000mm support beam will lie unevenly and there will be gaps visible to the naked eye.
 | 11. We begin to process the wood. Each board must be leveled with an electric plane. First, a layer is removed from one side. |
 | 12. Next, remove from the other side. The difficulty in working may be with the wider side - without skill it is quite difficult to remove the same size on each side, and it is even more difficult to do this with a regular mechanical plane. The main thing is not to overdo it and not to remove too much - the board for the veranda will be too loose in the prepared corner. |
 | 13. After trimming, we grind the surface using a grinder and a grinding wheel. |
 | 14. We carry out the procedure with each board. After this, it is advisable to put them in a dry, moisture-protected room so that the boards do not absorb water before being coated with a protective composition. |
The remaining pieces of timber will be used to make corners. Good support corner:
- has an angle of 45 degrees;
- designed for the required weight.
To do this, you don’t need to have much experience - just measure the same distance on each side of the board on which it will be attached. Since when connected, this structure will take the form of a triangle, the marked point will be its corners.
After this you need to use the formula: a 3 =b 2
Where a is the measured distance on the board, and b is the required length of the outer side of the support. We cube the distance on the board and put the resulting number in the root and extract it. You can also do this using a calculator - the resulting number will be accurate and will not let you down.
 | 15. To make an even 45-degree angle, simply gently bend one of the corners of an A4 sheet of paper to the opposite side. The resulting angle will be 45 degrees. |
 | 16. You can now draw corners from the outside and saw them. After all the manipulations, we will have corners for the veranda almost ready for installation. |
 | 17. We also grind them, and then make them perpendicular to the beveled plane of the hole using a long drill. |
 | 18. It is better to make several holes in a checkerboard pattern - this way the boards can be pressed evenly over the entire area. With such holes, the frame will come out more even, and the screws will definitely not go beyond the board. It is important that the holes are slightly smaller than the selected screws - otherwise we simply will not turn the wood and the self-tapping screw will lie freely in the boards, without having any effect on the strength of the structure. |
 | 19. After this, metal “legs” must be screwed to the future pillars for the veranda frame. To begin with, they need to be placed at the ends of the beams. If they are adjusted evenly, then this will have to be done with a hammer or mallet. |
 | 20. After the support is level on the beam, it must be screwed in place. We used 35mm screws, but you can use any you have on hand. You need to twist it first from one edge, and then from the other. |
 | 21. This way we ensure uniform placement of the part. The self-tapping screws screwed in the middle are support ones, so they should be screwed in when the part is already in place. As a result, we get a similar design. |
 | 22. Place the structure on the ground. The residue left after cutting can be used for support and more convenient twisting in the future. |
 | 23. In our case, we need 200mm self-tapping screws, which will be screwed on top of the load-bearing logs of the veranda, as well as 152mm self-tapping screws, which will fasten the corner supports to the boards. |
 | 24. We twist everything, measuring the surfaces using a metal corner or a ruler - this way the frame will come out much smoother. |
 | 25. It is better to recess the screw heads inside, or make them flush with the board - otherwise they will stick out, and when painting, excess varnish will collect and cause smudges. |
 | 26. After we have built the frame for the veranda with our own hands, it needs to be raised. You can’t handle this alone, so it’s better to call a neighbor or friends. The raised frame must be strengthened with one longitudinal joist. |
 | 27. In this case, it is temporarily secured with a clamp, which pulls the two together. On the side of the house, the beam is secured using a metal blank. |
 | 28. To level, you can place identical metal corners under each rack. |
 | 29. When the structure is leveled, you need to start pouring the cement mixture into the prepared holes. The mixture is made from cement, sand and gravel in a ratio of 1:2.5:2. Water should be added slowly until the future concrete reaches the desired viscosity. There is no need to make it too liquid or thick - it should flow smoothly from the spatula, as this will dry it out faster. |
 | 30. When the mixture hardens, the frame will look like this. After this you can paint it. For this veranda, a tinted antiseptic in Walnut color was used with an additional coating of yacht varnish. Here you can use any types of paints and antiseptics - everything is absolutely at your discretion. |
Upper harness
 | 30. Work for the top trim of the veranda begins with painting the longitudinal joists. |
 | 31. Acrylic varnish was used for coating. It impregnates the wood from moisture and prevents the process of rotting from developing, since it kills any bacterial infections. |
 | 32. After finishing painting, you need to start securing the veranda joists between the house and the frame. It is better to attach it to the house first, and it is very convenient to do this using prepared and painted plates. They are screwed on with screws on both sides. The free edge can simply lie on the frame - the concrete should already hold it quite firmly. It is better to twist the lag that we used to level the frame last, since it still holds the structure. We screw the end of the frame using 200mm self-tapping screws. |
 | 33. It is necessary to screw the screws into the frame quite accurately - otherwise there is a risk of the screw passing to the side, through the wood, which will spoil the appearance of the structure. After fixing all the logs, the structure will hold firmly and will not be dependent on the wind. |
Roof roof
Step 34. We cover the roof using already prepared polycarbonate sheets. They are attached to the upper plane of the longitudinal ones using self-tapping screws and special thermal washers. By the way, you can do without them - the veranda is open, and this will not particularly affect its insulation. The film must be removed from surfaces in advance.
The polycarbonate sheet has two sides - back and front. On the front side there is a film with marks indicating that the panel does not transmit ultraviolet rays.

You need to twist it as slowly as possible, otherwise there is a risk of cracking the polycarbonate.
Step 35. You may encounter a problem when the connection of two polycarbonate sheets extends beyond the joists. In this case, a special jumper is used, which is either put on the sheet in advance or can be placed in it afterwards. For this you only need a mallet. The jumper is driven between the sheets and does not require special fastening. 
Floor installation
On such a veranda there is no need for additional installation of the floor, but if it is needed in the future, you can simply create a lower frame on small posts along the edges and secure it with screws to the existing joists. After this, the frame can be covered with any finishing material - decking board, MDF board or linoleum.
After finishing the work, you get such a beautiful open veranda made by yourself. 
The polycarbonate used provides excellent transmission for sunlight, protecting the place from ultraviolet radiation. However, if there is too much light for you, then you can sew them that will be lined with the ceiling - this way they will cover up the excess sun.
It would be a good idea to decorate the racks with curtains or even large blinds. You can also hang colorful garlands, which will bring some New Year aesthetics even on the hottest evening, making the space more cozy.
If you wash the floor well, it will be quite possible to walk on it barefoot, taking off your shoes at the threshold. Carpets and other utensils can be placed on the veranda, and a rocking chair or hammock will be an excellent addition to the relaxation area.
Video of the construction of a timber veranda
More details on how to build a veranda for your house with your own hands can be obtained from the video, which shows in detail all the processes described in the article. Special thanks to its creators for a clear and detailed explanation of all the points!
Now let's look at how to build a closed veranda with your own hands for a country house.
Do-it-yourself covered veranda made of expanded clay blocks
A veranda for a house with your own hands in the country (the project and photos are described below) made from blocks is excellent for creating a warm room. It is quite durable and can serve as a good basis for building a balcony in the future.
Characteristics of building blocks
The veranda will be made using expanded clay blocks. The house itself is built from the same ones, so they will harmonize perfectly. See below for a table of types and characteristics of such blocks.
| Block type | Dimensions, mm | Density, kg/m3 | Emptiness, % | Strength grade | Frost resistance | Thermal conductivity | Weight, kg | |
|---|---|---|---|---|---|---|---|---|
| four-slit | 390x190x188 | 800-1000 | 40 | m35-m50 | f50 | 0,19-0,27 | 11-14 | |
 | 390x190x188 | 800-1000 | 40 | m35-m50 | f50 | 0,19-0,27 | 11-14 | |
 | 390x190x188 | 800-1000 | 40 | m35-m50 | f50 | 0,19-0,27 | 11-14 | |
 | 390x230x188 | 800-1000 | 40 | m35-m50 | f50 | 0,19-0,27 | 13-16 | |
 | 390x190x188 | 1000 | 20 | m50 | f50 | 0,27 | 14 | |
 | 390x190x188 | 1200 | m75 | f50 | 0,36 | 17 | ||
 | 390x90x188 | 900 | 25 | m35 | not standardized | 0,3 | 6 | |
 | 390x90x188 | 1200 | m50 | not standardized | 0,36 | 8 | ||
The blocks, despite their impressive size, are very light and at the same time heat-resistant, so the closed version of the veranda in the future can be easily insulated without constructing thick layers of insulation or sandwich panels.
The size of the blocks used is 390x190x188mm, quite common and available in any store. If necessary, expanded clay is easily cut into pieces using a grinder and a stone disc. 
Drawing and project
In order not to make mistakes during construction, it is better to think in advance about the design of the veranda for construction with your own hands at the dacha. We work with expanded clay blocks, so a more solid strip foundation is required.
You need to start developing a project by calculating the territory. In this case, a veranda is being built to the country house at the main entrance, so you need to calculate the area next to it.
The distance from the house is 2500mm, the width is 3500mm. The foundation is 500mm high. The height of the wall is 2300mm, with the highest point of the roof being 3060mm. In addition, there will be two doorways, the width of which is 750mm, as well as a window combined with the front door.
The roof will be sloped, one part is attached to the house, the other - to the erected walls. The floor is poured with concrete and in the future it can be covered with any finishing material.
In total, the area of the room will be approximately 4.5 square meters, the construction volume will be about 10 cubic meters, excluding the roof drop. You can see the drawing of the veranda below.
 Veranda to the house - project and photo of the actual building
 Tools and materials
To build a veranda at the dacha with our own hands we will need:
- Expanded clay concrete blocks;
- Cement;
- Sand;
- Gravel;
- Wooden beams and boards;
- Metal profile for roofing.
The amount of expanded clay concrete is calculated depending on the height and width of the wall. We needed approximately 150 expanded clay blocks, including cutting.
Cement is taken at the rate of 1 bag per 2 sq.m., 2.5 parts of sand and 2 parts of gravel are added to it. To save on cement, old concrete blocks will be laid inside, which will allow the entire volume to be filled faster.
You don't have to buy sand - if you have old, unsifted sand, you can clean it using a similar sieve. 
Any metal mesh with small cells, nailed to a box of boards, will help out perfectly and make the old sand “newer.”
For formwork, you can use any more or less even boards that are suitable for creating a flat surface. You will need one board, 50x150mm and 2500mm long, and one beam, 150x150mm. The logs will be 50x150mm in size and approximately 2200mm long.
The metal profile is taken taking into account the surface - in this case it is equal to 14 sq.m.
From the tools we need:
- Concrete mixer;
- Hammer;
- Accurate level;
- Putty knife;
- A circular saw;
- Grinder with a stone saw.
By the way, a circular saw can be replaced with a grinder with wood cutting circles, but a circular saw will give a much more even and accurate cut.
Strip foundation
 | 1. To start construction, you need to dig a ditch. We will dig to the freezing level of 500mm. Taking into account that we will make the height of the foundation 500mm, then such dimensions will be enough for strength. |
 | 2. To speed up the pouring and spend less cement and sand on the work, we will place old concrete pillars inside that are not used anywhere. |
 | 3. After this, you can begin constructing the formwork. It should be approximately 500mm higher than the ditch. Any boards can be used, however, the gaps between them should not allow concrete to pass through, and the surface adjacent to the concrete should be flat. |
 | 4. To prevent the formwork of the future veranda from falling apart, we twist the boards together onto small pegs, and place the resulting panels on supports. They can rest on any solid surface, or be driven into the ground and screwed to the formwork. To get a foundation that is even in width, we will add spacers from small pegs. |
 | 5. As the concrete is poured, the spacers will be removed. After finishing, check everything for evenness using a level. This will create a “trench” into which concrete will be poured. To fix the width of the formwork, the walls can be twisted on top with small planks. This will not allow her to either disperse or collapse. |
 | 6. After this, we begin to pour concrete for the base of the veranda. We remove the pegs as the concrete is poured since they are not needed as part of the future foundation. After complete filling, we level the surface - this is necessary for even laying of expanded clay concrete blocks. In case of rain, it is advisable to cover the wet concrete, otherwise it may absorb excess liquid. After the concrete has hardened, the formwork must be removed. |
Monolithic slab as a floor
During the construction of the veranda, the option of a completely poured concrete floor was chosen, which allows you to put any covering on top.
 | 7. First, you should raise the floor. For this, either old concrete floors or ordinary soil, which should be compacted very tightly, are suitable. With a house foundation height of 700mm, it is necessary to raise the floor approximately 400-450mm from the ground. After this, the surface is covered with cellophane to insulate it from moisture. |
 | 8. For strength, any reinforced mesh is laid out on the floor of the veranda. To save money, you can use old bed frames or mattress springs - they are no worse. The most used places – the entrances – need to be strengthened especially firmly. |
 | 9. After this, the mixture is started and the floor is filled with it approximately 5-7mm. |
 | 10. After finishing the mixture, it must be allowed to dry for one day. You can level it with a wide spatula or any flat and smooth board. |
 | 11. For convenience, the step will be flooded. We separately assemble a reinforced frame for it. |
 | |
 | 13. Fill with more liquid concrete. This step will last for decades! After it dries, we advise you to pave it. |
Laying expanded clay concrete blocks
After the floor is ready, you can begin laying the walls of the veranda. In this case, it was done the other way around, however, it does not make any difference, but it will be more convenient to work with the field already made.
 | 14. Before starting work, it is necessary to apply waterproofing. For this purpose, a special mastic made of bitumen and rubber was used. |
 | 15. A layer of roofing felt is laid on top, which will not allow any moisture rising from the ground to pass through. If you don’t have mastic, you can use regular tar or bitumen - they are no worse in effect. They must be laid in an even layer, since excess pieces do not allow creating an even laying. |
 | 16. Before fixing the blocks with the mixture, they should be placed on the foundation and tried on. You can stretch a thread along the edges of the corner blocks - it will show the border of the masonry. |
 | 17. After fitting and alignment, you can begin laying the blocks. The masonry must be checked according to the level that is placed between adjacent blocks. The mixture for expanded clay concrete blocks is mixed, if possible, in a concrete mixer - quite a lot of it is required in volume, and it is undesirable to be distracted once again by tedious work. If necessary, the amount of mixture under the block is added, or excess is removed. |
 | 18. Once ready, the masonry should be allowed to dry. The top layers and the mixture absorb moisture well, therefore, to speed up the process and protect them from the weather, you need to cover them with cellophane. |
Veranda roof truss system
 | 19. To install the rafters, you will need one rectangular beam and one square one. First, the timber is attached to the side of the house. |
 | 20. Using a hammer drill, holes are made in the beam and wall. When working with a beam, you need to use the drilling mode, and with the wall of the house - a combined mode. After drilling, you need to hammer in the dowels. It is enough to use 200-300mm dowels, which are strengthened with a hammer. |
 | 21. After this, the veranda beam is strengthened with additional corners. |
 | 22. The next step is to lay the timber on the wall pillars. The beam together with the wall is drilled to 300-400mm. |
 | 23. A metal pin is driven in. You can buy it in a store, or make it from scrap materials, for example, a piece of an old lever from a car. |
 | 24. Next, the rafters are laid out on which the roof will be supported. They must be laid out at intervals of 150-250mm, otherwise the roof may collapse under the weight of the snow. |
 | 25. The rafters are secured using self-tapping screws or nails. |
Rafters can be treated with impregnation and antiseptic - this way they will last much longer and will not require replacement.
Sheeting and roof painting
 | 26. For the roof of our small veranda, a metal profile is used - to begin with, it is lined across the entire roof so that it is convenient to measure and, if necessary, cut. |
 | 27. You also need to make sure that there is a margin at the edges that prevents water from getting onto the rafters. The next sheet is screwed on top of the previous one, forming an overlap that will protect the veranda from rain and wind. |
 | 28. To refresh the appearance of the sheets, the roof can be additionally painted with enamel or nitro paint. |
 | 29. When choosing a color, you need to take into account the primary paint on the roof - white colors will require several layers to completely settle on darker ones. After this, the frame of our cozy veranda itself will be ready for cladding, inserting windows and, if necessary, insulation. |
Video of the construction of a closed veranda
More details, as well as a description of the process, can be seen in these videos. Special thanks to the creator of the presented videos for relevant and useful information!
The first part is the foundation:
The second part is the walls and floor:
The third part is the roof:
How to avoid defects during construction
Construction is invariably associated with errors; they must be eliminated or minimized in every possible way.
Approximately half of all defects are associated with uneven areas. Masonry that was not checked for level and came out skewed is short-lived and will quickly crack, and unaligned beams will transfer the curvature to the roof. 
To avoid this, be sure to use a level and a square. The first will allow you to create a flat surface relative to the ground, and the second will allow you to make even 90-degree angles.
Don’t be afraid of preliminary calculations - accuracy will help you save material and get rid of defects in buildings. When working with masonry and wood, we must not forget the usual laws of mathematics - the dependence of the sides on the angles of a triangle and calculations of the area and volume of geometric figures. Even despite the famous phrase of Albert Einstein. 
The tool also plays a role, but the dependence here can be traced not on its cost, but on the quality and skills of the master. A good metal plane will serve much better than a cheap electric one, and it’s not a fact that an expensive one will be much better than it.
How to insulate a veranda
You can only insulate a closed veranda - for an open one it makes no sense. The degree of insulation required depends on the region. For example, for the Crimea and the Krasnodar Territory, where the temperature rarely drops below zero, ordinary compacted polypropylene placed under the walls, ceiling and floor is sufficient. 
Colder regions require warmer solutions - foam sheets, penoplex, felt and other materials. When insulating, it is not so much the thickness that is important, but rather the absence of “bare” areas and holes in the walls. All surfaces need to be insulated, from ceiling to floor.
Also, with a strip foundation, you need to make sure that there are no holes in it - the cement itself creates a good air cushion that needs to be protected from the cold.
There are a huge number of materials for laying floors - linoleum, decking boards, tiles, rubber coating and others. It all depends on your preferences and design decisions, however, there are some features of the materials. 
Tiles are always much cooler than linoleum or decking, but they are extremely resistant to all types of wear and tear. Linoleum sometimes tears easily, but it is much warmer. Everything is dictated by the characteristics of your home and region, as well as whether the veranda is open or closed.
Also, do not forget about the possibility of painting the floor covering. Paint can look very beautiful - for example, rubber paint for concrete surfaces creates a durable and long-lasting coating. The boards can even be painted every year, updating their appearance and preserving them from wear and tear.
How to insert a window into the veranda?
Glazing of the veranda depends on your requirements. To equip you only need a window opening. If desired, you can also glaze an ordinary veranda - high sliding windows with doors will be an excellent design solution for any home. 
The cost of the issue depends on the glass itself. A cheap option is ordinary glass without the ability to open, but this is completely impractical. The complexity of the work is dictated by the features of the veranda - it is much more difficult to insert windows if they were not planned.
Arranging terraces next to the house is considered by many people as a very attractive design solution. But, as with any type of construction work, there are subtleties that must be taken into account. If you do this, building a great-looking structure turns out to be quite simple and accessible to almost anyone who knows how to work with tools. It is not necessary to invite professional builders for this.


Types of structures
Strictly speaking, terraces are only open (this is the interpretation given in SNiP), and all closed extensions to houses, no matter how they look externally, should be called verandas. The semi-open type - without walls or equipped with low walls - has sufficient space, and a roof or canopy will help to avoid the effects of precipitation and sunlight. But all the same, the furniture will have to be placed as far as possible from open areas.


A pergola-style terrace is ideal for dry areas, and it is not at all necessary that the structure be covered with vine shoots. After all, metal gratings with dense weaving are considered self-sufficient and allow you to decorate the space both from above and from the edges. Provides simultaneous closure from outside observation in harmonious sunlight.


When you want to get the visual effect of graceful leaves, but don't wait until the pergola is covered in vines and don't care for them, you need to reproduce the appearance through carving. But you can make the external grille very rare, only hinting at the developers’ intentions. An exotic variety is a terrace on the roof. This is much more spacious than a simple balcony, and a supporting wall is almost never used, only a fence. There will be no talk about this option, but it is worth considering its existence.
The wooden type of terraces is actually not the same. Differences may appear in the size, shape, number of levels of the structure, the possibility of free access to the structure or fencing it with decorative plantings.


Project: dimensions and shape
The selection of size and configuration is determined by the size of the plot and the house built on it. Tiny terraces adjacent to a large building are perceived as aesthetically unnatural. Extension less than 4 sq.m. m is uncomfortable, and no methods will help correct the situation. The project should include a minimum consumption of concrete and ceramic slabs, as this will reduce the labor intensity of the work. It is best to make terraces rectangular in order to combine the lines of the buildings with each other.


Important: tiles are better laid on a rectangular terrace, and wooden flooring allows you to vary a variety of shapes through the use of electric jigsaws. But again, it is necessary to maintain visual consistency between the configuration of the extension and the main part of the house.


Terraces with barbecues are considered one of the best design solutions. It should be taken into account that stoves can be very heavy and large structures, which is why it is necessary to build a foundation, possibly for the terrace as a whole. We will also have to make a good, uninterrupted drainage system. The work associated with its arrangement is quite labor-intensive and can significantly increase the overall cost of construction. The screed must be reinforced, and the foundation must be strictly in the form of a monolithic slab.


The grillage is not made of concrete; this type of structure would be unnecessarily difficult to work with. Usually it is made either from a channel, which is connected to the piles by electric welding, or from a beam encircling the perimeter and axes of the supports. In a spacious terrace, it is best to place the stove in the center, using it to distribute the space into the guest and kitchen areas. It is quite common to install a barbecue on one side and a semicircular structure cutting off the selected corner.


Frame construction can be made from either wood or metal.
The choice of a specific material is determined by the following factors:
- convenience and practice of work;
- allocated budget;
- the required strength of the extension.

Even the high cost and difficulty of processing hard wood does not in any way negate its high strength and stable service over time. It is from such materials that the lower frame trims should be formed. To save money, their upper part is made from softer and more accessible breeds. It is unacceptable to use wood that has even the slightest signs of rotting, cracking, chips, wormholes and similar defects. The highest permitted moisture content of wood for constructing a frame is 14%, but it is better to limit it to 12%, it will be much more reliable.


The metal frame produced by welding is relatively durable. But one must take into account the fact that dismantling its individual parts will be impossible; the entire structure will need to be removed as a whole. The minimum permissible cross-section of round and profile pipes is 0.25 cm. If you take a thinner structure, welding work will be more difficult, and due to the increased stress in the metal, significant deformations may appear. Before using a used metal block, be sure to check it for any significant damage.
A terrace with a balcony always has an external fence and is quite narrow. When you need to attach a support beam to a brick structure, you will need to prepare connection points: holes are drilled in the walls into which dowels or wood plugs are mounted.


Important: placing holes with a slight slope from top to bottom helps increase the reliability of fastening, the same requirement is recommended when working with a wooden base. Often the beams for support are shortened by the width of one log at both ends, after which they are adjusted to the ends and attached with bolts, and the connection between the intermediate links is provided by hangers.
Anchor bolts help connect the timber and brick walls; special supports, the cross-section of which is 5x15 cm, can increase the reliability of such a structure. The distance between the supports should be 120 cm, and their use is especially important in areas where there is a lot of precipitation. Holes in the timber are made in increments of 400 to 600 mm; bolts with a diameter of 1 cm should pass through them freely.


Terraces made of foam blocks are much easier to build than using wood or brick, because the labor intensity of work is noticeably reduced. Products initially have correct geometric contours and strict dimensions, which allows you to accurately calculate the need for material and design the structure without errors. Structures based on foam concrete are for the most part created on top of strip foundations, but when the house is initially planned to be supplemented with a terrace, it is necessary to prepare a common slab foundation of the required configuration.


Legalization of the extension
Making a terrace at your dacha is technically quite simple, but regardless of the skill of the home craftsmen or the cost of the services of hired builders, you will need to register the construction with the authorities. It is impossible to do without submitting documents to the structures responsible for fire safety, sanitary and epidemiological control. The permissions received from them are transferred to the administration of the locality or rural settlement. The expenditure of time, effort and money on registration is not in vain, because in the future, its absence may lead to sanctions, including the demolition of the building. And even if this does not happen, selling, leasing, exchanging, or providing collateral for a loan will be impossible or difficult.


Tools and materials
It is imperative to use various kinds of tools during construction.
Each master has an individual set of them, but it is impossible to build a terrace without using:
- electric jigsaw;
- bayonet shovel;
- building level;
- hammer;
- roulette;
- chisels and screwdrivers;
- drill and marker;
- staples and paint brushes.


As for materials, you will need to use high-quality boards, cement at least M400, an antiseptic, steel blanks for structures and paint and varnish materials. A wooden terrace is relatively strong and extremely reliable, guarantees comfort and looks more attractive. In addition, construction work will proceed quickly, and costs will be significantly lower. Bricks, concrete and natural stone are much harder, but their design capabilities are worse; it will not be possible to realize a certain part of the design plans at all. The use of metal (steel and cast iron parts) allows you to create very elegant designs and decorative elements, but you will have to come to terms with increased costs.

A metal terrace will be especially expensive for those who do not know how to work with such materials on their own - and welding skills are not as common as carpentry skills, and the situation with tools is similar. The most modern options, such as wood-polymer composites, are processed more simply than traditional products, and the original PVC coating makes it possible to do without impregnations that protect against rotting. The most economical option is to use the elements left over from the construction or renovation of a house, but you will need to carefully check them for the absence of deformations and for protection from negative natural phenomena.


Step-by-step construction instructions
Properly attaching a terrace to a house means meeting two key requirements: eliminating the deflection and spring effect of the floor, and also ensuring the strength and safety of the mounted railings. It is recommended to provide for the construction of an extension already at the stage of designing a home, then it will be possible to use a common foundation and coordinate the installation of different parts with each other as clearly as possible. But when the terrace is built after finishing work on the house, you will have to order an individual project from professionals.


When building a terrace with your own hands, you need to consider:
- climatic characteristics of the area;
- soil type and freezing depth in winter;
- average annual level of snow cover;
- the type and physical condition of the wall to which the building will adjoin;
- required area and linear dimensions;
- building materials planned for use.


All this data must be immediately stated in the application for designers. Usually the terrace is placed near the wall in which the entrance is located, thanks to which it is possible to use the building not only for leisure, but also as an entrance hall and as a porch. In cold areas, it is recommended to install all extensions in the south and equip them with wide canopies. Where it is relatively warm, it is advisable to place terraces from the east or south, focusing on maximum shading of the place. The prevailing winds must be taken into account, especially if they are strong.


In any case, install waterproofing above the support beam to prevent penetration of various precipitation into the gap between the terrace and the house. Aprons made of aluminum or steel with an external galvanic coating are often used. The foundation is waterproofed with bitumen mastic or adhesive material (laid in a couple of rows). To the question of how exactly to insulate a terrace, the answer is very simple: in no way, the structure will not be heated anyway. After making the racks and rafters and installing them, it is necessary to sheathe such structures using boards or sanded slabs.


The voids separating the opposite edges are saturated with sawdust. But long before the construction of the rafters, it is necessary to deal with the base of the terrace - there is also a lot of interesting things here.
Foundation
The construction of the foundation in most cases involves the use of concrete blocks with dimensions of 0.3x0.3 m, which are buried ½ of the height into solid solid soil. Typically, the parts are placed on a sand bed so that the edge protrudes upward by 150 mm. Then parts of the frame will not rot due to contact with consistently moist soil.
Important: concrete blocks cast in artisanal conditions can replace factory products only in warm areas where there is no freezing of the soil, or it is weakly expressed. A pile foundation turns out to be the optimal and most economical solution in the middle zone on top of heaving soil.


When choosing a design, they are guided primarily by the rigidity and stability of the structure as a whole, as well as the correspondence of the foundation under the terrace and under the main house; if it is not provided, buildings may begin to deform. Racks (that is, pillars) are prepared in advance, with the help of which the load created by the terrace will be distributed evenly on the plane of the foundation. For the most part, such elements are given a cross-section of 10x10 cm, although for a large structure it will be necessary to increase the size of the supports.
Important: the racks must be attached to the foundation using brackets, since pouring concrete will lead to rapid rotting.


The racks can be made in two versions: in one they support the beams, in the other they pass through the flooring, forming fences or benches. Placing the beams on the posts can be a simple overlay or attachment using screws (bolts). The beams are aligned horizontally; if necessary, shims are used for leveling. In cases where it is planned to use not a flooring, but a solid structure made of wood, you need to give it a slight slope in the direction from the house (about 1%). By increasing the cross-section of the beams, you can make the span between the individual racks larger, that is, save on the number of blocks in the base.


For the manufacture of logs, boards measuring 5x15 cm are most often used., lay the logs at right angles with a gap of 40, 60, 80 or 120 cm - this depends on how thick the flooring will be created. The use of screw piles, grillage piles or a pile-monolithic structure is required when there is a body of water in the immediate vicinity of the construction site.
Flooring
When constructing the flooring, the logs should not be visible, but they should still be placed in advance at the same distance and strictly parallel. Then it will be easier to attach the railing later. Depending on the placement of the joists, it is possible to ensure an even and neat arrangement of the connecting screws. Or it fails - if the work was approached unprofessionally. The logs are attached using screws (bolts) to the support beam near the walls.


This beam is positioned so that a gap of 3 cm is maintained from the top point of the flooring to the base of the door opening. Then precipitation will not enter the room through the threshold. To secure the logs, it is necessary to use metal hangers in the shape of the Latin letter U. This is stiffer and more reliable than a connection made from screws and nails. In the event of the slightest damage or shift, momentary savings will result in significant losses; All professionals consider the use of support strips to be the worst method of installation.
When making a frame, most often the beams are attached to high posts passed through the boardwalks (since a completely finished railing post is immediately created). For a span of 180 cm, beams with a section of 10x15 cm are recommended, and for a larger size of 240 cm, this figure must be increased to 10x20 cm.


Every private homeowner is thinking about adding a veranda to their home. The entrance door to a home, equipped with a canopy or canopy, looks uninteresting. Having built a veranda, you can decorate it with curtains, hang flower pots or decorate it in the style you like. Being in such a building, it is pleasant to sit with a cup of tea without fear of hot sun rays or drizzling rain. The sunset will become more beautiful if you watch it from a convenient place. All this will create additional comfort.
The need for a veranda. Functions, advantages and disadvantages
The construction of a structure such as a veranda is often an important condition for creating comfortable relaxation and organizing functional areas in it. Designs come in open and closed types. Each of them has its own advantages and disadvantages. The advantages include the following:
- erecting an open-type structure is not particularly difficult and does not require additional costs for installing windows and doors.
- for these structures there is no need to lay a deep foundation.
- in a closed veranda you can place a winter garden that is not afraid of frost, or organize a recreation area where you can be at any time of the year.
Speaking about the disadvantages of types of verandas, it should be noted that:
- Closed verandas, as a rule, are insulated and have heating installed, which entails energy consumption and requires additional construction equipment.
- furniture and other interior items on open verandas quickly become covered with dust or become damp, so they must be made of moisture-resistant materials.
- an open veranda will not provide protection from strong winds or low air temperatures.
The need for this extension is determined by the following criteria:
- First of all, it increases the usable area of a residential building, especially if it is very small.
- Arranging a stove or summer kitchen in it during the warm months of the year is more practical than inside a home. Additional heat and fumes are not retained, making the cooking process more comfortable.
- The location of the dining room in it will move vacationers from the stuffy rooms of the house to fresh air.
- The veranda, with appropriate design, will become an elegant architectural addition and give the house a beautiful appearance.
- The glazed structure will become an intermediate space between the house and the street. This will keep you warm during the cold season.
The functionality of this structure, depending on the type of construction, is as follows:
- thanks to its design, the veranda protects the house from various atmospheric phenomena;
- the existing veranda fences will prevent direct debris from entering the home;
- the designs of closed verandas allow the placement of a large number of plants and even trees in them in winter;
- the sliding frame of this extension allows you to adjust the shading areas and provide shelter from the rain;
- The extension makes it possible to be in the fresh air even in unfavorable weather conditions.
Design gallery of possible options
This option will serve as a dining room and kitchen at the same time  A fireplace in the veranda will create a special atmosphere
  Adjustable roof allows you to stay in the shade all day long
  Thanks to a convenient sliding system, this design will turn into an open veranda
  It won't be cold here even in the colder months
  There are two verandas attached to the residential building: one glazed and one without a roof.
  The extension serves as an intermediate zone between housing and the street
  Even in cold weather, this structure will be warmed by the sun's rays
  Tall plants will feel comfortable in such a structure
How to attach a veranda to your house: preparation
Before you start building the veranda frame, you need to decide on the type of future construction. Before starting construction work, it is necessary to select a place for its location, make the necessary measurements, prepare materials and install one of the suitable foundations. In order to accurately calculate the required amount of materials and the area of occupied land for this extension, you should carefully design it and draw up a drawing.
Types of suitable foundation
If you install a foundation made of logs, you should pay special attention to the quality of the wood. For supports, oak and larch species that have been previously treated with a bitumen mixture or burned are suitable. For these purposes, logs with a diameter of at least 25 cm are used. The method of installing these supports is similar to the construction of a columnar foundation: the bottom of the holes is covered with sand and compacted, after which the logs are placed there. For better stability, concrete is poured onto the sand layer or a wooden cross is installed.
Installing a strip base will require a lot of concrete and reinforcement cage. This foundation consists of solid walls hidden in the ground. It is intended for heavier buildings. The lower part of this base has an extension, which creates additional stability for the entire building. In cases of unstable or loose soil, the strip foundation can be increased. When installing this base, you need to leave holes for the necessary communications.
Tape blocks are very popular. To do this, ready-made concrete blocks are purchased and installed in a shallow (20 to 30 cm) trench, the bottom of which is compacted with sand. In this case, the block will be deepened into the ground by 2/3 of the slab. It will simultaneously play the role of foundation and basis for the floor of the veranda.
The column-pile foundation consists of long columns. To install it, you need to dig holes using a construction drill. Their depth should be from 40 to 50 cm. The bottom of the pit is covered with a layer of crushed stone or gravel. Then a sleeve with roofing material rolled into a pipe is inserted into it. Concrete is poured into the resulting cavity. The supporting column is built on top of the resulting base.
A screw foundation involves the use of metal pile elements, to the ends of which blades of various sizes are welded. This type of foundation is most suitable for unstable soil. Piles are screwed into the ground using manual force or pile-drilling equipment. The strength of the base, in this case, depends on the material of manufacture and the diameter of the pipes. The screw-in depth must be below the freezing point. Typically this value is from 70 to 12 cm. Installation of screw piles is convenient because they can be installed in frozen ground.
Project drawings, dimensions
As an example, an open veranda with a pitched roof, installed on a columnar foundation, is presented.
Materials for this design should be selected taking into account the design of the house
This design is a square shape, measuring 490x500 cm. The height to the ceiling beam is 230 cm. The roof angle is 20°. The distance from the bottom frame to the rafters adjacent to the wall of the house will be 420 cm. Since the width of the structure is more than 3 m, intermediate racks made of beams with a cross-section of 100x150 mm will be used to strengthen it. The distance between the first and second row from the wall of the house is 277 cm. From the second to third row is 180 cm. On the front side, the racks are 166 cm apart from each other. The distance between the longitudinal load-bearing beams should be from 80 to 110 cm. For the roof it is necessary roofing material with a total area of 24.5 m². The height of the foundation pillars, from the ground to the bottom frame of the veranda frame, is 145 cm.
On a veranda with these parameters you can place a couple of chairs with a table and hang a garden swing.
1 - support board; 2 - longitudinal load-bearing beams; 3 - transverse beam; 4 - racks; 5 - foundation pillars
Material selection and calculation
The most common material for constructing verandas is wood. It has a clear advantage over brick, metal and metal-plastic buildings. The material is easy to process, which is not typical for a metal structure. If you use profile pipes, channels or corners when building a veranda, then it is convenient to install double-glazed windows to such a frame.
A brick extension requires a deep foundation, which is an additional expense. In addition, its construction will take much more time than a wooden structure. To cover closed verandas, glass (double-glazed windows) or polycarbonate is installed. Metal tiles, bitumen coatings, slate and polycarbonate alloys are used for roofing. However, for better sound insulation, you should pay attention to soft tiles.
To make a frame veranda made of wood, the following materials are required:
- For the bottom and top trim:
- four beams with a cross section of 100x200 mm, 500 cm long;
- ten beams with a similar cross-section, 490 cm long.
For vertical racks you need:
- five beams with a cross section of 100x200 mm, 430 cm long (posts attached to the wall of a residential building), and the same number - 285 cm each (intermediate posts);
- six beams with a section of 100x200 mm, a length of 230 cm (facade racks).
- For longitudinal load-bearing elements (rafters) you need seven beams with a cross-section of 100x150 mm and a length of 540 cm.
- For flooring, tongue and groove boards with a cross-section of 100x40 mm and a length of 490 cm are required, for a total area of 24.5 m².
- OSB boards are needed for roof sheathing.
- For the railing, beams with a cross section of 100x100 mm and a total length of 15 m are required.
- For an x-shaped fence, similar beams with a total length of 40 m are needed.
- Concrete M-300.
- Roofing felt or boards for formwork.
- Reinforcing bars with a diameter of 10 mm.
- The roof requires soft tiles to cover 26.5 m².
- Waterproofing material.
Required Tools
To build an open veranda structure, you will need the following tools:
- Screw, bayonet and shovel.
- Concrete mixer.
- Water container.
- Screwdriver.
- Jigsaw.
- Grinder machine.
- Electric planer.
- Hammer.
- Building level.
- Roulette.
- Large square.
- Ladder.
- Cord.
- Pencil.
Step-by-step instructions: how to build a summer terrace
To build a frame veranda, it is necessary to lay a foundation. When installing it, you should adhere to some construction nuances:
- pits and trenches for the veranda should be at the same depth as the foundation of the house to which it is attached;
- if the soil under construction is unstable or there is abundant groundwater, then a pile-screw foundation will be able to cope with this problem;
- it is necessary to determine the ability of the soil to absorb moisture and the homogeneity of the soil at the construction site.
Depending on the composition and quality of the soil, the appropriate base for the frame is selected. In our case, this is a columnar foundation.
The base consists of individual concrete pillars installed in the ground. A grillage or frame for erecting walls is attached to them.
- Make markings for the future veranda using a cord and wooden pegs.
1 - cast-offs from boards; 2 - cord; 3 - plumb line; 4 - level
- Using a screw shovel, dig holes with a diameter of 40 to 50 cm, to a depth of 60 cm.
- Place wet sand at the bottom of each hole. It must be compacted to form a sand cushion 20 cm thick.
- To prevent liquid concrete from being absorbed into the sand, you need to lay a waterproofing layer. For these purposes, use roofing material.
- Make formwork from the boards. The size of each wall should be 40x90 cm.
- Place reinforcing bars inside the formwork.
- Pour the concrete mixture there so that its level rises 40 cm above the ground.
The reinforcement cage will strengthen the concrete pillar
- Use stops to hold the formwork walls.
- Leave the concrete to harden.
- When the base has hardened sufficiently and the pillars have formed, remove the formwork.
- Using a building level, check the vertical position of each pillar.
Optimal dimensions for the base under the veranda
- Treat them with bitumen mastic.
- Compact the soil around the posts and install a fence.
- Lay a waterproofing layer on the finished foundation. To do this, you need to roll the roofing material twice.
- Install the bottom frame of the structure on top. For this you need beams with a cross section of 100x200 mm. You need to cut grooves in them to install vertical supports.
- Install a floor made of tongue-and-groove boards with a cross-section of 100x40 mm on wooden logs.
- Install vertical supports from similar beams into the grooves.
Grooves make the structure strong
- Attach long supports to the wall of the house using anchors and screws.
- Mount the top frame of the structure. The connections of the wooden elements are similar to the bottom trim
- Install the extension truss system to the top frame, on one side, and the wall of the house, on the other. Arrange its elements in increments of 50 cm. To do this, you need beams with a cross-section of 100x150 mm.
The structure is ready for insulation and finishing
- The frame of the rafter system is attached to the top frame using metal corners or plates.
Metal connections will not be visible after finishing
- Install veranda side railings.
- Attach waterproofing to the rafter system, on top of which fill the sheathing with a section of 20x40 mm, in increments of 40 cm. Attach OSB boards to it using self-tapping screws.
Soft tiles are easy to install and repair
- Now you can proceed to installing the roofing material. Laying of soft tiles is carried out from the eaves from the center of the slope. The first row of this covering must be laid 2 cm from the edge of the cornice. Lay the layers of tiles with an overlap of 5 - 10 cm. Cover the joints with bitumen mastic. Secure the tiles on four sides with nails.
There are a large number of colors and shades of soft roofing
Final finishing
The selected materials for finishing the veranda should have not only aesthetic value, but also practical value. The open design is exposed to the environment. It follows from this that finishing materials must be resistant to high humidity and temperature changes.
The most common material that meets all the requirements of open structures is wooden lining. This is an environmentally friendly coating that is ideal for wall coverings. A veranda with this finish has a pleasant woody smell. For better joining of wooden elements, their sides are equipped with grooves. To increase the service life, this finishing material is pre-treated with antifungal impregnations.
The lining is easy to install, thanks to the cutouts along the edges
MDF boards are used as the final finishing of the veranda walls. This material is more suitable for closed structures. This is due to the fact that moisture has a detrimental effect on the slabs, causing them to deform and lose quality.
Inexpensive and reliable material - MDF boards
The opposite of MDF boards are PVC panels, which are moisture resistant. This coating is easy to clean, fire-resistant, and comes in a variety of textures and colors. Installation of these plates is very simple.
Easy to process and install PVC panels
An affordable and practical material for finishing verandas is siding. Its texture usually resembles stone or wood. Available in the form of long panels of various colors and shades. The material is resistant to fire, rotting, and has a long service life.
Siding is securely attached thanks to convenient holes
Thanks to the variety of shades, it is easy to choose in accordance with the color scheme of buildings on your site. Vinyl siding is often used for this.
To make the external decoration of the veranda you need:

How and with what to insulate floors and ceilings
When insulating a veranda, first of all you need to pay attention to the floor. This is especially important when the foundation is piled, columnar or does not have a continuous strip. In this case, from below, it is covered with penofol, after which all the cracks between the boards are puttied. Carpet or linoleum on a polypropylene base is suitable as insulation for the floor surface.
If you do high-quality insulation, then it is necessary to arrange a subfloor, followed by filling and installing a finished surface with a coating.
Floors on the veranda can be insulated using expanded clay granules. To do this, wooden logs are installed on the existing surface from beams with a cross-section of 40x150 mm, with a pitch of 60 cm. Expanded clay is poured between them, the height of which should not exceed the upper edge of the boards. OSB boards are fixed on top of the logs, onto which the finished floor is installed.
The granules must be evenly spaced
Also, floors and walls are insulated using mineral wool. For ease of installation, it is sold in the form of rectangular slabs of various thicknesses. To insulate the floor with cotton wool, you need to cover it with waterproofing material. For this, foamed foil propylene foam is used. Wooden logs with the same cross-section and pitch are installed on top of this layer. Mineral wool slabs are tightly laid between them. If its thickness is insufficient, then the slabs are stacked on top of each other, with the condition that they do not rise above the wooden frame. Otherwise, the insulation will wrinkle and lose its thermal insulation properties. Attach a vapor barrier material on top of it, to the joists. Then the finishing is installed.
The form of mineral wool in the form of slabs is convenient for installation
Penoplex and foam plastic have proven themselves well as insulation. These materials have the same base, but penoplex has a uniform structure, and polystyrene foam tends to crumble. This insulation is available in the form of slabs of various thicknesses. Just as in the previous options, its installation requires a waterproofing and vapor barrier layer. The slabs are fastened to the joists using plastic dowels. The joints of the slabs are filled with polyurethane foam, which serves as an additional adhesive material. OSB boards or tongue and groove boards are fixed on top. The ceiling is also insulated using the same principle.
Lightweight and durable material - penoplex
If the veranda is an open structure, walls made of beams are built along its perimeter. Then, using the above methods, insulation is installed. Double-glazed windows are inserted into the walls.
Video: DIY veranda
Thanks to a wide range of materials, the appearance of the veranda can be designed in an original and beautiful way. By insulating this structure, you will enjoy the view not only of flowers, but also of the winter landscape. Lunch or evening tea parties will be more memorable thanks to the natural freshness and soft light at sunset, and rainy weather will not spoil the outdoor party.
A terrace is a platform attached to a house or standing separately. It usually resembles a large porch adjacent to the wall at the entrance to the house. In the southern regions, terraces are usually open. In the middle zone they are covered with awnings or awnings. The terrace design can be initially included in the house construction plan and built on the same foundation. But, if the house already exists, adding a terrace to it will not be difficult for any home craftsman. Let's talk about what basic terrace designs exist and how to build them yourself.
Before you start building a terrace, you should carry out the design and decide which design option to give preference to.
The simplest terrace designs are made at ground level. These are areas paved with paving slabs, paving stones or clinker. Paving is carried out on a gravel-sand cushion laid in a pre-arranged excavation in the ground, 20-30 cm high.
On a gravel dump, you can also build a wooden terrace with a deck made of boards or composite decking. Wooden blocks or steel profiles are laid on top of the fill, acting as joists. Wooden support beams are mounted on them. Flooring boards are fixed on top.
Terraces raised above ground level are more complex in design. Moreover, they can be raised either by 15-20 cm or by 2-3 m (second floor level). In this case, you cannot do without a foundation. Such a terrace rests on reinforced concrete slabs, blocks or piles, which act as a monolithic, columnar or pile foundation. An example of a raised terrace: a platform in the form of a reinforced concrete slab, lined with ceramics or porcelain stoneware. When building a wooden raised terrace, wooden logs are fixed to the selected foundation (concrete columns, slabs, piles), which are covered with edged or decking boards (decking) on top.
We will provide you with several options for constructing a terrace, presented in the form of informational master classes.
Option 1. Terrace paved with clinker
This version of the terrace is built on a compacted sand cushion at ground level. The clinker tiles from which the flooring is laid make it possible to form curved lines of the site. To clearly define the boundaries of the terrace, fences are installed along its perimeter. For example, small wooden posts impregnated with antiseptics.
The work is carried out as follows:
1. Clear the soil where the paved terrace is installed. Remove stones, snags, remove the top layer of soil, 20 cm thick.
2. Sand is poured into the resulting recess in a layer of 15 cm.
3. Along the intended border of the area, dig a trench with dimensions of 70x70 cm (depth, width). A layer of gravel or sand, 15-20 cm high, is poured onto the bottom of the trench. It is necessary for better drainage of water in the area where the fencing posts are installed.
4. Two rows of wooden posts (on the inside and outside) are installed in the trench, on the drainage layer. Their verticality is controlled by the building level. The posts installed at the ends of the fence are fastened with self-tapping screws. This solution provides stronger adhesion of structural elements and does not allow them to shift and fall out of alignment.
The fence has the appearance of a closed “pocket”, which will later be used as a flower bed framing the terrace. If setting up a flower bed is not part of your plans, then the border can be made in one row by installing bricks, ready-made plastic fencing, etc. in the trench.
5. To prevent soil from being washed out of the future flower bed, a layer of roofing material is placed inside the enclosing “pocket”, placing it on the walls of the posts. The roofing material is laid to the height of the planned level of backfilling with soil. At several points, the waterproofing layer is secured to the walls of the posts with screws or nails.
6. Pegs are driven into the ground, from the wall of the house to the fence, in increments of 3 m and cords are pulled on them with a slope of 2-3 cm per 1 linear meter. In this way, the level of sand backfill is outlined, which must form a slope for the drainage of rainwater from the terrace area.
7. The sand backfill is compacted and leveled to the level of the stretched cords, adding, if necessary, the missing amount of sand.
8. Begin installation of clinker tiles. Each tile is laid on a layer of sand, pressed tightly and tapped on the surface with a rubber hammer.
9. The remaining free areas, between the paving and the fence, are covered with large decorative gravel.
10. The seams between the tiles are filled with fine sand using a stiff brush.
11. Excess sand on the surface is washed off with a stream of water from under the hose. The pressure should be small so that the sand does not wash out of the seams.
12. So that rain moisture can flow freely from the paved area, drainage is performed. To do this, a drainage pipe with slots, wrapped in jute fabric, is laid along the fence posts with a slope (so that debris and soil do not get into the slots). To camouflage the surface of the pipe, cover it with gravel.
The end of the laid drainage pipe is connected to the storm sewer pipe. The drain outlet is also connected here through a tee. A gutter with a grate is installed in the desired location.

Option #2. Wooden terrace on gravel
A durable and easy-to-make terrace, built on a gravel backfill, can easily be made from steel profiles (joists), wooden blocks and boards. Since they will practically lie at ground level, for this version of the terrace it is allowed to use only wood from hard, non-rotting species: larch, oak, garapa, teak, merbau, etc. Before use, boards are treated with antiseptics to protect them from moisture, rot, insects, and UV rays.
Progress:
1. At the site of the future site, remove the top layer of soil, 20-30 cm thick.
2. Fill the pit with gravel.
3. Steel profiles are laid on the gravel, forming a slope of 2-3 cm per 1 running meter. The distance between the profiles is about 500-600 mm.
4. Load-bearing beams are attached to the profiles. The distance between the beams is about 600 mm if the thickness of the decking board is 27 mm. With a board thickness of 20 mm, the pitch of the beams will have to be reduced to 400 mm. To additionally protect the beams from moisture, rubber gaskets cut to the width of the boards are placed in places where they come into contact with the profiles.
5. The supporting beams are covered with dark protective fabric (geotextile, for example) to prevent the germination of weeds.
6. Perpendicular to the supporting beams, a flooring is assembled from boards with gaps of 2-3 m. Spacers are installed between the boards and the protective fabric to prevent moisture from accumulating in the floor space. A compensation gap of 1-2 cm is left between the walls and the flooring.
7. Upon completion of assembly, the boardwalk is covered with antiseptics, coloring impregnations or varnish.

Option #3. Terrace on a columnar foundation
A wooden terrace on a columnar foundation is the traditional and most win-win option. The structure is adjacent to the house and, in fact, forms one whole with it. A columnar foundation is capable of raising the platform by 15-60 cm. At the same time, the ventilated space formed under the flooring promotes effective ventilation of the terrace elements and minimizes the possibility of wood rotting.
Step-by-step construction instructions:
1. To connect the future terrace area with the house, the first beam is fixed horizontally on the wall adjacent to it (at the level of the terrace). A galvanized steel drain is mounted above the upper edge of the beam.
2. Excavations are made in the places where concrete pillars are installed. The columns should be installed in increments of 1.5-2 m. The recesses are made taking into account the desired elevation of the terrace, the height of the columns and the required layer of gravel backfill, 10-15 cm thick.
3. Gravel filling is poured into the recesses, then trapezoidal concrete columns are installed. A metal embedded part for square beams is attached to the top platform of each column.
4. The support beams are placed into the embedded parts on the posts and secured with screws.
5. Platform beams are mounted on top of the support beams, perpendicular to them, at a distance of 40-60 cm from each other.
6. Screw the terrace boards to the platform beams, maintaining 2-3 mm gaps between them. The gaps serve to prevent rainwater from accumulating on the deck and allow it to flow freely into the subfloor.
7. If unprepared edged boards are used for the deck, the surface of the deck may look uneven after installation. Therefore, the floor is leveled with a grinder, bringing all points of the terrace to the same level. After sanding, wood dust is removed and the boards are treated with impregnation - antiseptic or coloring. When using a special decking board, additional surface sanding is not required.

A columnar foundation for a terrace can also be built from flat concrete blocks. A similar option for constructing a terrace is presented in the video:
Option #4. WPC terrace on a pile-screw foundation
Sometimes it is irrational to install a terrace on a columnar foundation. For example, with high groundwater levels, on wet and unstable soils. In this case, the soil will swell and push out the concrete pillars. Difficulties in constructing a columnar foundation can also arise in areas with large differences in levels and on slopes. In all these cases, for light buildings, another type of foundation is more successful - a pile-screw foundation. Screw piles make it possible to raise the terrace platform to the desired height (even 2-3 m!), They perfectly hold the wooden flooring with all the necessary furniture. In addition, screwing in screw piles for a terrace occurs within 1 day.
Let's consider the technology for constructing a lightweight WPC terrace on screw piles.
Progress:
1. Determine the installation points of the piles. They are screwed in in increments of 2-3 m, with mandatory installation in the corners of the future site.
2. Screwing in the piles is done using special equipment or manually. When screwing in manually, a metal scrap is inserted into the slots on the upper end of the pile, which serves as a lever. In the process of turning this lever, the pile breaks the soil with its blades and sinks to the required depth (below the freezing level of the soil).
3. The screwed-in piles are cut to the level of the future supporting frame.
4. Cement mortar is poured into each screwed pile to increase its strength and prevent corrosion of the internal cavity.
5. A steel metal frame made of profile pipes is mounted on top of the piles. The frame has the form of a frame with intermediate elements located in increments of 50-60 cm. The finished frame is coated with a primer, paying special attention to the welding areas.
6. Aluminum logs are laid on the piles. Since the corrosion process starts when aluminum comes into contact with the steel of the frame, it is recommended to lay the logs only through rubber gaskets.
7. The decking boards are attached to aluminum joists using clamps that are inserted into the slot of the joist. The terminals allow you to mount boards without using self-tapping screws and the need to drill holes in them. If the aluminum profile used does not allow the installation of terminals, the decking boards are fastened traditionally - using self-tapping screws.
8. After assembling the composite decking, an enclosing aluminum profile is installed at the ends of the decking. Now a terrace made of composite decking is almost indistinguishable from an expensive wooden structure!

How the work of installing a terrace on screw piles is carried out is shown in the video: