One of the most inexpensive fences for a summer house or private home is made from corrugated sheets. Its design is simple - dug-in pillars to which transverse joists are attached. A corrugated sheet is attached to this grille using self-tapping screws or rivets. Everything is really simple, especially if you know how to use a welding machine. Although there is a technology without welding - on bolts or on wooden crossbars. In any case, you can build a fence from corrugated sheets with your own hands. If necessary, you can do all the work alone, but when installing sheets it is more convenient with an assistant.
Construction with metal posts
The simplest production is a fence with metal posts dug into the ground. You can use round or square pipes, but it is more convenient to work with square - profiled ones.
The length of the pillars is taken depending on the desired height of the fence, plus 1 to 1.5 meters are added for penetration into the ground. It is necessary to bury it in the ground below the freezing depth of the soil. For each region, the soil freezes to a different depth, but in central Russia it is about 1.2 m. When determining the depth to which you bury pipes, it is better to play it safe and make the holes deeper. Otherwise, the forces of winter heaving will simply push the posts out, and your fence will collapse (see photo).

For pillars, a profiled pipe with a cross section of 60*60 mm and a wall thickness of 3 mm is usually taken. The distance between the pillars is from 2 to 3 meters. The greater the thickness of the profiled sheet, the less often you can install pillars. If the soil is difficult to dig, it makes sense to make the distances larger, otherwise you can save on purchasing metal - the thinner, the cheaper and the difference in price is significant.
Logs for a fence made of corrugated sheets are made from a profile pipe 40*20 or 30*20 mm. The second option is wooden blocks 70*40 or so. When using wood, a significant amount is saved, but the wood disappears faster, and besides, it warps from moisture. Most likely, in a few years you will have to change the logs, and they will already be metal. But it will work as an economical option for several years.

When making a fence from corrugated sheets with your own hands with wooden logs, do not forget to thoroughly treat the wood with an antibacterial compound (for example, Senezh Ultra). It is better to do this in the bathroom - immerse the bars completely in the solution for 20 minutes. This way they will last longer.
The number of logs depends on the height of the fence. Up to 2 meters - two are enough, from 2.2 to 3.0 meters you need 3 guides, even higher - 4.
Methods for attaching joists to poles
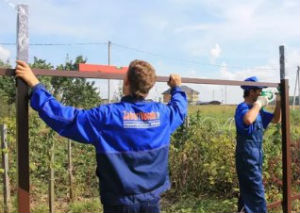
Metal logs are welded either between the pillars or in front. The first method is more labor-intensive, and produces more waste: you have to cut the pipes into pieces. But with this arrangement of the logs, the structure turns out to be more rigid: each post serves as a support for the sheet and it “walks” less; if desired, a couple of additional fasteners can be placed along it.
If you weld pipes in front of a pole (from the street side), there is less work, but you will still have to cut and there will be waste: it is necessary that the weld of two sections falls on the pole. Unless you adjust the distance so that they lie flat. Then you purchase materials in advance, and then calculate the installation step of the pillars.

To fasten wooden blocks, holders are welded in front or on the sides - metal corners or U-shaped guides. Holes are then drilled into them and fastened with bolts or self-tapping screws.
There is an option to assemble a fence from corrugated sheets without welding. For this there is a special fastening element called an X-bracket. This is a cross-shaped plate with curved edges, which is attached to self-tapping screws.


Corrugated sheeting for fences
For fences, corrugated sheets marked C are used - for fences and walls. There are also N and NS, but they are not suitable for fences - these are more roofing materials. It is rare to see A and R markings; A profiles can be used for fences.
In the marking, after the letter there is a number - from 8 to 35. It indicates the height of the rib in millimeters. So C8 means that the profiled sheet is intended for a fence, and the wave height is 8 mm. The higher the wave height, the more rigid the surface will be. In strong winds, take at least C10, or even C20.
Sheet thickness - from 0.4 to 0.8 mm. The best option is a thickness of 0.45 mm or 0.5 mm. They are suitable for fences up to 2.5 m in height. If you need a higher one, take at least 0.6 mm.
The height of the sheet is usually around 2 meters, you can find 2.5 m. The width can be very different - from 40 cm to 12 meters. Different factories produce corrugated sheets of different formats.

Corrugated sheeting can be galvanized or painted (painted ones are 15-25% more expensive than galvanized ones). There are two types of paint applied: powder and polymer coating. Powder coating is more durable, but also more expensive.
There are sheets painted on one side - on the second there is galvanization, covered with a gray primer, there are sheets on both sides. Double-sided coating is naturally more expensive than single-sided painting, but it looks better and has a longer service life.

Support pipes and fence logs are usually primed and then painted. And somehow it became customary to paint them with dark paint. By then attaching a corrugated sheet painted on one side to them, you get a clearly visible “skeleton” on a light gray background. In a small area this can be critical. Please note that when building a fence from corrugated sheets with your own hands, paint the supporting frame light gray. The result will please you: it looks much better from the yard.
How to attach a corrugated sheet to a frame
The sheet is secured with self-tapping screws or rivets. Self-tapping screws for corrugated sheets are galvanized and painted. They are selected to match the color of the fence. Tighten with a screwdriver using an attachment.
The installation step depends on the wavelength and height of the fence. The higher the fence, the more often you need to install fasteners. It holds normally if you fasten it through a wave, to increase strength, with two lags you can fasten it in a checkerboard pattern, and not one above the other.
When installing, it is important to align the first sheet vertically. Then everything else will install without problems. When laying sheets, the next one goes onto the one already installed on wave 1. Attach to the bottom of the wave. The self-tapping screw must be installed strictly perpendicularly. Then the hole is blocked with a washer and precipitation will not cause the paint to peel off.
To see how one can attach a corrugated sheet to a fence, watch the video.
DIY corrugated fence: photo report
A fence from neighbors and a front fence were being built. The total length is 50 meters, height 2.5 m. Brown corrugated sheet is used on the front, galvanized sheet is used on the border, thickness 0.5 mm, grade C8.
In addition, the following materials were sent:
- for poles profiled pipe 60*60 mm, wall thickness 2 mm, pipes 3 m long;
- 80*80 mm with a 3 mm wall were installed on gate posts and gates;
- logs 30*30 mm;
- gate and wicket frame 40*40 mm;

One person built the finished fence from corrugated sheets with his own hands.
The fence is installed on metal posts, between which the base is then poured. The owners need it because they plan to plant a flower garden in front of the fence (you can see the fence made for it). It is also needed to prevent water from flooding the yard during heavy rainfalls. Metal sheets are not attached immediately from the ground, but slightly retreating. This gap is closed with a die-cut tape that remains in some industries. This was done on purpose so as not to block the access of air, so that the earth dries out faster.

Metal preparation
The first stage is preparing the pipes. A rusty pipe arrives from a warehouse; in order for it to serve for a long time, you have to clean off the rust, then treat it with Anti-Rust and then paint it. It is more convenient to first prepare all the pipes, prime and paint, and then just start installation. The rust was removed with a metal brush mounted on an angle grinder.

There were only 6-meter pipes in the warehouse. Since the height of the fence is 2.5 meters, another 1.3 meters need to be buried, the total length of the post should be 3.8 meters. To save money, they cut it in half into 3-meter pieces, and the missing parts were welded with various scrap metal available on the farm: cuttings of corners, fittings, pieces of various pipes. Then everything was cleaned, primed and painted.
Installation of pillars
The two corner posts were installed first. The holes were drilled with a drill purchased from a store. The soil was normal; it took about 20 minutes to complete one hole 1.3 meters deep.

The first pillar was placed horizontally and so that it rose above the ground to a height of 2.5 meters. To set the second one, it was necessary to recapture the height. A water level was used. You need to fill it in such a way that there are no bubbles - from a bucket, not from a tap, otherwise it will lie.
They placed the second post along the marked mark (they put it on a plank that was placed next to the hole) and concreted it. When the cement set, twine was pulled between the pillars, along which all the others were aligned.
The filling technology was standard: a double-folded roofing material was installed in the hole. A pipe was placed inside, filled with concrete (M250) and placed vertically. The level was controlled by a plumb line. It is very important to position the posts correctly, otherwise the entire fence will warp.
During the work, several times it turned out that the concrete was poured not inside the rolled up roofing material, but between it and the walls of the pit. It was a little pleasure to scoop it out from there, so the protruding part was cut into petals and nailed to the ground with large nails. Problem solved.

After the concrete had set, we made portable formwork from boards covered with thick film. With their help, the basement was filled. To make it stronger, reinforcement bars are welded along the bottom to the pillars on both sides. Formwork was placed around them.

Installing jumpers
Cleaned, primed and painted pipes for the crossbars were cut and welded. They cooked between the pillars. They also need to be leveled to make it easier to attach.

After the welding is completed, all welding areas are cleaned with a wire brush, treated with Anti-Rust and then painted.
Installation of corrugated sheets
Since the top lintel runs along the very top of the fence, and it is welded exactly level, there were no problems with leveling and installing the sheets. First they fastened along the edges, then installed intermediate screws. To make it easier to place them evenly, a thread was pulled between the outer ones.

Evenly installed fasteners are also beautiful
Afterwards the gates were welded and attached. As a final touch, additional elements were installed on top - a U-shaped profile covering the top of the fence and plugs for the pipes.

As you understand, there is nothing particularly complicated. It is important to align the posts evenly and weld the frame. This is the main task. A lot of time—about 60%—is spent preparing the pipes—cleaning, priming, painting.
Fence made of corrugated sheets with brick pillars

Of course, a fence with brick pillars looks more decorative. If you wish, you can do it, but it will take more time. There are two options:
- Make a full-fledged strip foundation. But it is long and expensive. On well-drained soils, you can make a shallow foundation; on heaving soils, you will have to dig below the freezing depth of the soil. And although the tape will not be wide, there is a lot of work - digging a trench along the entire length of the fence, installing formwork, tying reinforcement, pouring it and then finishing it. Place brick pillars on top. Durable, reliable, but expensive.
- Make according to the scheme described above: load-bearing pillars with a base. Bricks are laid around the pillars. This method is less expensive. About,

The whole technology is the same, only the reinforcement will be more rigid - two belts of two rods with a diameter of 10-12 mm. It will be necessary to install embedded elements in the pillars to which the guides will be attached. They (mortgages) can be welded to the pipe after it has been exposed and the solution has set.
Photos of the design of fences made of corrugated sheets
Often a profiled sheet is combined with forging, sometimes a frame is made from a profile pipe, a profiled sheet is mounted into it and the whole thing is decorated with metal patterns - forged or welded. Another option to make the fence non-standard is to install the wave not vertically, but horizontally. It would seem like a small change, but the appearance is different. Some ideas in the photo gallery below.
The decision to build DIY corrugated fence requires certain skills and knowledge. Installation of a corrugated fence requires preliminary study of some nuances; it is important to understand the types of construction, draw up a work plan, and select suitable components and materials. This review will help you understand how to build a fence, A video at the end of the article it will be useful for beginners.
Types of designs
The variety of landscape and aesthetic requirements determine the features of the structure:
- Continuous fencing. Sheets of corrugated sheets cover the supports. This option is most often used.
- Sectional. They are not in demand so often; they are constructed in the presence of stone or brick pillars. The length of the section depends on the terrain features. Accurate calculations of span lengths make it possible to reduce the amount of waste from cutting corrugated sheets.
In addition, fences are divided into:
Fundamental. The pillars are included in the strip foundation design. It increases the wind resistance of the fence. The gap under the fence is completely covered with profiled sheets, and dust from the street will not blow into the area. Construction time and costs for its arrangement are increasing. This is how permanent façade fences are built.
Supported - fences are mounted on support posts that are not connected to each other. This results in significant cost savings. However, the high height of the building significantly reduces the reliability of the fence. But it ensures good circulation of soil and water on the surface of the earth. These advantages are especially noticeable when building on a slope or on loose, creeping soils, as well as soils with high humidity. Fences between neighboring areas are usually used as support fences.
It is better to determine the type of structure after creating a complete sketch of the construction.
Required materials and tools
To install any type of fence you will need:
- Corrugated sheeting, wave height 8-20mm.
- Fasteners, rivets, screws.
- Sand, gravel, cement.
- Coating against metal corrosion – metal paint.
- Marking ropes, pegs.
- Tools for earthworks (shovels, drill).
- Welding machine, electrodes, fasteners for cross beams.
- Riveting device, drill, screwdriver, cutting devices.
- Supports made of profile pipe 60x40 up to 3.5 m long for support.
- Measuring tools (tape tape, level, plumb line).
- Cross members – profile pipe 40x20.
- Ruberoid, another insulating material that prevents concrete and earth from mixing in the holes.
Measurements and a sketch of the fence allow you to calculate the required amount of materials.
Watch the video! Mistakes when installing a fence
Carrying out work according to plan
Step-by-step instruction How to create a fence from corrugated sheets is suggested below. Installation involves 6 stages of work. It is better to study these steps in advance so that make a fence from corrugated board strong and reliable.
Marking
The future location of the fence is marked with pegs that are driven into the corners around the perimeter. After measuring the distances, you can determine the number of openings. The locations of the supports are marked with pegs. You will need to designate a place for a gate or wicket. Pegs are driven in there too.
Advice! For a sectional fence, it is better to make the span width a multiple of the sheet dimensions. For solid – the standard 2.5 – 3 meters is suitable.
Installation of a fence on a strip foundation, including a stepped type, requires the installation of levels. Marks are placed on appropriate posts installed in the corners along the perimeter, and on inclined areas - at the beginning and end of each section.

The marking of the territory is carried out independently; there is no need to use any complex equipment.
Creating a Project
To create a plan, the perimeter of the territory, slopes are measured, and obstacles that cannot be moved or removed are identified. These could be pipelines, electrical poles. According to the measurements taken, a fencing plan is drawn. Depending on the type of soil, terrain features, and economic opportunities, choose:
- foundation type;
- rack design;
- material for pillars and additional structures (cross beams, connecting brackets, mortgages);
- types of fasteners used, finishing.
Drawing up a detailed sketch allows you to carry out comprehensive calculations and determine the number of necessary components.
Installation of supports
The following types of racks are used to ensure strong fastening of sheets:
- regular tubing pipe diameter from 73 mm to 89 mm or profiled 60x60 or 80x80 mm;
- pillars made of reinforced concrete or wood;
- brickwork;
- screw piles.
Installation of profile pipes as supports
In the designated locations, holes are drilled with a depth of 1 to 1.5 meters and a diameter of 20 to 40 cm.
Comment! With a high fence height of 2 meters or more, the depth of embedding of the supports should increase by 35% underground and 65% above the ground.
The racks are placed in one line using a plumb line. Verticality and linearity eliminate possible difficulties in joining corrugated sheets.
 The supports will need to be concreted. Before pouring the solution, the edges of the pits are covered with roofing material; you can use plastic film. This will prevent mixing of concrete and earth and maintain high structural strength. The solution is poured to a depth of 1 meter, the rest is covered with sand and compacted. This method helps compensate for soil deformations when temperatures change.
Important! Concrete always has air pockets that need to be removed. The air is removed by bayoneting with available tools. It is permissible to use reinforcement or a metal corner.
The remaining types of work can be performed only three days after pouring the concrete.
Before installing the profile pipe requires:
- Make a top cap to prevent rainwater from entering. You can use plastic plugs and decorative tips. It's a good idea to just weld the top of the counter.
- It is better to immediately coat the supports with paint of the required color.
- It is necessary to weld metal heels (a square of sheet iron) onto the base of the supports. This will simplify the work of aligning the pillars. The fastening will be more reliable and reduce the draft.
Installation of reinforced concrete or wooden poles
 Installation of wooden or reinforced concrete supports is carried out in the same way as when installing a tubing or profile pipe. Wooden supports are not durable.
Reinforced concrete pillars are too heavy and crossbars are difficult to attach to them. It is better to install such elements on a strip foundation.
Installation of brick pillars
Installation of brick pillars requires the presence of a strip foundation, since the weight of the structure is very large, the pressure on the ground increases. Such poles are difficult to install and require significant costs and additional waterproofing.
The installation process repeats the installation of a profile pipe, which is later covered with brick.
Important! When installing brick pillars, it involves installing metal mortgages, which are used when attaching the transverse elements of the fence.
Watch the video! Fence made of corrugated board. Very budget option
Fence on screw piles
Installation advantages:
- creation of a traditional foundation;
- can be used on any soil;
- no need to use special equipment, high installation speed.
Proper anti-corrosion treatment ensures a fence service life of more than 50 years.
However, there are also disadvantages. Screwing into rocky soils breaks the protective coating, making visual detection of damage impossible. The posts are attached to the piles by welding. Its implementation requires certain qualifications and experience. Installation of posts on piles using screw connections is carried out after welding the flanges.
Installation of cross beams
 The next stage of fence installation is the installation of transverse joists. This is done using welding, clamps, and bolted connections. Electric welding is the most efficient and reliable method. The logs are placed parallel to one another and to the base of the structure. For a fence less than 1.7 m high, 2 logs are required; if the height is greater, you will need to install 3 logs.
The created structure is a frame. Everything is painted with anti-corrosion paint. Particular attention is paid to welding areas to prevent corrosion.
In addition to welding, it is allowed to use:
- Brackets, clamps for connecting joists to supports.
- The brackets allow you to fasten the logs to the pole (end-to-end at the front, with holder pads, at the side of the supports).
Installation of corrugated sheets
The fifth stage is attaching the corrugated sheets to the transverse strips using screws. The joining of the canvases is usually done with an overlap.
Important! One edge of the sheet should have a full wave, the other - not a full one. The joint is made in one direction only. This point is important if the sheet is marked and cut gradually during installation. The joint should be secured with rivets.
 Self-tapping screws are screwed into the lower front wave:
- Loose screw tightening will cause leakage.
- a self-tapping screw that is tightened too tightly causes deformation of the gasket and destroys the metal coating.
- A screw placed crookedly will tear the metal, causing a loose seal on the gasket, which can lead to premature corrosion.
Correctly, the screw is tightened at an angle of 90 degrees in order to evenly press the gasket without touching the metal surface. Self-tapping screws are allowed to be attached every third wave.
Completion of installation work
The end of construction will be the installation of a U-shaped strip on top of the fence. The element is optional, but creates a smooth edge. The bar is secured with clamps.
Some features of installing a fence made of corrugated sheets
Uneven areas or heaving soils require special techniques.
Heaving soil
 This aspect is taken into account by those who want to install sectional or combined fences with heavy stone pillars. Sandy loams and loams pose a danger. In other words, soil that retains moisture during frost has a heaving effect. The soil rises sharply when it freezes. The foundation behaves like plasticine.
The problem can be solved in various ways:
- Complete removal of soil to the freezing depth and its replacement with sand. The soil around the foundation must also be removed.
- Installation of the foundation below the freezing point. But the pressure of the heaving will remain on the walls of the base.
- Lightweight structures can be installed if the foundation is insulated with special material. The insulation is laid at a width equal to the freezing depth.
- A good solution is drainage. It is a trench with a depth equal to the depth of the foundation. The bottom of the trenches must be equipped with a pipeline wrapped in filter material. The trench is dug at a distance of 30-50 cm from the foundation. The finished drainage is covered with crushed stone.
Uneven areas
If leveling the area is too expensive, you can install a fence on uneven ground. An area with sharp slopes can be fenced off with sectional or combined fences that fit perfectly into the terrain. It is necessary to calculate the height and width of each span. Aesthetics will be ensured by a stepped foundation.
On a slope of less than 35 degrees, it is allowed to make fence spans 2.5 meters wide. If the slope is uneven, you can make a fence from spans of different lengths. Increasing the slope requires reducing the length of the section. On uneven areas it is better to install fences on a strip foundation.
- The connection of sheets at an angle must be closed with corner strips, which are obtained on bending equipment.
- Working with corrugated sheets requires the use of work gloves, since the material has sharp edges.
- Sheets are cut using metal scissors. The edges need to be painted over. A grinder cannot be used; it destroys the decorative coating.
Features of care
There is practically no need to maintain a fence made of corrugated sheets with a polymer anti-corrosion coating. The polymer serves as excellent protection. The barrier along the road can be damaged by stones and gravel. Places of damage must be periodically painted over with a special paint.
Watch the video! How to make a fence from corrugated sheets with your own hands
If you decide to install a corrugated fence with your own hands, then this review is for you. It describes in great detail and clearly all the nuances of the work process. You just need to repeat all the steps - and the result will be no worse than that of professional builders.

How to organize work correctly
To get a good result, it is not enough to understand only the features of installing a fence made of corrugated board. You need to choose high-quality materials, use the right tools and build a strong supporting structure. We'll walk you through the process from start to finish so you don't have any questions.

Preparatory activities
Going straight to buy materials is not the best solution. Since you do not know the exact quantity, and even a professional will not carry out calculations by eye.
Therefore, do not be lazy and spend half an hour to carry out measurements and calculations:
- First of all, the location of the fence is determined. A construction cord is stretched along the line, which will serve as the main guide. Wooden pegs or metal elements are hammered into the corners, onto which a cord or fishing line is attached;

- Length measurements are taken. First of all, it is worth checking the length of the fence. Everything is simple here, to work you need to attract an assistant and use a tape measure to take all the measurements;

- The pitch of the columns is determined. It can be anything, but most often the range from 2 to 3 meters is chosen, 2.5 meters is the most popular and convenient solution. It is best to immediately mark the position of the supports, so you can accurately calculate the required number of columns;
- The required volume of profiled sheet is calculated. Everything is simple here if you know the dimensions of the corrugated sheets. The standard width is 1155 mm, the useful width is 1100 mm. The height can be any, the material will be cut to the nearest centimeter.

If you have an uneven landscape, you should design the fence to compensate for any level changes. In this case, a strip foundation must be made, with the help of which all irregularities are covered. Below is an example project for an uneven area.

Materials and tools

Even perfect adherence to installation technology does not guarantee the reliability of the fence if you used low-quality materials. Therefore, you need to choose everything you need very carefully. The table below will help you make the right decision.

| Material | Recommendations for selection |
| Corrugated sheet | It is best to use options with a wave height of 8-10 mm; they are marked as C8 and C10, respectively. The thickness of the material should be 0.5 mm or more; I do not recommend taking thinner sheets. When purchasing, pay attention to the quality of painting: the surface must be perfect, without defects or scratches. |
| Columns | Most often, a profiled pipe measuring 50x50 mm or more is used. The length of the supports depends on the height of the fence; if this figure is 2 meters, then the post must be 3 meters for reliable fastening in the ground. It’s easier to buy ready-made posts, their price is higher, but you get a ready-made option that doesn’t need to be painted or cut |
| Jumpers | They are best made from light and durable pipe 40x20 mm. For ease of fastening the profiled sheet, choose products with a wall thickness of 1.5 mm. With this thickness, you can screw in screws without drilling holes, which speeds up and simplifies the work process |
| Fasteners | Corrugated sheeting is best secured using roofing screws. They are painted in the color of the base coating and have a drill tip for screwing into metal without pre-drilling. The product also has a washer with a rubberized base that closes the hole and protects it from moisture penetration |
| Materials for concreting | To secure the pillars, you will need either concrete made from cement, sand and crushed stone, or cement-sand mortar and filler made from stone, brick and broken concrete. The second option is simpler and cheaper, since stones and old bricks can be found almost free of charge |
| Dye | Necessary for painting pillars and lintels. Use either primer and paint, or a composition that combines these components. |

Installing a fence from corrugated sheets with your own hands requires that you have a certain set of tools:
- Welding machine for attaching wires to poles. A mobile household option operating on a 220 Volt network is suitable. If you don’t know how to cook, it’s easier to hire a welder for an hour or two. In this case, you need to carry out preliminary preparation and marking so as not to waste time and complete the work quickly;
- Grinder for cutting metal and cleaning it before welding. This tool allows you to quickly and efficiently cut a pipe, clean welds and prepare the surface for welding. Don’t forget to stock up on cutting and grinding discs of the appropriate diameter;

- Use tin snips to cut corrugated sheets. Under no circumstances should you carry out work with a grinder; this will cause the profiled sheet to overheat and within a year the ends will begin to rust;

- To dig holes for posts, use a shovel or a special drill with a diameter of at least 20 cm;
- The solution is prepared either manually (in this case you will need a large container) or using a concrete mixer. The second option is preferable for large volumes of work. It is not necessary to buy equipment; you can rent it for 1 day;
- Measurements are made using a tape measure; markings are best done with a felt-tip pen. The most convenient way to control the position of pillars and corrugated sheets is with a building level;
- The sheets are fastened using a screwdriver with a special M8 attachment. It is sold in hardware stores and is designed specifically for roofing screws; the magnetic holder allows you not to lose the fastener during work.

Installation of pillars and fastening of veins
Installation of a corrugated fence begins with the installation of posts.
The process consists of the following steps:
- Digging or drilling holes for poles. The work is carried out with a shovel or drill; the minimum depth of the supports should be at least 1 meter. In addition, a cushion of sand or gravel is poured onto the bottom in a layer of 10-20 cm; this nuance should also not be forgotten. The total depth is usually 120-140 cm;

- A pillow is poured onto the bottom. It will ensure installation stability and will not allow the pillar to sag during concreting;
- The pillar is installed in place. First of all, the height of its above-ground part is checked, and if necessary, the position is adjusted. If the support is low, then sand is added, if it is high, then the column is carefully deepened;
For reliability, protrusions and lintels can be welded to the underground part. Then, when concreting, the pillar will be fixed much more firmly.

- If a filler of stones and bricks is used, then the hole is filled to 2/3 of the depth. The rest should be placed after the initial filling of the solution, when it fills all the voids. The stones are carefully compacted, while the position of the pillar is constantly checked using a level; it must stand level;

- The solution is being prepared. If you don’t have filler, then mix cement, sand and crushed stone in a ratio of 1:3:5, the consistency should be quite thick. If you use stones or bricks, then prepare a semi-liquid solution of 1 part cement and 3 parts sand. The solution must penetrate into all voids and fill them for the best fastening;
- Pillars are being concreted. The solution is poured into the holes and compacted with a stick or reinforcement so that it fills the hole as best as possible and there are no voids left in it. The solution with crushed stone is poured to the top, and if you used stones, then at the first stage they must be closed, after which the filler is added to the very top and the solution is filled to the required level;

- The position of the elements is checked. I know from my own practice that even with careful pouring, the pillar can move. Therefore, immediately after concreting, be sure to check its position with a level on all sides and, if necessary, level it. Only after this can the work be considered successfully completed.

It takes time for concrete to gain strength. It is best to continue work no earlier than 5 days after concreting, during which time the material will set well and harden.

The technology for installing a fence from corrugated sheets with your own hands includes such a stage as fastening the veins. This part of the work can be done in two ways: welding and using special brackets.
Let's look at each of them and start with welding:
- Jumpers and pillars are being prepared. As for the veins, they are cut into pieces that should be 5 mm less than the distance between the posts. The surface of the pillars at the place where the lintels are attached is cleaned; if they are painted, they are removed;
- The veins are exposed and welded. If you have clamps, then the easiest way is to fix the jumpers with their help; if there are no fastenings, then two assistants should hold the element until it is grabbed. Welding is carried out along the entire perimeter of the junction;

- After welding, the seams are cleaned. Too protruding sagging and other flaws are removed. If poorly cooked areas are found, they need to be cooked again;
- The surface is cleaned and painted. If you had painted posts, then only the joints and veins are painted. If there is no coating, then the entire treatment is performed. The protective composition is applied in at least two layers, special attention is paid to welding areas and other joints.

Now let’s look at the option of connecting pillars and joists using special brackets. You can see what they look like in the photo, and we’ll look at how to use them below:

- The first element is installed at the level you need. Installation to the pole is carried out using self-tapping screws. Fastening can be done on the sides or from the front, it all depends on the design of the fastening unit;
- The bracket is placed on the second post. To accurately determine its position, you need to install a jumper and place a building level on it. The exact location of the fastening is determined from it, and it is screwed to the support. In the same way, work continues along the entire length of the fence;

- The jumpers are fixed with self-tapping screws on the back side. The result is a very strong and perfectly smooth knot. The only disadvantage of this solution is that the fasteners cannot be found in all cities, so if you decide to use this technology, make sure that you can buy the brackets.

Fastening corrugated sheets
Installation of corrugated sheets on the fence is carried out according to the following scheme:

- First of all, a sheet is prepared. If cutting is needed, then marking is made and the element is cut. If there is a protective film on the surface, then it is better to remove it before fastening, since then it will be very difficult to tear it out from under the screws, and pieces of polyethylene sticking out from under the washers will ruin the entire appearance of the fence;
You should also know how to properly secure elements with self-tapping screws. Here you should be guided by the rubber base of the washer; it should not be crushed, but it should not just touch the surface. The correct option is shown in the simple and clear picture below.

- The sheet is placed in the required position and tacked. To begin with, it is enough to tighten 4 self-tapping screws in the corners so that you do not need to hold the element. Next, the corrugated sheet is attached as expected, the hardware should be located through 1 wave, their length is usually 20-25 mm;

- The following sheets are attached in the same way. Do not forget to check the position of each element with a level; many people forget about this after installing the first sheet, and as a result, a noticeable distortion forms at the end of the fence;

- Fence strip attached. It is needed in order to give the structure a more attractive appearance and to cover the upper ends from precipitation. The elements are simply put on the upper part, at the places of their connections an overlap of at least 30 mm is made. Fastening is done using rivets, which are matched to the color of the fence, everything is simple and quick.

Installing a corrugated fence according to this review will not be difficult. If you are interested in the question of assembling gates and wickets, then the process is similar to that described above with the only difference being that you need to weld the frames and attach them to the posts with hinges. This type of work is described in detail in a separate review on our website.
Conclusion
After reading the review, anyone can handle the job, especially since you choose the options for assembling the structure yourself. The video in this article will help you understand the topic even better and will clearly show many important aspects of installation. If you still have questions, write them in the comments below.
As a rule, such fences consist of sections and exist in two types: fences with supports made of metal pipes or brick columns. The profiled sheets on them can be located in one case at a short distance from the ground, and in another - rest on a foundation or a brick side connecting the fence posts.
The first option is more economical, as it involves the use of fewer materials and simplified installation. Another type of fence allows you to make it more respectable, but requires more materials and labor effort.
The use of profiled sheets in metal fencing of a site is quite justified, as it has a number of advantages:
- The fence installation process does not cause technological problems;
- The profiled sheet is quite durable;
- If such a fence is installed correctly and then maintained, it will stand for a very long time;
- The appearance of the corrugated board fencing is quite modern.
Corrugated fence installation technology
The entire production process of installing a corrugated fence can be divided into several stages. Let's look at them in order.
Preparatory work before installing the fence

Before purchasing basic materials, you need to prepare tools and equipment for work. You will need a building level, a concrete mixer, a welding machine, pegs and a cord for marking the territory, an electric drill with drills, and 2.5 mm electrodes. You should also organize a water supply to the concrete work site.
It is not recommended to build any fence without a diagram or drawing. To compile any of these documents, markup data is required. It should begin with determining and measuring the perimeter of the site. To do this, you need to hammer pegs in its corners and connect them by pulling a cord between them. Using a tape measure, you need to determine the length of the future fence and the required number of its supports, which are located in increments of 2-3 m, depending on the length of the sheets. The location of each pillar must be marked with a peg.
In addition, you need to determine the dimensions of the foundation, the width of the entrance gate and entrance gate. The width of the base, in order to save costs on excavation and concrete work, can be made unequal. Then under the supports it is made to their size, and under the sheets it is narrower. The dimensions of the gate depend on its purpose. All marking data must be transferred to the diagram to calculate the required amount of materials.
If it is not planned to cover the supports with bricks, then a powerful foundation for a lightweight fence structure will not be required. In this case, a hole 15 cm wide and 1.5 m deep is dug under each rack. You can use a hand drill. The depth of immersion of the supports into the ground depends on the height of the fence. The higher you plan to make the fence, the deeper you need to dig its supports.
A heavy fence with brick posts will require a more massive foundation. To prepare it, you need shovels, a supply of polypropylene bags for removing excess soil, and time.
A trench, for example, with a volume of 4 m 3 is dug by a pair of workers within 4-5 hours with smoke breaks. Its depth for the foundation depends on the level of soil freezing in a certain region, on average - 1-1.5 m.
The most important thing in this type of work is sampling the soil to the required depth. The level of the foundation, its immobility and the normal functioning of the entrance gate depend on it.
Selection of materials for corrugated fence

The main material of the fence is corrugated sheet. It is made from durable zinc coated steel. All sheets have a ribbed shape, as well as markings A or C followed by numbers from 8 to 35, which indicate the wave height of the product in millimeters. For example, C10 corrugated sheeting, used for fences, has a wave height of 10 mm. The larger it is, the stiffer the profiled sheet. In regions with strong winds, it is recommended to use C20 corrugated sheeting for fencing.
The thickness of the profiled sheets should be selected depending on the height of the fence. If it is, for example, up to 3 meters, the optimal value will be 0.5 mm. For a higher fence, sheets of 0.6 mm are suitable.
When purchasing, you should pay attention to the flooring coating. Powder coating is more durable. Sheets must be double-sided. Their outer side has a brighter color. The inside has gray corrugated sheeting.
To make a fence from corrugated sheets, in addition to steel sheets, you will additionally need:
- Pipes and bricks for supports. Steel pipes are taken of rectangular or round cross-section 60x60 mm with a wall thickness of 3 mm and a length of 3 m. The bricks used are silicate, clay or facing. To lay columns from it you will need mortar.
- Lags. These are transverse fencing elements designed to securely connect the supports into a single frame. In addition, they serve as a basis for fastening profiled sheets. The material for the crossbars will be steel pipes of rectangular section 40x25 mm with a wall thickness of 2 mm and a length of 6 m.
- Fasteners. It is needed for installation of fencing sheets. These are roofing screws or metal rivets measuring 3.2x10 mm.
- Concrete M200 for installation of fence posts. If you plan to prepare it yourself, you will need cement, crushed stone and sand.
Pouring the foundation for the fence

Assembling formwork is an extremely responsible undertaking. The fact is that after pouring concrete, the defects in the formwork cannot be corrected. Therefore, in addition to a half-edged board, a drill and screws, you will definitely need wooden lintels and brick supports for additional fastening of the entire structure.
The assembly of formwork panels is carried out in a trench and begins with the top board, which marks the level of the foundation. Its upper part should be 10 cm above the surface of the ground to avoid the accumulation of dirt on it during rains.
The foundation is reinforced using a three-dimensional frame made of metal rods with a diameter of 10 mm. In the frame, horizontal reinforcement is represented by two lower and two upper reinforcement bars. Vertical reinforcement - four short jumpers connecting horizontal rods at equal intervals of 1.5 m. The reinforcement is connected with knitting wire.
After installing the frame, pipes or powerful corners are lowered into the formwork to strengthen future brick columns. Installation of these elements is carried out using a plumb line and a building level. Then they are fixed in it with short boards. After securing the formwork with lintels and supports, concrete can be poured into it.
When installing a corrugated fence, the concrete is prepared manually or using a concrete mixer. The composition of the mixture used is as follows: cement - 1 part, crushed stone - 6 parts, sand - 3 parts, water - 0.7 parts, concrete additives (liquid household soap) - 0.1% of the amount of cement.
Mixing 100 liters of concrete by hand takes 30-40 minutes. After concreting, it is advisable to cover the formwork with film to prevent the top layer of coating from drying out, and it can be removed after a week if the weather is warm.
A massive strip foundation under brick columns is poured in the usual way. If the racks are not planned to be lined with stone, the bottom of the recesses under them is filled with a 200 mm layer of crushed stone, then the racks are installed and concreted with a cement mixture.
In order to prevent the soil between them from being washed out over time, the pipes of the supports can be connected instead of a foundation with a buried concrete strip with a total height of 20 cm. To make it, a wooden box is made along the bottom of the metal racks. Its boards are fastened with wire or scraps of timber, and then lined with waterproofing from the inside. After pouring concrete into the box and setting it, the formwork is carefully disassembled. The resulting side will not only serve as protection against soil washout, but also as an obstacle to the penetration of domestic animals under the fence into the territory.
Instructions for installing a fence made of corrugated sheets

The fence frame made of profiled sheets is assembled from a metal pipe with a cross-section of 20x40x2 mm using manual welding. Pieces of profile pipe cut to the required length in a horizontal position are lightly welded to vertical posts in 2-3 rows, the accuracy of installation is checked by the building level. After this, the final welding is carried out. A fence 15 m long takes about 2 hours of welding work.
After completion, anti-corrosion treatment of the frame elements and its welding points is carried out. For this purpose, GF-020 primer is suitable, which can be applied to metal with a brush or spray paint.
For the installation of brick columns, facing bricks are used. Usually, experienced masons are involved in such work, because the quality requires it. When laying bricks, a mortar is used in a cement/sand ratio of 1 to 3 with the addition of a small portion of liquid soap for the plasticity of the mixture. The masonry of the columns is carried out alternately in 1 day to a height of 0.5 m.
The gaps between the masonry and the metal post are filled with mortar while working on the post. Each row of masonry is reinforced with a 50x50x4 mm mesh. To protect the upper end of the column from rain and snow, decorative caps are installed on it. This gives the fence a special expressiveness.
As an option, the racks can be faced not with brick, but with artificial or natural stone. The appearance of the fence will only benefit from this. However, such a procedure will require considerable investment.
Installation of corrugated sheeting is the last stage of fence manufacturing. To avoid damaging the end of the profiled sheet during installation, it is recommended to lay cardboard on the foundation. The products are fixed on the profile pipe through a wave at the base of the corrugation. The connection is made with overlapping screws using an electric drill with an attachment. You can also take rivets, but they must be steel.
Aluminum fasteners can create a galvanic couple between different materials of construction, the appearance of which causes electrochemical corrosion of steel.
Sheets of profiled flooring in the same fence are easily combined, for example, with forging. In order for such a fence to have an attractive appearance, you can use different arrangements of its enclosing elements: the upper, lower part of the structure or the gap between them can be covered with decking.
To maintain a serviceable and attractive condition of a fence made of corrugated sheets, a lot of effort is not required. It is quite enough to periodically clean it from dirt. Any solution containing soap is suitable for this. It is important that the emulsion does not contain solvents: they can damage the coating.
How to make a fence from corrugated board - watch the video:
Until recently, profiled sheets were a fairly simple and inconspicuous material. Made from galvanized sheets, they were used to cover the roofs of production workshops, small outbuildings, hangars and garages, as well as for construction around construction sites. But that's all in the past.
A fence made of corrugated board combines quality and low cost.
Manufacturers have tried to bring corrugated sheeting to a higher level, for which they approached the manufacturing process with imagination and greatly improved its quality characteristics.
And today, corrugated sheeting is a completely new material, which is based on the same galvanized metal sheet, but its external characteristics have become much more attractive. For example, the latest variety, the upper side of which began to be covered with a layer of polymer.
Thus, the manufacturers solved two problems at once:
- Strengthened protective properties.
- We have created a material that has excellent appearance in terms of color design.
Therefore, at present, many developers with great pleasure began to use corrugated sheeting not only to cover the roofs of their country houses, dachas and outbuildings, but also for.
And, as practice has shown, building a fence from corrugated board is so simple that even a non-professional can handle it.
In addition, it should be noted that installing a fence from is cheap. And today, financial indicators play a more important role for many than all others.
But, as in any construction process, it is necessary to accurately calculate everything, prepare well, not missing a single detail, and only then begin the process itself. And one more very important addition: it is necessary to strictly adhere to all stages of constructing fences from corrugated sheets with your own hands.
Calculation of required materials

In order to make professionally made corrugated sheets with your own hands, you need the following materials:
- profiled sheets. It is necessary to immediately make a reservation that corrugated sheeting is divided into two categories: roofing and for fencing. Although both can be interchanged. So, for fences, it is best to use a material whose ridge does not exceed 21 millimeters;
- racks. There are various options you can use here. For example, brick or stone pillars, logs, pipes of various cross-sectional shapes, metal profiles, and so on. Since we are talking about making corrugated sheets with your own hands, you will have to choose the simplest option. These are pipe pillars. Their installation is simple and the price is low. It is best to choose round pipes with a diameter of 59 mm or square pipes with dimensions of 60x60 mm;
- cross beams. Metal pipes of rectangular cross-section with dimensions of 60x25 mm are also used here. Mandatory condition: the wall thickness of such a pipe should not exceed two millimeters;
- metal screws;
- paint for painting pillars and joists is chosen to match the color of the profiled sheets;
- cement and gravel.
Now everything needs to be accurately calculated. Let's start with corrugated board. To do this, you will have to decide how tall your fence will be. Please note that profiled sheets are manufactured in lengths of 12 meters. Therefore, you will have to cut them into multiple pieces to avoid waste. Ideally this is 1.5 m, 2 m, 3 m, 4 m and so on.
For example, let’s choose a two-meter fence. Next, you will have to calculate the perimeter of the area that will be fenced. The width of the sheet is known, the height of the fence is also known, all you have to do is make a few mathematical calculations, and you will know exactly the required amount of corrugated sheeting.
There is a small nuance. From the total amount you will have to subtract the dimensions of the gate and wicket if it is located outside the gate.
Now we count the number of pillars and their size. The height of the fence is 2 m, but this is only its outer part, and the installation of the pillars will have to be done in the ground. So the underground part of the pillars should be 30% of the external part. In our case, 70 cm. This means that the length of each metal stand is 2.7 m.

Now the number of pillars. Here you need a diagram of the site and the size of its perimeter. The best option is when the pillars are located at a distance of 2-2.5 meters from each other.
The number of transverse joists is determined again based on the layout of the site and its perimeter. There is one subtlety here. If the height of the fence exceeds 2 m, then the installation of the logs is carried out in three rows, if less, then in two. The number of screws is determined simply.
One sheet will require either six or nine pieces. It all depends on the number of lags. The remaining materials are calculated according to SNiPs.
How to make a fence from corrugated sheets: stages of construction
Stage No. 1 – excavation work. You have already decided on the distance between the posts. The countdown will start from the goal post. If they are already standing, then the first hole will have to be dug near them. You can dig with shovels, but it is a labor-intensive process. It is best to use a garden auger.
After each hole we open, measure the distance and dig another one. It is better to drill a well a little deeper. You will have to pour gravel into it and compact it. It will serve as a pillow.

Stage No. 2 – prepare the concrete solution. There is no need to do it on a large scale here. You can limit yourself to small batches, which would be enough to concrete several wells. Mortar recipe: one part M400 cement, four parts gravel.
Stage No. 3 – installation of racks in wells and concreting. The pillars must be placed strictly vertically. The poured concrete must be pierced using tools or available materials. This is a must. During the bayonet process, the air that remains in the body of the solution is released.
Attention! Before installation, the racks must be painted.
Stage No. 4 – installation of transverse joists. It is best to start this stage a few days after you have installed everything yourself. The concrete solution must dry.
Now to the process itself. Here you can use two options for attaching the logs to the racks. The first is using electric welding. This is the simplest process, and it is also a very reliable fastening, but it will only be beneficial to you if you yourself have the skills to work with a welding machine.
If not, then you will have to invite a professional who will need to be paid. And the very construction of a fence from corrugated sheets with your own hands goes into the category of using outside help.
The second method is where you can use a bolted connection. That is, through holes are drilled in the joists and in the racks, these two elements are connected with a bolt and nut, or better yet, with two nuts.
Attention! The installation of transverse logs is carried out at a distance of at least 20 centimeters from the top edge of the column and from the ground. After installation, the joists need to be painted.
Stage No. 5 – installation of profiled sheets. This process starts from the gate. Each sheet is aligned vertically using a level. They must be secured with self-tapping screws using an electric screwdriver. Two fasteners at the edges, one in the middle for each joist. Each subsequent sheet is overlapped on one wave.
In principle, it would be possible to complete the construction of a fence made of corrugated sheets with your own hands. But there are a few more nuances.
How to make a fence correctly: additions

First. The top open edges of the uprights must be covered. Here you can use decorative elements in the form of balls, peaks and so on. Their production is carried out by a large number of workshops. The choice is huge.
Second. Under the profiled sheets, you can remove part of the soil and carry out concreting in the form of a strip, creating a small blind area towards the street from the outside and towards the site from the inside.
Third. The construction of the fence must strictly comply with all norms and design requirements of the site as a whole. That is, the correspondence of the gate and the fence, the main house and the fence, the extensions and the fence. Everything should be united by one concept of landscape design. By the way, more and more often designers are proposing to make gates and fences from the same material.
Fourth. The scheme must strictly comply with all modern standards and requirements.
Important! No initiative and saving of building materials. A temporary approach to this structure is unacceptable, everything is durable, everything will last forever.
Conclusion
From all of the above, a fairly simple conclusion can be drawn. If you decide to build a fence from corrugated sheets yourself, without attracting qualified outside help, then know that the structure and design of the fence are quite simple.
You could see this for yourself. But approach its construction with a great deal of responsibility.
Please note that a small mistake or neglect of one of the stages can lead to the fence becoming skewed after some time. You will lose not only money on its repair or restoration, but also a lot of nerves.