Our master class today is exclusively for beginners. I will tell you where to start so that your efforts are not wasted. After all, as often happens, there seems to be a desire, and there are enough useful materials with textbooks, and the “first pancake” can at once discourage all the best undertakings.
And if you are still in thought and don’t know which type of needlework to choose, then my arguments, I am sure, will help you decide.
Let me start with the fact that decoupage (or napkin technique) is the simplest, most inexpensive decoration technique accessible to everyone, suitable for absolutely any surface. You can decorate everything with decoupage - from a hot stand to your grandmother's wardrobe. After such a transformation, the item not only looks very beautiful (as if hand-painted), but is unique in every sense. You will soon see this for yourself!
The first thing you should know when starting the decoupage technique is the properties of materials. What they are, why they are suitable or not suitable for you for certain purposes. This simple knowledge, although simple at first glance, has many nuances that a beginner should remember.
Acrylic paint is the most important thing. This is where the main work begins. You can use acrylic purchased from specialty stores, or regular water-based interior construction paint. By the way, in the future you will see that construction paint is ideal for one-step crackle in decoupage. But be careful - construction paint should not be dispersive, otherwise it will not adhere well.
In decoupage, special glue is used (for decoupage) and regular PVA (diluted by 1/3 with water). Both have their advantages and disadvantages.
Specialized glue is ideal for the job because of its consistency, but it costs several times more than PVA (the disadvantage of PVA is that it adheres worse).
Varnish. Decoupage uses a special decoupage varnish and water-based acrylic varnish for construction.
Due to its consistency, decoupage varnish is ideal for coating decoupage surfaces.
Construction varnish is also well suited for these purposes. In addition, it is sold at any hardware store. But you need to keep in mind that when using construction varnish, decoupage requires more thorough varnishing than when using specialized varnish.
Glue varnish for decoupage (2-in-1) is suitable if you just want to understand what decoupage is. This glue is easy to use because (as you guessed) it performs two functions simultaneously.
Additional materials:
Putty. You can purchase it at any hardware store. Perfect for correcting defects on wooden products and creating 3D decoupage. Which is very convenient, since this inexpensive method eliminates the need for artists to purchase expensive 3-D gels to create volumes.
Structural paste also copes well with various defects in products and creates volume.
Color. In this capacity, you can use ordinary artistic gouache by adding it to acrylic paint. Gouache produced by “Nevskaya Palitra” has proven itself well in work, retaining its properties for a long time.
At Nevskaya Palitra you can also purchase acrylic pearlescent paints “Perlamex” and “Metalex” with glitter, wonderful metallics for giving the product effects of gilding, silvering and others.
Of course, it makes no sense for a beginner to purchase a large number of paints, colors, etc. at once. This is expensive and impractical. But you should always have a couple of shades of light gold and dark gold on hand. I really don’t recommend buying Decola paints because of their short shelf life.
An alternative to a specialized color for decoupage is its analogue, which is sold in regular hardware stores. It is indispensable when painting large areas - such as a closet or chest of drawers, for example. The colors of burnt umber and autumn foliage are well suited for this type of work. The cost of construction colors is low (two times cheaper than acrylic paints), and the efficiency is no less.
Brushes and sponges. Medium sized flat synthetic brush. Indispensable for final application of varnish.
Sponges can be used instead of brushes when applying acrylic paints to the surface of a product.
Rollers are very convenient for smoothing decoupage cards or napkins.
Spatula for working with putty.
Sandpaper copes well with roughness when working with wooden products and in cases where it is necessary to remove the ends of the napkin protruding beyond the edge of the product. I advise you to purchase the most common types of sandpaper - No. 240 and No. 280.
I will separately dwell on the decor for decoupage. It includes:
Special napkins for decoupage
Napkins for table setting (three-layer)
Rice paper
Printouts made on a laser printer
Each option has its own advantages, but I would advise beginner decoupage artists to start with napkins (regular or for decoupage). They are simpler and easier to use.
Today we will take the first steps into the endless world of decoupage possibilities. Let's start with the simplest product.
Hot stand:
We will need:
Hot stand
Napkins for decoupage
White acrylic paint
Glue varnish
1. First sand the workpiece with sandpaper.
2. Cover with the first layer of acrylic paint.
3. Dry well with a hairdryer at a distance of 20-30 cm or leave until completely dry.
4. Sand again.

5. Apply a second layer of acrylic paint (don’t forget to paint the side of our stand!)
6. Cut the napkin to the shape of the stand.
7. Remove two protective layers.
8. For gluing we use a stationery file. To do this, place a napkin in the middle of the file, fill it completely with water and smooth out the bubbles with a brush - from the center to the edges.

9. Blot excess moisture with a napkin.

10. Apply the file with a damp cloth to the base and carefully remove it.

11. Apply glue or adhesive varnish to a damp cloth.

12. Dry with a hairdryer or leave until completely dry.
13. Remove the remaining napkin that extends beyond the edges of the stand using sandpaper (“zero” or “two”).

14. Apply another layer of adhesive varnish, which will allow us to secure the napkin for hot use.
15. We do the same on the other side.
16. At the end of the work, if desired, the edges of our stand can be aged using the aging effect.


Helpful tips when working: decoupage without folds
Without having much experience in decoupage yet, you may encounter the fact that the napkin, when pasted, puffs up and gathers in folds. Now I will show you several ways to avoid this.
Method A: (only suitable for small areas of the napkin)
1. If our napkin consists of three layers (which is most often), remove the two bottom layers, leaving only the top, colorful one.
2. Using your hands (not scissors!), tear off the desired fragment of the napkin - in this case, it organically merges with the main background of the product, which creates the illusion of a pattern.
3. Cover a fragment of a napkin with glue, moving from the center in a circle. The resulting small wrinkles can be smoothed out by slightly lifting the napkin and then smoothing it out. You need to act very carefully, because a wet wipe is very fragile.
4. Excess napkin extending beyond the edge of the product can be removed using sandpaper. But only after the napkin dries well!
Method B:
1. Separate the colored layer of the napkin.
2. Apply it to the product.
3. Place a dot in the center of the napkin with a brush dipped in water.
4. Carefully lifting the napkin, we continue to saturate the motif with water in a circle, starting from the center. Here you need to be very careful so as not to accidentally damage the napkin at some point.
5. If, when wet, the edges of our napkin go beyond the edge of the product, then they can be removed with your hands while it is still wet. We will sand the small parts later with sandpaper when the napkin is dry.
6. We fix the still damp napkin with glue, while barely touching its surface with the brush.
7. Leave until completely dry.
The article will tell you in detail and show you how to create incredibly beautiful crafts for home decor using the popular decoupage technique.
Decoupage is a modern trend in creativity and handicrafts, which involves the use of fabrics and paper to create beautiful decorations for everyday things: furniture, boxes, dishes, boxes and much more.
Decoupage can be flat and voluminous, artistic and in the spirit of minimalism. This creativity is within the capabilities of an experienced needlewoman and a complete beginner. If you have the opportunity, carefully study the instructions for work in this article and watch the video master classes.
What is required for work:
- Special decoupage base– thin paper with a selected design or pattern.
- Glue– special for decoupage or regular PVA
- Stationery knife
- Sharp scissors, may also require manicuring for smaller cuts.
- Ruler
- Simple pencil and eraser
- Fine sandpaper (paper)
How to get started:
- First, you should decide what surface you will decorate: tin cans, wooden boxes, corton boxes or glass bottles.
- The selected surface should be prepared: washed and dried thoroughly.
- If you have chosen wooden material for work, then you should first prepare it by rubbing it with sandpaper.
- If the selected wooden material has cracks, they should be covered with putty.
- It’s easy to prepare the material for applying decoupage: you can leave it in its original form or open it with acrylic paint.
- Before starting work without applying glue, you should place cut-out patterns from special paper on the surface to determine the design.
- Apply the glue to the selected surface in an even layer, and also apply the glue to the paper.
- Glue each drawing very carefully, straightening even the smallest folds so that the work is beautiful.
- After the glue has dried, the design should be opened with varnish.
- The varnish is applied with a brush or sponge in two layers, after the first has dried.
Video: “Master class on decoupage for beginners”
How to make decoupage from napkins for beginners step by step with photos: technique, master class
A napkin with a pattern is an ideal material for decoupage. In stores you can find a large selection of designs on napkins of different themes, which makes it possible to create crafts of extraordinary beauty in the chosen style.
Step by step:
Simple decoupage of a flower pot using a napkin

Decoupage soap with napkin
Decoupage hangers using napkins
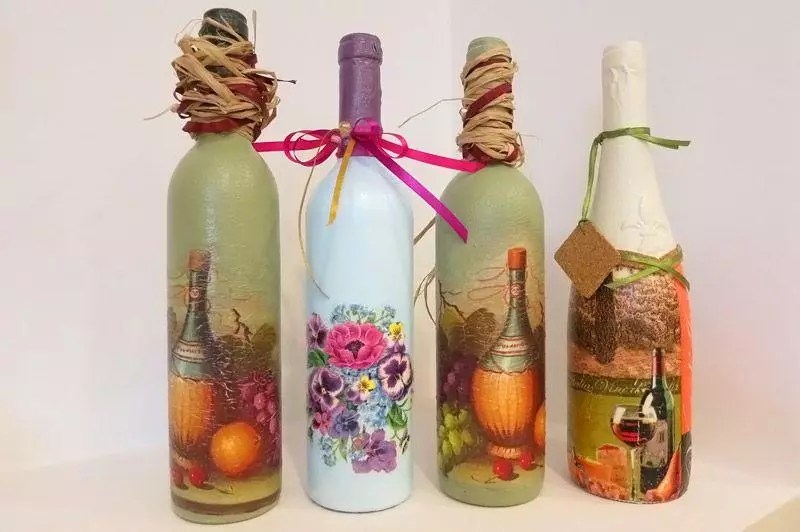
Decoupage of champagne bottles: photos of works and ideas
Decoupage of bottles is the most popular, since it is not difficult to find an empty bottle, and the finished work looks very beautiful and is easy to decorate the house with. Also, modern manufacturers of alcoholic and non-alcoholic drinks allow you to choose a glass bottle of any shape.

Decorated wine bottles
Work step by step:
- Wash the bottle thoroughly from the inside and outside and dry.
- If you are gluing a bright image, you should open the glass with white acrylic paint (or any other color). Acrylic paint is resistant to moisture and varnish and retains its brightness.
- Carefully cut out patterns and pictures from napkins
- Open the bottle with glue and the pictures on the back side
- Glue, carefully smoothing the paper, avoiding wrinkles.
- Wait until it dries and open the bottle with varnish, dry it and apply another layer of varnish.
- Decorate the dried bottle with lace, whip, canvas or other decorative elements to your taste.
Video: “Decoupage bottles: master class”
Decoupage glass vase: photos of works and ideas
An old flower vase can be very successfully transformed using a technique such as decoupage. So you can create a country-style vase for a country house or to support the overall style of the room. A large selection of creative paper will help you accurately determine the ideal image for the vase.

Decoupage a vase using special paper

Decoupage and craquelure on a vase
IMPORTANT: The vase should be opened with acrylic paints or stained glass paints. They are moisture resistant and will not leak when in contact with water. After applying the design, open the product with varnish twice or three times.
Video: “Decoupage of a plastic bottle under a vase”
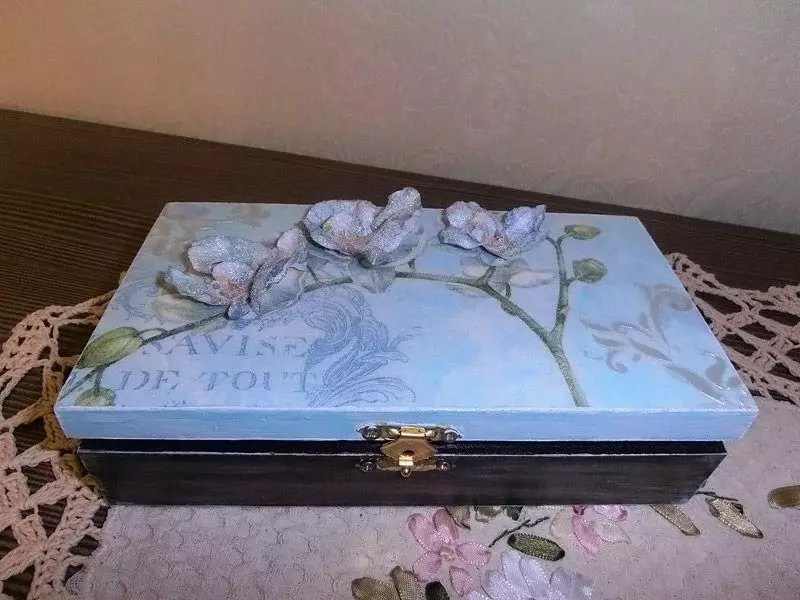
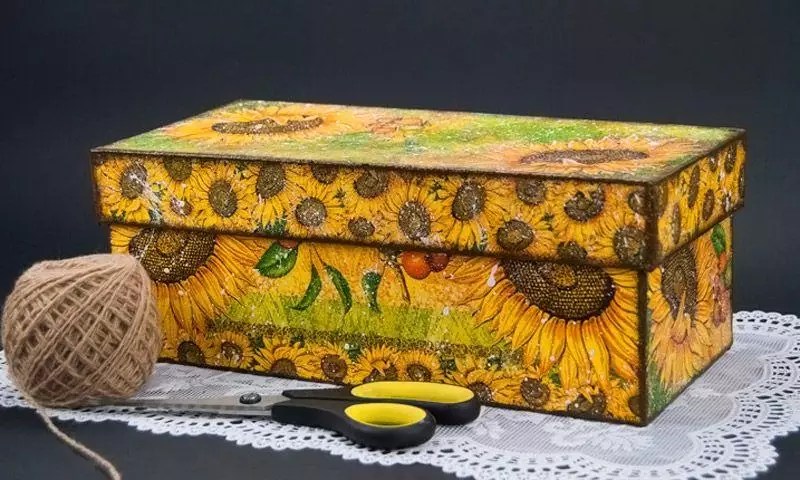
Decoupage boxes: photos of works and ideas for creativity
Every woman has a box. In it she keeps her secrets, cosmetics, jewelry or important papers. You can transform your plastic or wooden box very simply using decoupage.
Beautiful boxes:

Wooden box with decoupage decoration and lace

Stylish box made using decoupage technique with your own hands
Homemade decoupage of a wooden box
Video: “Decoupage boxes: master class”
Decoupage Easter eggs: photos of works and ideas
Using decoupage, you can also decorate Easter eggs for the holiday to make them incredibly beautiful and impressive. If you are decorating decorative eggs (carved from wood or foam blanks), they can be opened with varnish.
IMPORTANT: If you intend to decorate edible eggs, you can open them with a layer of PVA glue, which will be removed along with the eggshell during cleaning.
Photos of works:

Decorative Easter eggs

Beautiful Easter decor using decoupage

Volumetric decoupage of Easter egg
Video: “Decoupage eggs: master class”
Decoupage cans: photos of finished crafts, ideas for creativity
Decoupage can decorate your kitchen utensils and jars intended for storing cereals and other bulk products: sugar, salt, soda, cocoa, coffee, tea, and so on. Banks can be covered with a pattern over the entire area, or only some patterns and inscriptions can be glued.
Photos of works:

Stylish decoupage of tin cans

Beautiful decoupage of jars for the kitchen, decoration with lace

Decoupage of ceramic jars for the kitchen
Video: “Decorating plastic and glass jars for the kitchen”
Decoupage of plates: photos of finished crafts, ideas for creativity
A plate decorated with decoupage is necessary only for decorative purposes and to transform the room: kitchen, living room, even bedroom. You can choose any pattern and make it carefully, since the surface is smooth and comfortable. The resulting product is placed on shelves, walls or special stands.
Photos of plates:

Decor of plates for the kitchen

Decor of plates in medieval style
Stylish multi-layer decoupage plates
Video: “Decoupage plates: master class”
Decoupage cardboard boxes: how to decorate a box?
A box decorated with decoupage can be an excellent package not only for storing personal items, but also for gift wrapping. Decorating a box with decoupage is very easy, the paper lies flat and neat, the box has a comfortable, flat surface.
Photos of boxes:
Stylish decoupage box

Decoupage boxes in the spirit of minimalism
Video: “Decoupage boxes: master class”
Decoupage of tea houses: photos of finished crafts, ideas
A tea house is a special box in the form of a symbolic hut with a roof, which is intended for storing tea bags. It's convenient and beautiful. A tea house is a good gift and souvenir for loved ones.
Decorating cutting boards with decoupage is necessary only for decorative purposes. Such crafts should be hung on the wall or placed on shelves in the kitchen. As a rule, they are decorated with pictures of food, fruits, vegetables, flowers and cooked food.
Photos of works:
Beautiful cutting boards using decoupage technique
Original decoupage boards

Boards for room decoration
Video: “Decoupage a cutting board according to all the rules: a detailed master class”
We will send the material to you by e-mail
People of all age groups are engaged in creativity. Decoupage for beginners is considered an inexhaustible topic. Step by step with a photo of a bottle you can start making your first craft. Once you try it, you can easily decorate a wicker basket, any piece of furniture, or update an old lamp.
The advantage of this technique is that it can be used on different surfaces. Decoupage is reminiscent of an ancient technique. This decor is especially popular when creating items in a vintage style. An original solution is the use of retro accessories in interior design.
An ordinary interior is diversified by original decor
How to make bottle decoupage for beginners: step by step with photos and detailed instructions
Decoupage of bottles with tights is considered an unusual craftsmanship technique. The master class involves creating three-dimensional forms. This produces an imitation of waves or beautiful relief patterns.
Decoupage comes in the following types:
- direct method, in which the design is glued to the front of the object;
- the reverse is used to decorate glass surfaces, in which case the picture is glued from the inside;
- volumetric technique, when the drawing rises above the rest of the surface;
- the smoky method is a variant of artistic painting;
- Decopatch is a method where an object is pasted over with pieces of various materials: napkins, or regular colored ones.
Helpful information! The preference for a particular technique depends on the style of decorating the room, the capabilities and design of the product. For decoupage, you can use any pictures you like, newspaper clippings, bright magazines and labels. Napkins, textured paper and special cards for decoupage are also used.
You can start step-by-step decoupage for beginners with a photo of a bottle and preparing certain elements and materials. You will need any bottle with a smooth surface, acrylic paint, glue, varnish, scissors and an alcohol solution. An ornament on a napkin, newspaper photographs or printouts from websites are suitable for decoration.
| Image | Stages of work |
|---|---|
 | Remove any paper stickers. To do this, place the dishes in a soapy solution, and then remove all excess from it with sandpaper. Then the surface is wiped with a solvent. |
 | To create a more beautiful design, prime the surface. The paint can be applied using a sponge or brush. For rich color, apply paint in several layers. |
 | You can cut the image out of a napkin. In this case, the part with the pattern needs to be separated from the rest of the paper. If you use a newspaper clipping, the pattern is covered with several layers of varnish, dipped in warm water, and then the varnished area is separated from the wet paper and glued to the bottle. |
 | To glue the image, a pattern is applied to the dry surface of the bottle and varnished on top. |
 | The design is strengthened with varnish. |
 | Leave the craft to dry. |
Master class on decoupage furniture in Provence style
Provence style is often present in original ideas for do-it-yourself decoupage of kitchen furniture. Photos of interesting solutions can be seen on the website. If you have old pieces of furniture from your grandmother’s time, then with the help of this technique you can give them a second life.

The interior in Provence style is distinguished by its extraordinary beauty. To decorate a room in this style you don’t need to spend a lot of money; you can make a stylish thing with your own hands from scrap materials. To decorate furniture in a similar style, motifs characteristic of the French province are used. These are flower gardens, lavender fields, picturesque streets and vineyard plantations.
You can see how to make a masterpiece in Provence style in our master class using the example of a chest of drawers.
| Image | Description of actions |
|---|---|
 | Prepare a chest of drawers, beautiful designs on napkins, paint, glue, roller, brush, sandpaper and scissors. |
 | The piece of furniture itself is painted with paint. Apply layers with a roller, and after drying, sand down any imperfections with sandpaper. |
 | While the chest of drawers is drying, you can cut out elements of napkins for decoration. |
 | The glue is distributed over the location of the pattern and over the image itself. To create a scuffed effect, sandpaper is used. |
 | The surface is varnished. You need to apply 10 to 15 layers. |
 | It is recommended to sand every fourth layer with a varnish compound. |
 | Excess paint is removed. |
 | To complete the work, you need to wait until the chest of drawers is completely dry. |
How to make decoupage on glass from napkins: step-by-step instructions with photos
You can use an interesting decoupage technique using napkins on glass. To do this, you need to prepare paint compositions, themed napkins, varnish, glue and brushes.Choose a suitable glass container. Its surface must be treated with alcohol.
| Image | Job |
|---|---|
 | The glass must be tinted using the chosen method: paint, primer or sticking rice paper. |
 | Beautiful decorative elements are cut out of napkins. |
 | The prepared paper with patterns is applied to the surface and smeared with glue. After drying, the drawing is varnished. |
 | You can outline the drawing using a glass outline and complete small details. |
Helpful information! If you want to apply decoupage to dishes that are used for eating, then use special glue for glass and porcelain. The finished product needs to be dried for a day and then baked in the oven.
Decoupage on boxes
It’s worth trying to repeat a simple master class on decoupage of a shoe box. The materials you will need are a thick box, napkins, acrylic paints, glue and brushes.
| Image | Stages of work |
|---|---|
 | Apply white paint to the box and then dry thoroughly. |
 | Cut out a pattern from napkins. At the same time, we separate the top layer. Glue is applied to the part, which is glued to the box. |
 | The glue is applied from the middle to the edges with slight pressure. |
 | After the image has dried, you can decorate the surface using decorative stamps. |
 | To give an aged look, you need to go over the edges with dark paint. |
 | The drawings are fixed on top with acrylic varnish. |
 | This is what it looks like after the work is done. |
How to glue correctly without creases?
It is necessary to familiarize yourself with some rules before creating decoupage for beginners. Step by step, you can create unusual compositions with a photo of a bottle and napkins. Napkins provide a particular challenge. Some types of napkins cannot be applied wet, as they immediately begin to unravel. To glue smoothly and without wrinkles, you can use the hot method. PVA glue is applied to the surface. Then, after drying, the napkin is applied to this place and ironed with a hot iron through the paper. In this case, the napkin will stick without wrinkles.On a napkin glued in this way, you need to carefully apply varnish, especially the first layer.
Decoupage is a fascinating and uncomplicated activity that has many techniques and is accessible to even the youngest craftswomen. With its help, you can make exclusive interior items that will decorate not only your home, but also the exhibition halls of art galleries. In this review, we will look at how to perform with your own handsdecoupage for beginners step by step with photo. Don't worry that things won't work out, it's actually very simple. With the help of this technique, old furniture, dishes, shoes and many other things will find a new life in your home.
Products with decoupage are works of art
First of all, let's understand the definitions. Decoupage is gluing a design onto a surface. The picture can be placed on wood, leather, fabric, glass and almost any other product.
Reverse decoupage is the same process, but has only one feature - the picture is glued under the material. This can only be done on transparent surfaces: glass and plastic. Of course, in this case the picture is pasted face up.

For your information! If a plate is used for direct decoupage, then in the future it will only serve a decorative function. And when using the reverse technique, the dishes can be used as usual.
Tools and materials for work
| Materials and tools | Note |
| Using this technique you can decorate a book, dishes, flower pots, bottles, furniture, etc. In general, literally everything that is in your home. |
| Pictures can be used from special decoupage cards and napkins. In addition, for this purpose, craftswomen use drawings on fabric, old newspapers, and magazine clippings. |
| You can use regular nail scissors or a special tool that is sold in craft stores. The main thing is that the edges of the blades are very sharp. This is the only way to carefully cut out the desired image on a thin napkin. |
| You will need flat soft brushes. The pile in them should be tightly fixed. Lost lint can be a serious problem. It is better to have several brushes of different widths for smoothing and applying glue and varnish. |
| It is best to use regular household PVA. You can buy a specialized composition, but it will cost more. Among varnishes, it is better to give preference to acrylic. It does not emit toxic substances and is easy to use. |
| To decorate your work, you may need acrylic-based paints, sponges, primer, sandpaper, and craquelure. |


Decoupage kits
Basic Techniques
There are different ways to fix a drawing on a surface, let's look at them:
Method one
A simple technique of decoupage from napkins consists of placing it on an object and securing it with glue. After drying, the surface is varnished.

Method two
For reverse decoupling, a transparent base is used. The image is glued face down to the glass. After drying, fix with varnish.

Method three
Artistic composition. To make it, many images are used, which, when glued, are combined into one. To make the picture look like one whole, painting, shadows and accents are added.

Method four
This technique is called "decopatch". For it they use pictures from magazines, drawings on fabric. To get rid of clear boundaries, the edges of paper drawings are torn off. The surface is completely filled with images.

Method five
Creating a three-dimensional image. This is a technique that requires the talent of an artist. First, an image from a paper napkin is pasted on. And then painting is done on it with careful drawing of all the smallest details.
Decoupage bottles for beginners: step by step with photos and recommendations
- the simplest and most affordable material from which you can make an original gift. You can buy a bottle of wine or fill the container with your own homemade drink. Luxurious decoration will make an impression in any case.
We have already listed the materials and tools necessary for the work, so we will not dwell on this in detail. The only thing that needs to be added to the list is a windshield wiper. They pre-treat the bottle, which has been cleared of labels.
Important! It is better to work with a glass vessel while wearing gloves. Your fingerprints are unlikely to have artistic value, so it's best not to leave them.
Bottle decoupage sequence for beginners, step by step with photos:
| Illustration | Description of the stage |
Applying primer 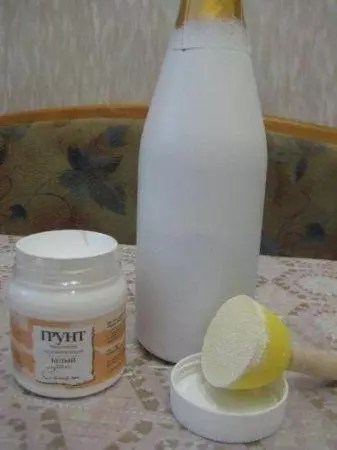 | For priming, you can use acrylic varnish or PVA. The soil should dry well. |
Making the background 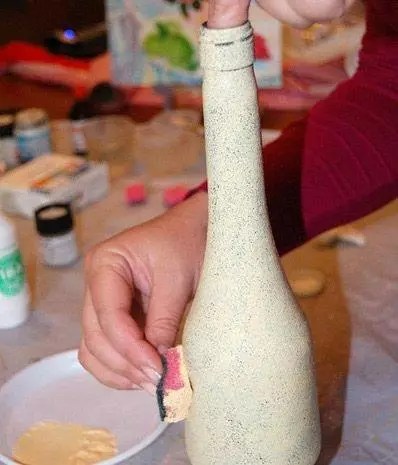 | For the background you need to use white or light acrylic paint. You may need to apply two or even three coats to achieve a completely opaque surface. |
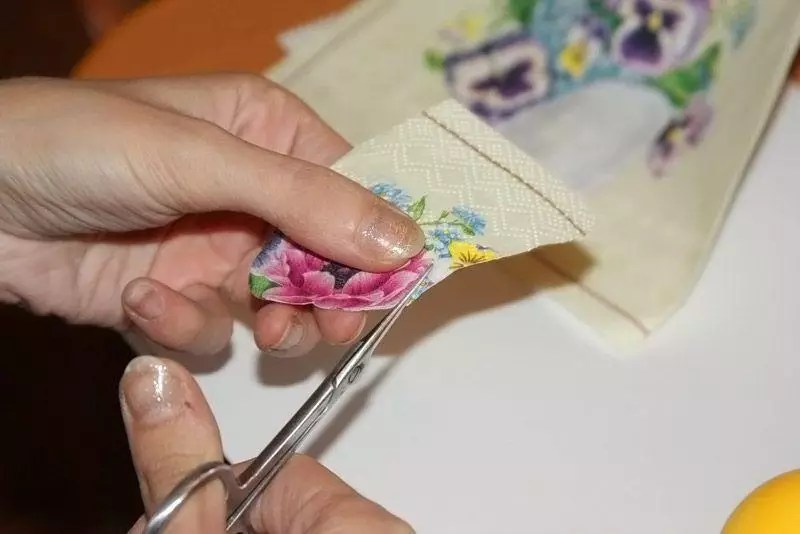
Applying images  | The design on the napkin is carefully cut out with scissors. If the background of the picture and the bottle matches, do without scissors and carefully tear off the napkins. To make the design on the print easier to apply, it should be soaked in a plate of water. |
We fix the drawing  | You need to apply varnish over the surface of the drawing. This can be done with a soft flat brush or a spray bottle. You should make sure that the picture is not covered with wrinkles. If necessary, it must be carefully straightened with a brush. |
Finishing  | After complete drying, you can carefully sand minor imperfections in the work. To highlight details, use a brush and dark paint. Once finishing is complete, apply a final coat of varnish. |
Another option for original design is decoupage of a bottle with tights. Master class on video:
Some tricks of decoupage on glass for beginners: step-by-step recommendations with photos of applying a design from napkins
The first experience of gluing a napkin can be unsuccessful: wrinkles and folds inevitably appear, which spoil the whole result. Some tips on how to avoid this:
- To apply a design to a convex surface, you can make “darts” on it. Cut the edges of the picture with scissors or even cut out triangular pieces. It is better to be careful with the last option; there is a risk of ruining the image if the angle of the cut is incorrectly calculated.
- You can apply glue to the surface, and then apply the design and straighten it with a brush. Another method would be just as good - apply glue over the design, straightening it at the same time.
- If the image is applied to an almost flat surface, you can pour glue into the center, apply a napkin and carefully disperse the composition, straightening the material over the surface.
- You can stick an image onto a perfectly flat sheet using an adhesive pencil.
- You can apply a design using a piece of polyethylene (a bag or a stationery file). The design is placed face down on polyethylene and moistened with water. Then a bag with a wet napkin is applied to the surface to be pasted. The package is removed, the napkin remains.

A simple master class on decoupage shoe boxes
The smooth surfaces of a cardboard shoe box are an excellent basis for decoration. This interior box will become a favorite place for household little things.
| Illustration | Description of the stage |
Surface preparation  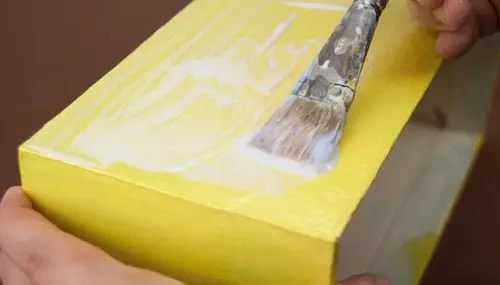 | The corners of the box need to be strengthened with pieces of masking adhesive tape, and then the surface should be primed with acrylic primer or paint. After drying, the primer should be lightly sanded with fine sandpaper. You may need to repeat the procedure if the layer does not lie flat enough. Then you need to paint the box with the color chosen for the background. |
Drawing 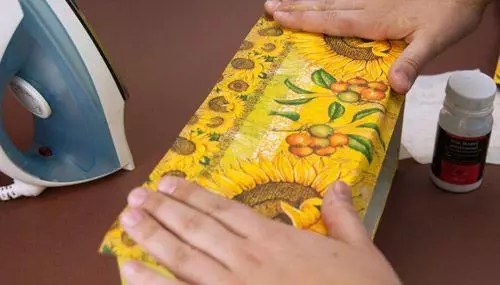 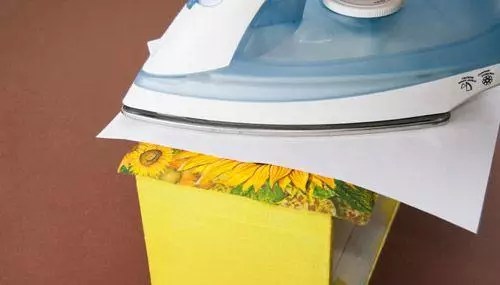 | The place for the drawing is covered with decoupage glue. After the layer has completely dried, a pattern is placed on top and smoothed with a hot iron through a sheet of paper. Afterwards the napkin is covered with a thin layer of varnish. A layer that is too thick will cause the design to become blistered. This procedure is repeated over the entire surface of the box. |
Decoration and finishing 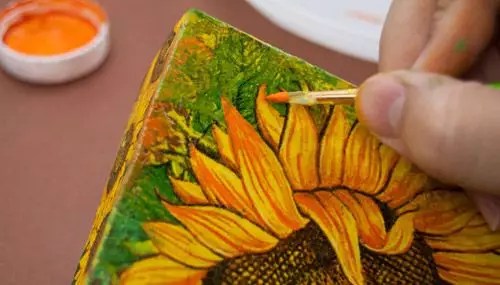 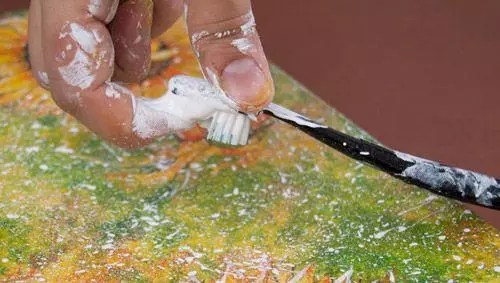 | Using a foam sponge, apply background paint and other shades to match the image. Small details are drawn with a brush. To add some casualness, you can squirt white paint on top using the bristles of a toothbrush. Afterwards the final varnish coating is applied. |
Decoupage of furniture in Provence style: master class on updating a chest of drawers
Having tried your hand at simple things, you can safely start decoupage with your own hands using napkins. In addition to the usual list of working materials, you will need wood putty. It is used to pre-level all the cracks, cracks and other irregularities on the surface of the chest of drawers, cleaned of old paint.
Sequence of decoupage of kitchen furniture with your own hands, photo and description:
| Image | Operation description |
Preparation  | The furniture must be thoroughly cleaned of all layers, and defects must be smoothed out with putty. After drying and sanding, all surfaces are coated with a primer and sanded with fine sandpaper. |
Preparing pictures 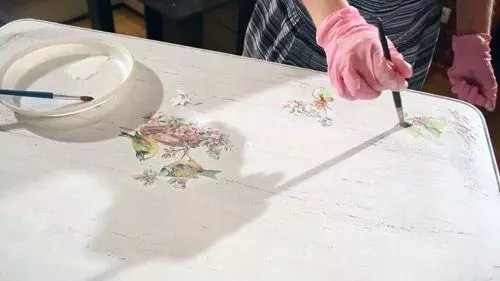 | The design on the napkins is carefully cut out or torn off by hand, and the bottom layer is removed. The picture is coated with glue and applied to the furniture. The application is carefully straightened with a brush. |
Finish coating  | No need to hurry. All drawings must dry. You need to varnish all the furniture, not just the place of decoration. For large areas it is convenient to do this with a spray bottle or spray can. This way the varnish will lay down in a thin layer. For the best effect, you need to apply 3-4 layers in succession, waiting for complete drying between treatments. |
 | Result. |
Helpful advice! If you need to apply a design to a polished surface, the polishing is pre-treated with sandpaper until the shine disappears.
When decorating furniture with fabric, the process is practically no different from that described.

The decoupage technique allows you to create real works of decorative and applied art using simple materials. This type of handicraft, which competes with artistic painting, can be practiced by a person who lacks not only an artistic education, but even drawing skills.
The decoupage technique (translated from French as “cut”) is based on the artistic decoration of interior items:
- Furniture;
- Crockery;
- Textiles;
- Office supplies;
- Household utensils
using a cut out image. The source of the pictures are decoupage napkins made using a special technology.

Rules, features of work, necessary materials for decoupage
Decoupage - applique for adults. In order to get an excellent result, you need desire, a little free time and material for creativity:
- Special napkins;
- Scissors for cutting;
- PVA glue or special adhesive composition;
- Varnish;
- Sandpaper;
- Alcohol;
- Tassels.

And, of course, an object for decoration.
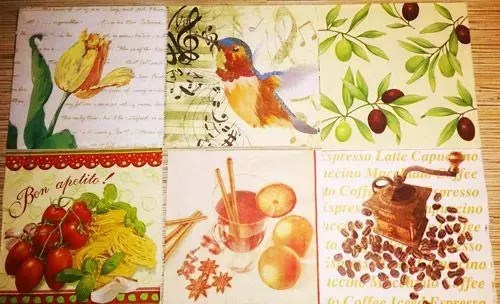
Napkins for decoupage: what are they?
Napkins for decoupage are the most popular type of material for this type of needlework, the basis of the technology, so it is very important to know what this material is, what it comes in and how to choose it correctly.
Napkins for decoupage differ from serving napkins not only in their bright and unusual designs, but in their texture and material. I would like to warn you right away that some table napkins are not suitable for decoupage, since some of them are: low quality paper ones - too thin; and others: premium cellulose ones are too thick.
So, special napkins for blending, distinguished by an unusual picture or ornament, sometimes even by an entire compositional group, are different depending on the parameters:
- Number of layers. Napkins come from single-layer to four-layer (regardless of the number of layers, we use only the top layer);
- Size. Napkins are available in different sizes:
- In the shape of a square: 21x21 cm, 25x25 cm, 33x33 cm, 40x40 cm;
- Rectangular: 33x42 cm;
- Round, the standard diameter of which is 32 cm.

- Image Location:
- Four identical motifs;
- Four motifs, identical in pairs;
- Four different motifs;
- Two motives;
- One image that occupies the entire area of the napkin.
Designer napkins are small editions made in a specific style.
When choosing napkins for work, you need to pay attention to their properties:
- The top layer is very thin, working with it requires tension, but it is the thinness and transparency that ensures excellent merging of the image with the surface being decorated;
- The paper from which the napkins are made can stretch and form folds. Therefore, before sticking it onto an object, it has to be processed;
- When applied, the napkin blends into the background. This factor must be taken into account when choosing the color on which the image is placed.
Advantages of napkins for decoupage:
- A large assortment range: color, theme, style allows you to choose material for any type of work;
- The small transverse size of the layer, otherwise known as thickness, facilitates the process of implanting the pattern;
- Availability - you can even buy napkins in a supermarket;
- Cost-effective - the price of napkins, especially for beginners, is low.
Minuses:
- A certain size limits work, for example, with large objects;
- An extraneous background that interferes with the harmonious combination with the background of the decorative item.
Compared to other materials for decoupage, a napkin, given its advantages, is the most practical.

Glue
The quality of the adhesive material is important when working with decoupage technique. It is the glue that will allow you to preserve a thing you created with your own hands for a long time.
Glue for decoupage must have certain qualities:
- Homogeneous creamy consistency;
- Average drying speed;
- Transparent finish;
- Neutral odor;
- Reliable packaging;
- Availability of a special device for application.
Depending on various factors: quality, durability, method of decoration, you can choose different glue for creativity:
- Special glue for decoupage expands the possibilities; it can be used:
- Not only for finishing wood, ceramics, stone, cardboard, glass, but also fabric, candles;
- For decorative purposes, and dishes decorated with such glue, for example, can be used for their intended purpose;
- Not only for fixing, but also for adding gloss and shine;
- For working with gold leaf or potal;
- For outdoor work, creating decorative elements on concrete, metal and wood.

- PVA glue. In order for this adhesive to be suitable for use in decoupage techniques, several conditions must be met:
- Use PVA glue intended for construction work;
- Before use, dilute the glue with water in a ratio of 2:1.
- Glue prepared at home from the following products:
- Starch, water and sugar;
- Egg whites and granulated sugar.
There are many options for glue for creativity; at the initial stage, you can get by with a simpler product; with experience, you can afford to purchase a high-quality, expensive product.

Drawing
In order for work done using the decoupage technique to look harmonious and of high quality, it is very important to choose the right design and think through options for its design. To do this, you need to take into account important nuances:
- Size of the drawing. It is necessary to correlate the size of the image with the size of the object being decorated;
- Color solution. The correct combination of the color of the picture and the background of the napkin and the workpiece will facilitate the work process and improve the result;
- Style. To create a harmonious artistic image, it is important to choose napkins of a certain style: retro, fantasy, glamor, country, hi-tech. Of course, they can be successfully combined, but this must be done with taste;
- Background. The color of the blank canvas should favorably emphasize the applied image, and not distract attention from the drawing.
Taking into account all the points, the decision to use a specific drawing is made by the master himself. After all, the author’s work is good precisely because of its special handwriting and individual approach.

Surface application
Decoupage is creativity, and in creativity such a concept as composition is very important. When decorating a workpiece using the decoupage technique, it is necessary to take into account the harmonious arrangement of the napkin fragments in relation to each other and to the shape of the workpiece itself. Compositional basis of decoupage:
- Determining the center that carries the main creative and semantic load;
- Symmetrical or asymmetrical arrangement of the drawing, depending on the idea;
- The harmonious existence of all elements of the work: the shape of the object, the style, the design, the color of the background, the design.
The idea is at the forefront, its embodiment is the main decor - the napkin motif, all other details serve only to decorate it.

Methods for gluing napkins
In the process of gluing napkins, you must follow an important rule: the top layer is used to decorate, which can be easily and tenderly separated from the whole napkin. This rule must be observed in all possible ways and techniques of attaching pictures from a napkin to an object.

Using a file
The “file method” is simple and universal. It makes it possible to transfer a fragment of a napkin to absolutely any surface: flat, round, to adjacent edges.
To use this method you need to prepare:
- Plastic file for storing documents;
- Water;
- PVA glue;
- Varnish.
The algorithm of actions is as follows:
- Pour water into the center of the file;
- Place the required piece of napkin in the water, face down;
- Straighten the pattern and drain the water;
- We attach the file with the stuck pattern to the object for decoration;
- We fix the drawing;
- We gradually lift the film and remove it;
- We fix the wet fragment of the napkin with PVA glue;
- After the drawing has dried, apply a layer of varnish.

Using an iron
This method can be used when decorating a flat surface. Steps for iron/glue technique:
- Apply a primer to the surface;
- On top of the primer, use a brush to coat the entire area with PVA glue or glue stick;
- Using a hairdryer, thoroughly dry the item;
- Lay out and level the napkin on a dry, flat surface;
- We use parchment paper for baking: iron the napkin through it with a heated iron;
- We move the iron from the edge to the center;
- Coat the fixed composition with PVA glue.
This is the easiest way to allow a beginner to do his first simple work using the decoupage technique.

Using a fan brush
This method will help neat needlewomen decorate concave or convex objects:
- Place the napkin on the surface of the object;
- Pour water on it;
- Using a fan-shaped brush, carefully smooth the pattern with water;
- In the process, we smooth out the resulting wrinkles;
- Finally, coat with PVA glue.
All three methods of gluing napkins are effective in their own way. Depending on the complexity of the work, the size of the decor and the item that you intend to transform, you can choose one of the proposed ones.

Decoupage technique: design of wooden and metal surfaces, glass and ceramics, plastic.
We have already said that you can decorate almost any surface with a napkin. But there are peculiarities of working with each material.
- Decoupage on a wooden surface. Before applying a design to wood, it must be prepared:
- Sand and putty if required;
- Apply primer;
- Paint it.
And stick the chosen motif onto the dried workpiece and finish everything with a varnish coating. This technique is suitable both for working with small workpieces and for decorating furniture.

- Decoupage plastic. In order to turn a faceless plastic thing into a unique one, you first need to prepare its surface:
- Degrease with an alcohol solution;
- Clean with sandpaper;
- Apply a layer of gypsum primer;
- Sand again;
- Paint with acrylic paint in light shades.
After all the manipulations, paste the selected pattern (when working with plastic, do not skimp on glue). After complete drying, the work must be coated with several thin layers of varnish.

- Decoupage on glass. Glass is the most difficult to work with, but the result of painstaking work is interesting objects that can delight others. Before you get creative and decorate the glass with a bright motif and fix it with varnish, you need to prepare the product:
- Degrease with alcohol and dry;
- Allocate space for decoration;
- Tint the surface with primer or paint (do not touch the place where the drawing will be located).
- Decoupage of ceramics or porcelain. The technology for working with ceramics is the same as with glass, the only difference is the need to treat the smooth surface with sandpaper.

- Decoupage of metal objects. Buckets, cans and old saucepans will get a new life thanks to applications. But first, before the sacrament of creativity, the metal must be processed:
- Sand the surface;
- Treat with an anti-corrosion agent;
- Prime;
- Paint with construction acrylic paint or car paint in cans.

And, as usual, in decoupage - apply a napkin motif and varnish.
With this knowledge, working with various surfaces will bring pleasure and remain unchanged for many years.
Decoupage is one of the ancient types of creativity, which, due to its ease of execution and incredible results, has become one of the most popular. There are no restrictions for practicing this type of needlework. Everyone can feel like an artist and a craftsman at the same time by picking up a decorative item, a paper napkin and a little patience.
Photo gallery
Video