Decoupage is a fascinating and uncomplicated activity that has many techniques and is accessible to even the youngest craftswomen. With its help, you can make exclusive interior items that will decorate not only your home, but also the exhibition halls of art galleries. In this review, we will look at how to perform with your own handsdecoupage for beginners step by step with photo. Don't worry that things won't work out, it's actually very simple. With the help of this technique, old furniture, dishes, shoes and many other things will find a new life in your home.
Products with decoupage are works of art
First of all, let's understand the definitions. Decoupage is gluing a design onto a surface. The picture can be placed on wood, leather, fabric, glass and almost any other product.
Reverse decoupage is the same process, but has only one feature - the picture is glued under the material. This can only be done on transparent surfaces: glass and plastic. Of course, in this case the picture is pasted face up.

For your information! If a plate is used for direct decoupage, then in the future it will only serve a decorative function. And when using the reverse technique, the dishes can be used as usual.
Tools and materials for work
| Materials and tools | Note |
| Using this technique you can decorate a book, dishes, flower pots, bottles, furniture, etc. In general, literally everything that is in your home. |
| Pictures can be used from special decoupage cards and napkins. In addition, for this purpose, craftswomen use drawings on fabric, old newspapers, and magazine clippings. |
| You can use regular nail scissors or a special tool that is sold in craft stores. The main thing is that the edges of the blades are very sharp. This is the only way to carefully cut out the desired image on a thin napkin. |
| You will need flat soft brushes. The pile in them should be tightly fixed. Lost lint can be a serious problem. It is better to have several brushes of different widths for smoothing and applying glue and varnish. |
| It is best to use regular household PVA. You can buy a specialized composition, but it will cost more. Among varnishes, it is better to give preference to acrylic. It does not emit toxic substances and is easy to use. |
| To decorate your work, you may need acrylic-based paints, sponges, primer, sandpaper, and craquelure. |


Decoupage kits
Basic Techniques
There are different ways to fix a drawing on a surface, let's look at them:
Method one
A simple technique of decoupage from napkins consists of placing it on an object and securing it with glue. After drying, the surface is varnished.

Method two
For reverse decoupling, a transparent base is used. The image is glued face down to the glass. After drying, fix with varnish.

Method three
Artistic composition. To make it, many images are used, which, when glued, are combined into one. To make the picture look like one whole, painting, shadows and accents are added.

Method four
This technique is called "decopatch". For it they use pictures from magazines, drawings on fabric. To get rid of clear boundaries, the edges of paper drawings are torn off. The surface is completely filled with images.

Method five
Creating a three-dimensional image. This is a technique that requires the talent of an artist. First, an image from a paper napkin is pasted on. And then painting is done on it with careful drawing of all the smallest details.

Decoupage bottles for beginners: step by step with photos and recommendations
- the simplest and most affordable material from which you can make an original gift. You can buy a bottle of wine or fill the container with your own homemade drink. Luxurious decoration will make an impression in any case.

We have already listed the materials and tools necessary for the work, so we will not dwell on this in detail. The only thing that needs to be added to the list is a windshield wiper. They pre-treat the bottle, which has been cleared of labels.
Important! It is better to work with a glass vessel while wearing gloves. Your fingerprints are unlikely to have artistic value, so it's best not to leave them.
Bottle decoupage sequence for beginners, step by step with photos:
| Illustration | Description of the stage |
Applying primer 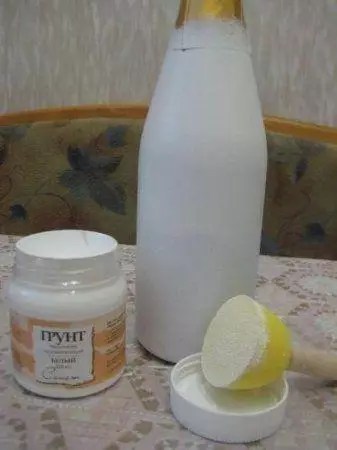 | For priming, you can use acrylic varnish or PVA. The soil should dry well. |
Making the background 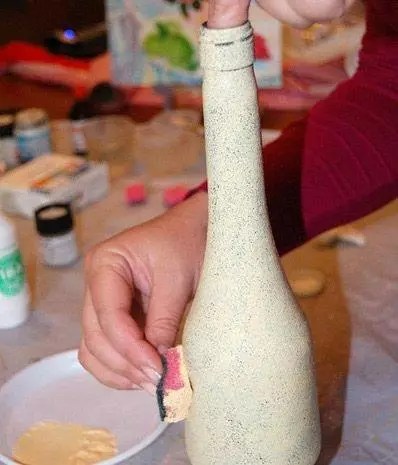 | For the background you need to use white or light acrylic paint. You may need to apply two or even three coats to achieve a completely opaque surface. |
Applying images  | The design on the napkin is carefully cut out with scissors. If the background of the picture and the bottle matches, do without scissors and carefully tear off the napkins. To make the design on the print easier to apply, it should be soaked in a plate of water. |
We fix the drawing  | You need to apply varnish over the surface of the drawing. This can be done with a soft flat brush or a spray bottle. You should make sure that the picture is not covered with wrinkles. If necessary, it must be carefully straightened with a brush. |
Finishing  | After complete drying, you can carefully sand minor imperfections in the work. To highlight details, use a brush and dark paint. Once finishing is complete, apply a final coat of varnish. |
Another option for original design is decoupage of a bottle with tights. Master class on video:
Some tricks of decoupage on glass for beginners: step-by-step recommendations with photos of applying a design from napkins
The first experience of gluing a napkin can be unsuccessful: wrinkles and folds inevitably appear, which spoil the whole result. Some tips on how to avoid this:
- To apply a design to a convex surface, you can make “darts” on it. Cut the edges of the picture with scissors or even cut out triangular pieces. It is better to be careful with the last option; there is a risk of ruining the image if the angle of the cut is incorrectly calculated.

- You can apply glue to the surface, and then apply the design and straighten it with a brush. Another method would be just as good - apply glue over the design, straightening it at the same time.
- If the image is applied to an almost flat surface, you can pour glue into the center, apply a napkin and carefully disperse the composition, straightening the material over the surface.
- You can stick an image onto a perfectly flat sheet using an adhesive pencil.
- You can apply a design using a piece of polyethylene (a bag or a stationery file). The design is placed face down on polyethylene and moistened with water. Then a bag with a wet napkin is applied to the surface to be pasted. The package is removed, the napkin remains.

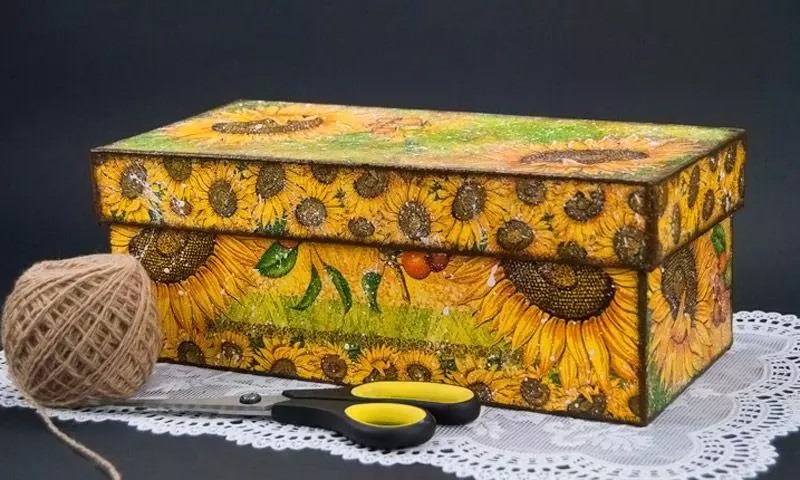
A simple master class on decoupage shoe boxes
The smooth surfaces of a cardboard shoe box are an excellent basis for decoration. This interior box will become a favorite place for household little things.
| Illustration | Description of the stage |
Surface preparation 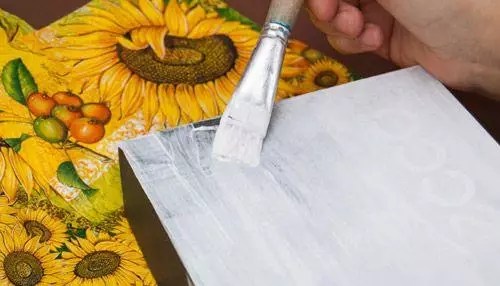  | The corners of the box need to be strengthened with pieces of masking adhesive tape, and then the surface should be primed with acrylic primer or paint. After drying, the primer should be lightly sanded with fine sandpaper. You may need to repeat the procedure if the layer does not lie flat enough. Then you need to paint the box with the color chosen for the background. |
Drawing 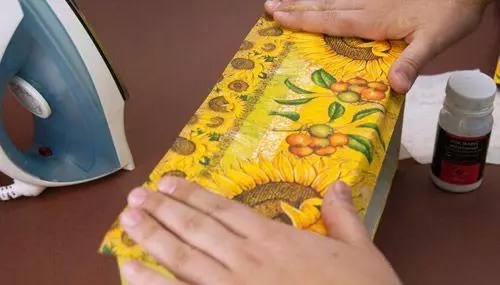 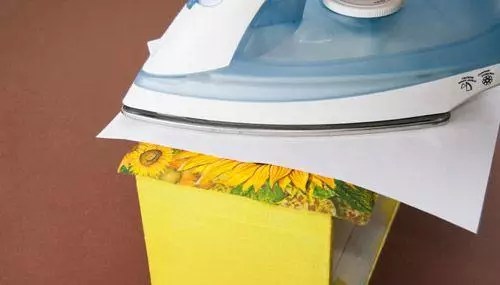 | The place for the drawing is covered with decoupage glue. After the layer has completely dried, a pattern is placed on top and smoothed with a hot iron through a sheet of paper. Afterwards the napkin is covered with a thin layer of varnish. A layer that is too thick will cause the design to become blistered. This procedure is repeated over the entire surface of the box. |
Decoration and finishing 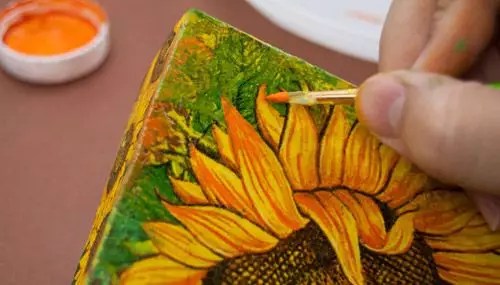  | Using a foam sponge, apply background paint and other shades to match the image. Small details are drawn with a brush. To add some casualness, you can squirt white paint on top using the bristles of a toothbrush. Afterwards the final varnish coating is applied. |
Decoupage of furniture in Provence style: master class on updating a chest of drawers
Having tried your hand at simple things, you can safely start decoupage with your own hands using napkins. In addition to the usual list of working materials, you will need wood putty. It is used to pre-level all the cracks, cracks and other irregularities on the surface of the chest of drawers, cleaned of old paint.
Sequence of decoupage of kitchen furniture with your own hands, photo and description:
| Image | Operation description |
Preparation  | The furniture must be thoroughly cleaned of all layers, and defects must be smoothed out with putty. After drying and sanding, all surfaces are coated with a primer and sanded with fine sandpaper. |
Preparing pictures  | The design on the napkins is carefully cut out or torn off by hand, and the bottom layer is removed. The picture is coated with glue and applied to the furniture. The application is carefully straightened with a brush. |
Finish coating 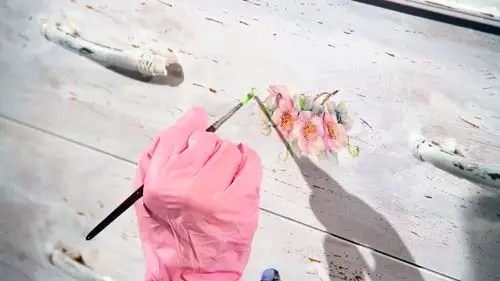 | No need to hurry. All drawings must dry. You need to varnish all the furniture, not just the place of decoration. For large areas it is convenient to do this with a spray bottle or spray can. This way the varnish will lay down in a thin layer. For the best effect, you need to apply 3-4 layers in succession, waiting for complete drying between treatments. |
 | Result. |
Helpful advice! If you need to apply a design to a polished surface, the polishing is pre-treated with sandpaper until the shine disappears.
When decorating furniture with fabric, the process is practically no different from that described.

The article allows the reader to become familiar with such a concept as decoupage for beginners. Step by step, with photos, we will analyze all the most popular decoupage techniques. After reading the article, you will learn to put some tips and instructions into practice, creating unique crafts with your own hands.
For ease of reading, the material is divided into several large parts:
- what is decoupage, what you should know before starting work, list of materials and tools;
- master classes on a variety of techniques - from ordinary work with napkins to creating glass goblets with drawings;
- reviews from masters, top 5 most common mistakes made by beginners during the decoupage process.
The concept of decoupage technique
Decoupage is a technique for decorating objects by inserting a picture or drawing, followed by coating the glued composition with varnish or paint, ensuring the preservation of the created appearance of the object.
The beginning of decoupage dates back to the fifteenth century. This art originated in Germany - there are the first mentions of the technique. Cut out pictures were used to decorate furniture and create unique interior items. In Venice, elaborately carved images were used, covered with many layers of varnish.
The second flowering of the decoupage technique began in the Victorian era in England, from where decoupage as a hobby spread in the first half of the twentieth century. In Russia, there was a similar technique of icon painting, and decoupage itself was developed in the seventeenth and eighteenth centuries.

Advantages and disadvantages
Decoupage is an excellent method of decorating interior items. Like any decor, it has its own pros and cons that determine its use for decoration.
Advantages:
- the ability to use any material;
- ease of execution;
- availability of materials for work;
- high durability of most types of decor.

Decoupage is undemanding to the source material. Napkins, magazine clippings, and individual printouts are used as drawings. If you wish, you can cut out flowers from the wallpaper and place them on the cabinets - decoupage does not limit the author’s imagination.
Decoupage does not require any special skills or tools - all you need is scissors, an old magazine, varnish and a brush. In some cases, there is no need to carefully cut out the design, since some carelessness can add additional charm to the interior.
Varnish and paint are sold in any store. Decorating a wooden door will take no more than one 200 ml can of varnish.

Almost all types of decoupage are durable due to varnish protection. Fragile works include those protected by other means or without protection at all. For varnished designs, the only threat is cracking over time.
Flaws:
- impossibility of application to all interior items;
- requirement for accuracy when working;
- difficulties when working indoors.
Not every piece of furniture is decorated using the decoupage technique for beginners. Step by step, with photos, we will analyze how bottles, fabric, plastic, cutting boards and other objects are decorated. Upholstered furniture or glass is not so easy to decorate. The varnish will not adhere to the fabric, and the glass will be damaged. In some cases this is not critical, but do not apply decoupage to glass in windows, since removing the varnish is extremely problematic.

The surface for decoupage must be prepared - the old peeling layers of coating are removed from it. This applies to enamel on old furniture, which must be completely sanded.
To work, you need to be patient - delicate drawings require great care from the master when creating, since careless movement will easily tear the paper. This is critical when using thin paper.
Paint and varnish products have a specific smell that takes a long time to evaporate from the room. Considering that decoupage requires applying several layers of varnish, we recommend carrying out this operation outdoors.

The situation is aggravated when it is necessary to sand the surface to begin work. With large sizes of the latter, a lot of dust and debris often form. This will put an end to the possibility of working indoors.
What you need to know before you start making decoupage
Before you start working with drawings, study the features of the fabrics and materials with which you will work.
A thick pattern for decoration looks less natural. This imposes restrictions on the use of thick cardboard and introduces its own requirements for the accuracy of work during the creation of the drawing.

Not every drawing is located under varnish. The image must have solvent-resistant paints that will not begin to dissolve under the influence of the latter. Glossy designs are excellent, less so are images printed with inkjet ink.
Consider the combination of colors during decoupage for beginners (step by step instructions with photos below). Carefully select images for decoration, since an already fixed illustration is almost impossible to remove from the surface.

What you need for decoupage for beginners: a list to get started
For almost any type of decoupage, a standard list of materials and tools is sufficient. So, what do you need for decoupage for beginners - list of things:
- drawing;
- scissors;
- glue;
- glue brush;
- varnish;
- varnish brush;
- sandpaper.
To make standard decoupage you need a drawing. It is selected in advance. Scissors are needed to cut it. For greater accuracy of work, use a stationery knife with a sharp blade, or special decoupage knives.

Be especially careful when choosing glue. You can also use regular PVA glue, but over time it will give the image a yellowish color. To get rid of the effect, choose a special glue that is sold in arts and crafts stores.
You should choose a special varnish - it is applied in thinner layers and does not use aggressive solvents that can damage the design. If you don’t have this, use regular varnish for wood or other material - it is selected depending on the material used.
Any brushes can be used, but for glue it is preferable to have several brushes of different sizes, allowing you to carefully apply it under the design.

Sandpaper is useful for cleaning the surface from roughness before coating and treating the varnish. We recommend using sandpaper of the least accessible fractions – 1600, 3200 and others. Too large will unnecessarily damage the varnish and surface.
Decoupage for beginners: video master class
This video shows a master class on the technique. For successful work, just follow the tips and steps presented in the video.
Decoupage for beginners: step by step with photos 7 master classes
Below are step-by-step instructions with photos. Decoupage for beginners will not seem so difficult if you adhere to the clear rules that we described below.

Decoupage with napkins: step-by-step instructions
Napkins are a very affordable, but not the easiest material to work with. They have a beautiful pattern and look good as decoration, but leave unsightly folds.
To work you will need:
- napkin;
- water;
- flat surface for drawing;
- acrylic lacquer;
- brushes
Start by cutting out a design from a napkin. We recommend doing this with a stationery knife or a set of decoupage knives. The more accurately the design is cut, the better the quality of the finished element.
During cutting, the napkin will most likely begin to delaminate. Remove the layers without the image, leaving only the layer with the image. This will make the result more realistic.
  | 1. Place the design on the surface - the napkin attaches perfectly to it. The approach allows you to completely get rid of all possible folds. |
 | 2. Wet the brush and begin to smooth out the design. |
 | 3. If any wrinkle appears during work, carefully lift the edge and smooth it out with a brush. The napkin will lie neatly without wrinkles. |
Wait for the water to dry. During soaking, the napkin will increase slightly in size, so take this into account when composing the composition.
Finally, coat the entire composition with varnish. The varnish depends on the type of surface. Acrylic varnish is universal. Apply it with a brush in one direction. The number of layers depends on the wishes of the master; 2-5 layers of varnish are enough.
The detailed process of decoupage with napkins is in the video below.
On wood
In the master class presented below we will talk about decoupage for beginners in wood. Step by step, with a photo in it, we will decorate a wooden panel. No special skills are required for the work, and all materials are sold in craft stores.
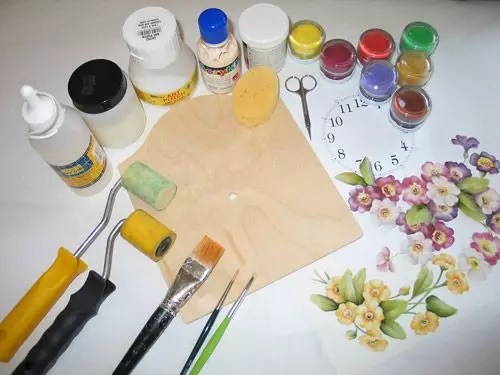
List to work with:
- tablet;
- rice paper for decoupage;
- green and white acrylic paints;
- acrylic glue and varnish;
- brushes
 | 1. Work begins by painting the board with acrylic paints. Paint the front side and sides. |
 | 2. To highlight the main composition, paint the side in a different shade. White and green acrylic paint are mixed to create a softer shade. |
 | 3. While the board is drying, prepare your drawing. Tear the rice paper without fear with your hands - this approach eliminates noticeable transitions. |
 | 4. After the entire composition has been torn out, place it on a board and glue it with acrylic glue. It can be applied directly to the drawing itself. |
 | 5. After the glue has dried, add decorative branches. This is done with green acrylic paint. |
 | 6. Once the glue and paint are dry, begin applying varnish. The varnish is applied in one direction - for example, from top to bottom. |
 | 7. The last step is the addition of decorative beads applied to the acrylic varnish that has not yet hardened. |
 | 8. After the varnish has dried, the finished work is obtained. |
The video shows the complete process of creating a decorative panel using the decoupage technique.
Decoupage on fabric
Working with fabric is almost no different from ordinary decoupage; the main thing is to be as careful as possible while working. The master class tells how to use decoupage techniques to add a design to an ordinary bag, making it a work of art.
You will need:
- bag;
- special decoupage glue for fabric;
- acrylic varnish for fabric;
- brushes
 | 1. Work begins with trying on a napkin. It is important to make sure that it is the right size for the item. It's okay if she goes beyond his boundaries. |
 | 2. After trying on, cut out the design, which is subsequently placed on the bag. |
 | 3. Layer the napkin - take only the front part of the napkin, where the design is located. |
 | 4. Next, place the napkin on the bag. To apply the glue evenly, mark the borders. It is convenient to do this with pins, marking the edges of the future drawing. |
 | 5. Apply acrylic fabric decoupage glue to the fabric. It is sold in arts and crafts stores. Before applying glue, place cellophane under the fabric - multifors are suitable for this. |
 | 6. After applying the glue, place the picture. Smooth it out with a brush. Place the napkin perfectly evenly. |
 | 7. Ironing is done through a multifora - this way the napkin will stick well. After this, apply a special varnish glue. |
 | 8. Wait until the fabric dries. To enhance the effect, iron the design through a sheet of paper. |
 | 9. Then make other decorations - for example, embroidery along the edges of the design. |
Other features of the work are presented in the video, which makes it possible to create exactly the same bag.
On plastic
The master class explains how decoupage is done on plastic. An old computer mouse is used as a basis, which will become a pleasant element of room design.
Tools and materials:
- mouse;
- synthetic water brush;
- acrylic lacquer;
- napkin with a pattern;
- PVA glue;
- stationery knife.
The work begins with processing the plastic. It often becomes contaminated with grease, so wash it well and treat it with alcohol. This will get rid of excess fat, which will damage the fragile design on the napkin.
 | 1. Cut out the design. Layer the napkin, removing excess layers under the pattern. After cutting the napkin, this is easy to do. |
 | 2. The next step is placement. Place the design in the desired location and smooth it with water. Water will soften the napkin and make it more flexible for the following operations. |
 | 3. Glue the design using PVA glue or decoupage glue. The latter is better because it does not leave a yellow tint, but in the absence of it, other adhesives can be used. |
 | 4. Apply acrylic varnish in several layers - the next layer is laid after the previous one has dried. This provides durability to the coating. After the varnish has dried, cut the pattern at the joints of the keys with a regular stationery knife. |
More details about decoupage on plastic in the video below. It is permissible to use this method with any plastic – the main thing is to degrease it first.
Decoupage cutting board
Creating a board using the decoupage technique is almost no different from creating a panel. The technique is similar and the only differences are in the material used.
You will need:
- uncoated wooden board;
- a napkin with a suitable pattern;
- acrylic paints;
- PVA glue;
- brushes and sponge.
 | 1. Prepare the board. To do this, paint one side of it with acrylic paints using a piece of sponge. |
 | 2. Wait until the board is completely dry. At this point, prepare your drawing. As with any decoupage napkin, layer and cut or tear it to the desired size. |
 | 3. Glue the napkin with PVA glue. Apply it from the center of the design, smoothing it evenly and getting rid of wrinkles. |
 | 4. Since the drawing does not occupy the entire surface of the board, additionally paint over the free space. To do this, select acrylic paint to match the background color of the napkin and paint over the entire remaining space. It is permissible to work with an acrylic sponge. |
 | 5. When the paint is dry, coat the decoupaged side of the board with acrylic varnish. Cover with 2-3 layers - this will make the board more resistant to use. Use the other side of the board as usual. |
Decoupage bottles for beginners: step by step with photos
Working with glass is different from other materials. It is specially prepared for the job, since ordinary paint or acrylic varnish does not adhere to glass.
To complete the work you will need:
- bottle;
- napkin;
- acrylic primer;
- sponge;
- degreaser - solvent or alcohol;
- acrylic paint;
- acrylic lacquer.
Let's take a closer look at how bottle decoupage is done for beginners, step by step with photos and useful recommendations.
 | 1. Degrease the surface with alcohol or acetone. It is important to wipe the entire surface - otherwise the soil will not settle on the glass. |
 | 2. Prime and paint the bottle. To do this, take an acrylic primer and mix it in half with the paint of the desired color. Apply priming using wet movements, leaving an equal layer of primer on the entire bottle. Cover the surface with paint of any color. |
 | 3. Prepare your drawing. This is done by peeling the napkin and cutting it into the necessary sections. After preparing them, start gluing - this is done with PVA glue. Glue it with gentle movements from the center to the edges, smoothing the napkin. |
 | 4. After the glue has dried, coat the entire bottle with acrylic varnish using a soft brush, creating several protective layers. |
Decoupage on glass
Decoupage on glass is one of the most difficult, as it requires great care in the work. Otherwise, the glass will become cloudy and lose its appearance.
For work, prepare:
- glass surface;
- napkins with the required pattern;
- decoupage glue and varnish;
- brushes
 | 1. Work begins with preparing the surface - degrease it using any solvent (alcohol or acetone). Since the method does not involve coloring, immediately prepare the drawing - to do this, peel the napkin and tear out the drawing of the desired size and shape. |
 | 2. Afterwards, the drawing is located in the required place and glued. Work from the center outwards, leveling the napkin. Additionally, dry the drawing with a hairdryer - this will speed up the work process. |
 | 3. The last step is to cover the drawings with acrylic varnish. Any extension beyond the edges of the design is noticeable, so apply the varnish with due care exclusively to the design. Acrylic varnish is difficult to remove from the surface, so there is no room for error during coating. |
Wait for the varnish to dry and place a candle in the wine glass. The decorated piece acts as an excellent candle holder at night, creating stunning patterns in the room.
More details of the work in the video below - it shows the process of gluing and varnishing a glass.
To help beginners - from people with practice
Decoupage is a hobby with a lot of fans. Despite the apparent complexity, there are a large number of nuances that are not always available to beginners. Next we will talk about some of them.
What professional decoupage artists will tell us - reviews, recommendations
“Decoupage is a cheap and profitable hobby that requires almost no skills. But sometimes the work seems too deceptive. You should start learning technology with unnecessary things that you don’t mind spoiling. Don’t neglect special varnishes and adhesives - they allow you to do the work much more beautifully and accurately.”
Alla Nikitenko– teacher of decoupage courses in Moscow with 5 years of experience.

“For me, the main advantage of decoupage as a hobby is its limitlessness - there are no restrictions for a decoupage artist, since the technique can be applied to almost any surface. You shouldn’t stand still - having completed one subject, start another, because only through practice does one gain mastery.”
Olga Ivanenko– practicing decoupage artist, 4 years of experience.

TOP 5 mistakes
The list below was compiled by experts and allows you to learn about the most common mistakes when decoupage.
- Smoothing the pattern from the edges to the center. In this case, folds form on it. This is noticeable with napkins because they are soft and thin. When gluing the design, work exclusively from the center to the edges;
- When decoupaging glass or other smooth surfaces, be sure to use a primer. Neglecting it will negate all efforts - the varnish will quickly peel off the surface, ruining all the work;
- When choosing a pattern for decoupage, you cannot use thick patterns with smooth edges. Such notches are very noticeable - especially when viewed from the side. This will spoil the appearance of the product and make it unpleasant.
- Buy a special set of brushes for glue and varnish. Using natural brushes for varnish leads to damage to the appearance due to destruction of the fiber, and using synthetics for glue leads to damage to the design. Mixing glue and varnish on the same brush leads to unpredictable results.
- When working with napkins, cut them after delamination. Otherwise, the drawing will shift relative to the lines and deteriorate, becoming unsuitable for further work. Using glossy images, first cover them with water, loosening the tension of the surface layer.
Decoupage courses in Moscow for beginners - school addresses
In this article I would like to cover in detail the decoupage technique. Convenient master classes will help even beginners master this needlework.
The pleasant-to-hear word “decoupage” immediately evokes associations of something elegant and beautiful. That’s right: the things touched by this art amaze with their special charm. And, what’s most interesting, absolutely anyone can master the decoupage technique. Let's talk in this article about how this miracle happens.
Decoupage technique for beginners
The decoupage technique has its basics things beginners need to know:
- You can glue the picture in different ways, but the best way is smooth it out from the center to the edges. There should be no bubbles or folds initially.
- It is recommended to glue using the old proven method, that is PVA glue. It will hold the drawing very tightly
IMPORTANT: Do not try to do everything quickly - it is very important to let the furniture dry thoroughly. And not with the help of a hairdryer, but in a natural way.
- Don't neglect acrylic paint- this way the image does not look alien, and the thing itself becomes more elegant. Apply paint preferably with a roller
- How many layers of varnish should there be? As a rule, the best results are obtained when there are two layers. Moreover, before applying the second one, you must wait until the first one has dried.
IMPORTANT: Construction varnish will work, but acrylic varnish is preferable, as it is odorless and does not cause allergies.
- It is useful for beginners to know that acrylic paints and varnishes are washed off with plain water during the first 24 hours after work. Thus, not entirely successful work can be easily corrected
- Whatever the idea, the thing must go through the preparation stage. It includes cleansing both from various types of contaminants and dust.
IMPORTANT: It is advisable to use a solution containing alcohol, however, just a damp cloth will do.
As for the types of techniques, then there are few of them:
- Classic - This is when the picture is attached using a dry, wet or hot method, and then varnished and then polished. You can also tint it


- Artistic or smoky- looks like a real painting thanks to the successful combination of the picture with the background


- Reverse - recommended for processing transparent surfaces
- Gluing occurs on the reverse side of the item being decorated.
- Decopatch or patchwork - in other words, similar to a patchwork quilt
IMPORTANT: Decopatch can be achieved on any materials, but beginners are recommended to use special paper.


- Volumetric - very similar to relief painting. Fabric and so-called structural paste will help with this. They also use a material that is very similar to eggshells

What you need for decoupage: tools, materials
- First of all, it's yourself decoupage object. And it can be anything from furniture to small plates. Any surface is allowed - wood, glass, fabric, plastic, ceramics, porcelain, metal
IMPORTANT: It is better to take the first steps in decoupage on wooden surfaces.
- Napkins special for decoupage with images to suit your taste


- Cards for decoupage— they are a little more difficult to work with than with napkins, but the paint on such cards is of good quality. Beginners are recommended to purchase cards on rice paper - they are thin and durable, and do not stretch during work.


- Scissors It is recommended to use those that are small in size and have rounded ends - this will guarantee that small parts can be cut out of thin paper without any problems
- Brush you need a flat one, the width is desirable within a centimeter or two - varnish and paint are applied to such tools simply perfectly. And keep in mind that the larger the item being processed, the larger the brush should be

 This brush is what you need for decoupage
 - Glue - as previously mentioned, PVA is still desirable, although you can purchase special glue for decoupage just for fun
IMPORTANT: Usually, after gluing a picture, craftsmen treat it with paints and varnish. Sometimes the adhesive properties of the varnish are enough, but it’s better to keep PVA with you.
- Varnish - and again a flight of fancy is guaranteed. Matte, glossy, acrylic, diamond glitter effect and craquelure - a choice for every taste. The advantages of decoupage varnishes are that they are odorless, do not turn yellow over time and, which is important during the work process, do not allow brush marks on the surface
- Sandpaper - an indispensable assistant in preparing the surface for work
- Primer It is also advisable to purchase, as it perfectly levels the surface and helps reduce paint costs. The best choice is an acrylic non-toxic water-based primer

Decoupage for beginners from napkins: master class
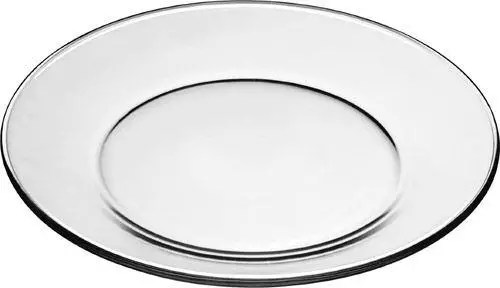
The smooth ceramic surface of the plate is what beginner decoupage artists need. It is still not recommended to eat food from such a plate, but as a decorative item it is incomparable. You will need to stock up:
1. Actually, with a plate
2. Alcohol wipe
3. Napkin for decoupage
4. Stationery file
5. Spray bottle with water
6. Glue
7. Acrylic varnish
8. Acrylic paints
9. Brush
10. Roller

 Decorative plate made using decoupage method
 Let's get started:
- First of all, we take alcohol wipes - they are excellent degrease the plate. After it has dried thoroughly, you need Apply PVA to the entire surface. And leave it to dry again
- Now It's time to start making decoupage napkins. You need to carefully separate the first layer with the pattern from it.
IMPORTANT: Many beginners mistakenly believe that the drawing should look up after applying the napkin to the surface. In fact, it is applied with the front part precisely to the surface.
- Place a layer on the file so that it does not tear. Then spray it all with water from a spray bottle.
- That's all - the file can be applied to the surface of the plate
- Next with a roller smoothing is carried out in the direction from the center to the edges. This must be done, otherwise excess moisture and air will interfere with the normal attachment of the image. However, you can do without a roller - a flat brush will serve as a good alternative
- Now the file is removed and the remaining moisture is removed an ordinary napkin. You can coat it with varnish or paint, glue three-dimensional elements from colored napkins


Decoupage bottles for beginners
Will come in handy:
1. Bottle
2. Acrylic paints and varnishes, special varnish for decoupage
3. Sketch
4. Alcohol
5. Picture to your taste
6. Sponge or sponge. Preferably several pieces - depending on the number of expected colors


Let's get started:
- Alcohol, as in the case of a plate, degrease the surface. The surface dries out
- Acrylic paint needs to be poured in some container
IMPORTANT: Paint is applied to the bottle not with a brush, but with a sponge or sponge using blotting movements.
- Do not skip this point under any circumstances! It is important to wait until each layer of paint is completely dry. It is recommended to apply two of them per bottle
- Fill a deep container with water, Dip a sketch of the drawing there
- Try it on How does the sketch fit the size of the bottle?
- The glue should be diluted with water from the ratio 2 to 3
- Apply this adhesive mixture to the bottle with a brush.. Choose directions from the center to the edges
- It is recommended to use a sponge dipped in paint to go over the part of the bottle not occupied by the picture. This way you can achieve smooth transitions
- Dry the bottle properly - Only then can a second coat of paint be applied. And let it dry again
- Now you need to coat the product with varnish for durability. You can tie a ribbon around the neck


Decoupage furniture for beginners
Real vintage furniture is very expensive, but that’s what decoupage is for - to imitate antiquity and decorate initially faded furniture. Beginners should start with something big - for example, from the chest of drawers. You will need:
IMPORTANT: If you want to create truly vintage-looking furniture, do not skimp on craquelure varnish. It will give the necessary cracks when drying, which will create the desired visual effect.
4. Bitumen
5. PVA
6. Scotch tape
Let's get started:
- First of all, unscrew all metal handles- they will only interfere with work. Most often, chests of drawers are polished - in this case sanding and primer required
IMPORTANT: If the dresser is not polished, do not waste time sanding and priming. It is enough to simply apply acrylic varnish.
- Now it's time for gold paint. It needs to dry well


- Measure a centimeter from the edges. Apply tape for an hour so that this tape protrudes. It's the same with drawers.


- Apply white enamel on top of furniture and on drawer faces


- It's time for craquelure- apply it to the side panels of the dresser
- When an hour has passed after applying the tape strips, remove them. The same surface that was previously under the tape must be paint it brown
IMPORTANT: Apply brown paint with a sponge - this is how it will adhere best
- Part of the chest of drawers painted with enamel process with sandpaper. You need to try until the golden paint shows through.
- Cut out those designs from decoupage napkins that you want to stick on furniture. Glue them with PVA and smooth them out. Wait for the glue to dry
- Cover the furniture with craquelure again. This time, try to ensure that the craquelure varnish covers the entire surface of the chest of drawers along with the drawings

- Wait for the craquelure varnish to dry. Cover the surface with it again. Wait until it dries - after that cracks will begin to appear.
- Fill the resulting cracks with bitumen- this is the final stage of work


Glass decoupage for beginners step by step
To start you can try working with a glass jar, a favorite for storing coffee. It is well known that grain or ground coffee will best retain its aroma if stored in a glass container. So, for a themed jar you will need:
1. The jar itself with a lid
2. Alcohol-soaked napkin
3. Sponge and clip for stationery. The latter is advisable if you don't want to get dirty with paint.
4. White acrylic paint
5. Napkin for decoupage
6. Aqualak
7. PVA
8. Flat wide brushes
9. Toothpick and old toothbrush
10. Real coffee beans
11. Burnt umber is a paint that will help create a slight aging effect
12. Twine
13. Bitumen varnish


Let's get started:
- First of all, of course, you need degrease the jar with an alcohol wipe

- Now The jar is covered on all sides with white paint. Don't forget about the lid
IMPORTANT: The background is applied using blotting movements with a sponge fixed in a clamp - this is convenient and effective.

- All this should be good dry out
- Now on PVA the drawing is glued. Since the can is convex, the image is best applied in parts. Don't forget about the lid either.


- Both the jar and the lid are needed cover with aqualac


- The lid should be decorated coffee beans. They are glued with PVA


- Now let's make it old. A toothbrush is dipped into the umber, and a toothpick is used to spray onto the jar and lid.
IMPORTANT: Umbra should first be slightly diluted with water.


- Now it's all dried, then varnished
- If you want to add a little more aging, cover the edges of the lid with bitumen varnish. Some areas of the can can also be coated


- Tie the twine- and the jar is ready!

Decoupage for beginners step by step on wood
It's best to start with something simple - for example, from the cutting board. This thing will serve to train decoupage skills and will be used often in everyday life. So, stock up:
1. The board itself
2. Acrylic paint in white and gray colors
3. Decoupage napkin
4. Acrylic varnish
5. Water in a glass
6. PVA
7. Sponge
8. Brush
9. A toothbrush that isn't used
10. Candle
11. Sandpaper


We create beauty:
- Apply white paint to the entire outer surface of the board using a pressing motion.. Start application from the top of the board
IMPORTANT: For convenience, the sponge should be cut into 2 or even 3 parts.


- Carefully comes off the napkin or that piece of the image is cut out, which is necessary


- From the right piece The topmost layer with the picture is separated. This should be done as carefully as possible


- Add PVA to a glass of water in such a ratio that the end result is the consistency of liquid sour cream. Place the required piece of the image on the board. Dip the brush into the glass and drop a little solution into the middle of the drawing

- The glue needs to be spread over the pattern with a brush.. The pattern should be carefully smoothed out in order to avoid wrinkles and the effect of bubbles.

- By a similar principle paste other images

- About the edges of the board you need rub the candle


- Further paint the edges with gray acrylic paint. Apply it with a sponge using pressing but gentle movements.
IMPORTANT: Do not overdo it with the amount of paint - there should be a little of it.

- Gray paint should be applied to the rest of the surface, but this time with light rubbing movements


- Sand the edges. Since they were treated with a candle, they will turn white


- Now gray paint is applied in a small amount to the toothbrush. Swipe along the stubble away from you - this will make splashes

 Splashes - another decoupage trick
 - And now make splashes of white paint like this


- The final stage - varnishing the board
 Apply varnish and the Provence style board is ready
 Decoupage boxes for beginners
This master class is a kind of basis from which you can build on when creating other boxes. You will need:
1. Blank for the box
2. Flat brushes
IMPORTANT: It is advisable that the brushes are made from non-natural materials
3. Brown acrylic paint
4. Light enamel
5. Toothbrush
6. Candle
7. PVA
9. Rice paper, decoupage card, napkins
10. Patina. As an analogue, it is permissible to use brown oil paint
11. Acrylic varnish
12. Sponge
13. Double-sided tape
14. Various accessories - buttons, lace, etc.

Now you can start:
- All irregularities are carefully removed. The surface needs to be cleaned Cover with brown acrylic paint. The box should dry well
- Now use a candle to rub all the corners and edges
IMPORTANT: Do not remove excess candles with your hands - it is better to use a toothbrush for this purpose.


- The surface is covered with white enamel and dried


- Take any metal thing. Use it to scrape off the paint in those places that were previously rubbed with a candle.. Carefully remove excess paint


- Dilute the glue in water in a ratio of one to three. Using a wide brush, apply the solution to that area of the box. where the image will be placed
- Attach a picture and at the top coat with PVA again. Move from the center to the edges. In this case, you need to smooth out all the unevenness
- Remove excess glue with a brush. Leave the workpiece to dry


- Soak the cards in advance for decoupage in water
- Patina or oil paint corners and edges need to be covered


- Now it’s the turn of acrylic varnish. The box needs to dry after this.
- The bottom of the box should cover with double-sided tape- fabric will be attached to it
IMPORTANT: Do not forget to pre-moisten this fabric in the adhesive solution - this will get rid of wet threads.


- Decorative items also need a preparatory stage. The lace should be soaked in instant coffee with sugar. Then they are slightly wrung out and placed on the battery. No need to rinse


- All that remains is to glue the lace, braid and buttons. Preferably with transparent glue


Decoupage for beginners watches
Clock decoupage is great for beginners. Stencils, dials, hands and other watch blanks can be easily found in bookstores or craft stores


- So, take the blank. You don’t have to worry about where to attach the arrows - the blanks, as a rule, have holes. There is also a hole for batteries
IMPORTANT: However, you need to prepare the future dial. If it is wooden, sand it; if it is plastic, degrease it.

- Now you can start designing the dial. There are absolutely no restrictions - when choosing, focus on the interior features and imagination. They even sell ready-made decoupage sheets in the form of dials.

- Glue the image onto the blank. Keep in mind that if the paper is rice paper, there is no need to soak it. Smooth out all wrinkles Clock after decoupage in Hollywood style
- First of all, you need prime blank for a house
- Cut out from the map the necessary pictures
- Paste all the images in the right places. However, glue only the middle of the pictures.
- Here's why you shouldn't paste the entire image at once. Apply relief paste under the free edges with a palette knife.- this is all done for the volume of the house
- You can draw bricks with relief paste. A toothpick will help with this
- Using a stencil and volumetric paste , you need to apply tiles
- Mix the paints in advance - It may happen that the desired shade is not available in finished form
- Now it begins house painting process
- For greater similarity don't be afraid to post additional details- lantern, stonework
- Paint the lantern and masonry. Add cracks on the walls for credibility
- Paint the roof
- It is recommended to use dark umber in order to finish the roof - so it will be brighter

Decoupage of tea houses for beginners
What you will need:
1. Wood blank
2. Thin acrylic relief paste
3. Spatula-palette knife, thanks to which it is convenient to apply primer and remove excess
4. Acrylic paints
5. Rice card
6. Matte varnish in the form of a spray
7. Matte acrylic varnish
8. Gel with 3D effect
9. Glue
10. Stencil for future tiles
Let's get started:

IMPORTANT: Make a centimeter reserve.


IMPORTANT: You should not paint the inside of the house.

- House after decoupage
Many people who love decoupage things think that only masters can do this art. But masters are not born, but made! Moreover, many of the techniques are quite simple to perform, so you should never be afraid to get creative.
The article will tell you in detail what decoupage is for beginners - step by step with photos we will analyze the rules of use and how to decorate the room. The article is conventionally divided into three parts:
- The first section is devoted to an introduction to decoupage - what it is, how a beginner can enter the technique and what tools are needed in order to become a professional specialist in this field;
- The second is practical advice regarding techniques and use cases;
- The third section will help beginners decide on ideas that can be brought to life using the methodology.
What is decoupage?
Let's start with a definition. Decoupage is a decorative technique using a cut out (torn out) image, which is glued to the surface of the workpiece and then secured with varnish. It doesn’t sound that complicated, but there are a huge number of subtleties. Let's try to understand the features of the technology.
 With flowers
 Who is suitable for decoupage?
Decoupage is applique - most of us are familiar with such activities from kindergarten. The technique itself requires both attention and perseverance, so the ideal candidate for a decoupage artist would be a person who would like not only to do beautiful work, but also to have fun and escape from the everyday hustle and bustle.
Important: There are no health restrictions when practicing, but you need to remember that some substances used in gluing can cause allergies.
That is why it is necessary to carefully familiarize yourself with the composition of the mixtures before you sit down to work. Otherwise, decoupage is a great activity both for evening relaxation for adults and for children's entertainment.
Basics of decoupage for beginners - all the important points
The process should not be particularly difficult if you approach the matter progressively. The sequence of decoupage actions for beginners (step by step with photos) looks like this:
- Surface preparation (sanding, priming, etc.);
- Gluing the decoupage motif;
- Intermediate varnishing to protect the motif;
- Painting and other decorative techniques;
- Final varnishing.
 Decoupage example
 Each stage is important in its own way and has a number of its own characteristics. We want to tell you a few secrets that will simplify your work.
- When working with paint and primer, use small containers up to 250 ml, and not entire containers. This way you won’t bring in dust and debris and the substance will last longer.
- A coarse nail file is suitable for sanding surfaces - you can use it to process small details.
- When decorating glass, use pre-prepared primer for complex surfaces.
- When decorating boxes, check how the hinges open.
- When gluing napkins, use a file. Wet the napkin on it and then apply it to the surface.
- After you have glued the napkin, do not wipe off the remaining glue. Do this after the first coat of varnish.
 Furniture
 What you need for decoupage for beginners: list
To start creating your own product you don’t need to be a professional - the technique is suitable for a beginner. What is needed for decoupage? We will provide a list further in our material.
Let's decide on the materials. For classes you will need pictures:
- Ordinary paper napkins with a pattern;
- Pictures printed on very thin paper using a printer;
- Special paper.
Model name
 Tools for work
 - The object of decoration is almost any object, but it looks most beautiful on an untreated wood surface. Wooden cutting boards or trays will do.
- You will need scissors - small nail scissors with rounded ends are preferable.
- To glue the picture, buy decoupage glue. There are options for using both special glue and regular PVA.
- Varnish for coating. Buy varnishes with both matte and glossy effects. Some types of glue contain elements of varnish; additional use of varnish is not necessary for them.
- Don't forget about brushes. There are many options in stores, but synthetic ones work great, especially flat ones. You can also use special rollers, but they are more convenient for smoothing the napkin rather than applying glue.
Decoupage techniques – photo instructions and video master classes
Let's try to figure out what items are decoupaged and what comes out of it as a result.
Bottle decoupage for beginners: step by step with photos (17 stages)
One of the most common techniques is bottle decoupage for beginners. Step by step with 17 photos we will analyze this process further. What will it take to turn a bottle into something attractive?
 | 1. First, you need to prepare the surface of the future craft. For this, any empty glass bottle is selected. Remove the label and wipe it with alcohol. |
 | 2. Apply primer to the glass with a brush or roller. The soil is sold in a specialized store. |
|
3. Apply a layer of paint. Acrylic or water-based will do. |
 |
4. Place a sheet of napkin with a pattern in the water. At the same time, apply decoupage glue or PVA. |
 |
5. Remove two layers from the napkin and apply it to the surface of the bottle. Iron it with a roller so that there is no air. |
 |
6. After drying, apply a layer of varnish. |
 |
7. We will make decorative elements on the sides of the drawing using putty. To do this, first outline the contours of the picture with masking tape. |
 |
8. Apply acrylic putty over the entire surface. Next, use a match to make lines, imitating a stone. |
 |
9. Immediately remove the tape before the putty dries. |
 |
10. Dry the surface completely and sand it with sandpaper. |
 |
11. Take dark acrylic paint and apply it to the surface with a brush. |
 |
12. Cover everything with another layer of varnish. |
 |
13. Apply gold wax with your fingers to create an antique effect. |
 |
14. Apply moment crystal glue to the neck of the bottle. Next we apply the chain. |
 |
15. Paint the lid with bronze acrylic enamel. |
 |
16. Apply a layer of glue and then wrap several layers of twine. Next, we attach a decorative lock to it. |
 |
17. Wait for the composition to dry. The product is ready. |

Decoupage for beginners: step by step on wood (6 stages)
Decoupage for beginners on wood (step by step below) requires a special kind of adhesion of the surface to the application.
 | 1. Prepare the surface. First, we remove the previous paint from it (if any) and clean it. Afterwards we cover it with a layer of acrylic primer. After drying, apply another layer. |
 | 2. Take a three-layer napkin and separate two layers from it. After this we apply it to the surface. We will glue it onto yacht varnish. Apply the first layer. |
 | 3. Upon completion, decorate the top of the board. |
 | 4. Cover the board with a layer of varnish, then apply another 2-3 layers. After this, dry for 24 hours. |
 | 5. Rub linseed oil onto the other side of the board. |
 | 6. Let the product dry, the composition is ready. |
Decoupage on plastic: video instructions with comments
Here we need plastic - it is sold in any hobby store.
- We prepare the surface. To do this, wipe it with an alcohol solution and remove the label. Next, apply a layer of acrylic paint.
- Cut out the required design.
- The next step is to squeeze a drop of glue onto the resulting plastic form, after which a paper cutout is glued onto it. Cover the outside of the paper cutout with glue - this way it can be varnished (in such cases we recommend using a special glue varnish).
- Place the finished form in the oven. After frying, make a magnet from the plastic blank by attaching magnetic tape to its base with glue.
Decoupage for beginners from napkins: step-by-step instructions for beginners, 5 stages with photos, videos
 | 1. Take a piece of file and place the napkin face down on it. First, separate two layers from the napkin. |
 | 2. Pour some water onto a napkin and smooth the edges with a brush. |
 | 3. Apply the file to the surface and remove excess air bubbles with a brush. |
 | 4. Slowly tear the file off the surface, leaving a pattern on it. |
 | 5. Apply a layer of glue over the design with a brush. After this we cover it with a layer of varnish. |
You can see more clearly how decoupage is made from napkins in the video.
Decoupage cutting board for beginners - video instructions and comments
Using technology, they also decorate a wooden board. How to do it? We follow the instructions:
- First, the surface of the board will need to be primed. To do this, white acrylic paint is applied to it (this is done with a sponge, in two layers and allowed to dry).
- The required composition is cut out from the selected napkin. Only one layer is needed, so if the napkin has two layers, then you will have to part with one.
- We place the drawing on the surface and carefully cover it with a layer of glue (diluted in proportions 50/50). To prevent the napkin from being damaged, try to smooth out the resulting wrinkles (and they will certainly form) with light movements of the brush.
- Let the glue dry a little.
- It's time to cover the board with acrylic varnish (initially it will be white, but as it dries it will become transparent). It wouldn't hurt to coat the board with furniture varnish.
- Wait until the varnish dries and use the board for its intended purpose.
 On a cutting board
Video master class on fabric with comments
A few words about the technique of decoupage on fabric.
- The fabric is laid out on the surface so that there are no folds. The finished drawing is placed on the surface and leveled (with your hands and with a roller). The placement is indicated by a disappearing marker.
- PVA glue is applied to the area marked for the drawing, where it is expected to dry completely. If the glue is thick, dilute with warm water.
- If the drawing is transferred from a napkin, do not forget to remove the bottom layer. The top one needs to be applied to the place where the glue has already dried.
- The top of the napkin should be covered with wax paper and then ironed. Ironing is carried out from the middle to the edge, the procedure lasts no more than 5 minutes.
 On fabric
 Advice: A little advice - to prevent the work surface from being damaged by glue, place a plastic bag or a stationery file under the fabric.
Full version of the master class on video.
Decoupage from eggshells - video and useful tips
Interesting patterns can be made using ordinary eggshells. Let's see what comes of this.
 On the plate
 Use a plastic plate that has been pre-plastered and degreased.
- Apply glue to the surface of the plate so that the shells do not “float” in it.
- We take the shell, divide it into not too large pieces, and lay it out with the concave side inward.
- Use a toothpick to break the shells to the required size.
- It is necessary to make the shells the same color - to do this, paint over them in two layers (drying).
- When the surface is level, place the shells on the glue.
- After this, glue the napkin. We glue with light movements using a brush or a finger dipped in water so as not to tear the napkin.
- Let the product dry and then decorate the room with it.
The word decoupage literally translated from French means “cutting” or “unfolding”. Therefore, decoupage is a technique of decorating an object with cut out paper motifs.
History of decoupage technique
Decoupage is a very ancient decorative technique for decorative items and furniture, which consists of meticulously cutting out illustrations from various materials (paper, fabric, etc.), and then attaching them to the surface to be decorated.
The origins of technology lead to the Middle Ages. Although decoupage as an art form was first mentioned in the 15th century in Germany, it gained its greatest popularity in the 17th century in Venice, where at that time furniture inlaid with Chinese and Japanese motifs was in fashion. But such a hobby was not available to everyone. Therefore, Venetian craftsmen came up with the idea of making imitations of inlays using cut-out images that were glued to the surface of the furniture they produced.
The popularity of this idea grew, the technique of the process was constantly improved, and decoupage reached the peak of its glory in England in the 18th century. At that time, not only furniture, but entire rooms were decorated in this way.
The decoupage technique has not lost its relevance to this day.
Why is decoupage needed?

Decoupage is used to decorate hats, shoes, accessories (bracelets, watches), plates and trays, Christmas tree decorations, and to create exclusive interior items.
Thanks to this technique, you can easily turn an old vegetable box or drawer into a stylish piece of furniture. And a bottle that should have been thrown away can, in skillful hands, turn into an irreplaceable flower vase.
But that's not all decoupage is for. This technique not only allows you to save on purchasing new interior items, but also breathes new life into them, turning them into unique things that cannot be found in the store.
What materials are needed for decoupage?

Today there are a lot of things that make the traditional process easier and faster. It will not be difficult for experienced craftsmen to select the necessary “ingredients” for a certain type of work (for example, for decorating a plate). But for beginners, the modern variety of tools and materials is sometimes even scary.
In big cities, there are more and more specialty stores for creative supplies every day. And those who decide to take up decoupage, due to their inexperience, rush to exactly where polite consultants will try to sell them branded materials and tools. But more often than not, in ordinary stationery stores you can buy almost everything you need for decoupage for a beginner, and at a fraction of the price. Although it is possible that you will still have to go to specialized retail outlets for some materials.
Here is a list of what a beginner needs for decoupage:
1. Tools:
- sharp scissors;
- synthetic brushes, preferably with a flat tip (natural ones tend to lose bristles);
- masking tape;
2. Materials:
- any napkin with a pattern, magazine clipping, printout, etc.;
- primer or, more simply, ordinary white acrylic paint;
- simple PVA glue (perfectly replaces special glue for decoupage and is much cheaper);
- the finest sandpaper;
- acrylic paints (which paints are needed for decoupage - decide for yourself, it can be either colored or metallic, that is, gold, silver, bronze, copper and so on, you can buy it either as a set or individually);
- acrylic varnish (although it looks milky white, it becomes transparent after drying);
- paint thinner or white spirit;
- wood putty, necessary when working with wooden objects.
3. Additional materials:
- crackle (for the formation of cracks);
- bitumen (for aging);
- silicone (for 3D effect).
Types of decoupage
Depending on the type of surface to be decorated and the desired effect you want to achieve, there are five types of decoupage techniques.

The most common is direct decoupage. What is needed for beginners and is most suitable is this particular technique, which is the basis for all the others. Direct decoupage is the application of an image to almost any surface without unnecessary effects.
To decorate transparent glass objects, there is a reverse decoupage technique. Its essence lies in gluing the application to the reverse side of the surface.
Three other techniques are more complex and are not suitable for a beginner decoupage artist:
- Artistic decoupage is the combination of several techniques and effects into a whole picture.
- Volumetric decoupage. To perform it, in addition to the standard set of items, a special paste, small pieces of fabric and/or natural materials (pebbles, eggshells) are required.
- Decopatch is a mixture of decoupage and patchwork (patchwork). Made from many pieces of paper.
Main stages of work

As with any process, for decoration using the decoupage technique, there are main stages of work, which are almost always performed in a certain sequence:
- Cleaning the decoration item from any contaminants (label, plaque) using an alcohol-containing solution.
- Coating the surface with acrylic varnish.
- Applying a layer of primer or white acrylic paint.
- Re-coating with acrylic varnish.
- Grinding.
- Attaching a drawing.
- Another layer of acrylic varnish.
- The process of artistic underpainting, applying the main background, and so on.
- Coating with acrylic varnish in several layers.
- Decorating, creating various effects (for example, the effect of cracks is achieved by applying a layer of craquelure)
- Applying the last layer of acrylic varnish.
When working using the reverse decoupage technique, the order of some steps changes: first, craquelure is applied (if necessary), then an image is attached, then decoration occurs using patterns, stamps, and the main background.
Objects for decoupage

The most common decorative items are various boxes, plates, cabinet doors and glass containers.
In general, decorating jars and bottles is quite simple. The list of what is needed to decoupage a bottle is practically no different from a typical list: the basic tools and materials are the same.
There is only one caveat when choosing a decoration method. As stated above, the design of transparent glass surfaces is done using the reverse decoupage technique. This rule is more often applied to flat decorative surfaces, such as plates, glass lids or doors, and the like. Bottles can be decorated in direct, reverse, or both ways together.
What else you need to decoupage a bottle is just to determine what your craft will serve as: a vase, a container for oil, or just a decoration for a window sill.
Newbie mistakes

Decorating using the decoupage technique is a creative process. But even here there are some points that do not forgive mistakes that are typical of almost all beginners.
The most common are the following:
- Start working on an unprepared and unprimed surface.
- Do not apply a finishing coat of acrylic varnish.
- Haste and haste.
- Late washing of instruments.
- Smoothing the pasted image with your fingers.
- Using gouache and watercolor instead of acrylic paints.
- Mixing paints directly in a jar.
Sometimes it happens that you seem to be doing everything correctly, following all the steps and points, but the result is not very beautiful. To prevent this from happening to you, use the advice of decoupage artists:
- You cannot brush over the same place more than twice.
- You should squeeze the brush well from the glue.
- Mix the paints with a small margin, this way you will have something to touch up the edges of the application or the background after drying.
- The plastic surface needs to be made a little rough using sandpaper so that neither the paint nor the illustration comes off.
- Before you start decorating an iron can, you should apply a base coat to it, since without it the paint will quickly peel off.
- To achieve a uniform background coverage, apply paint not with a brush, but with a foam sponge with the smallest holes.
- Do not skimp on varnish for the final layer, i.e. apply several layers.
- Before gluing pictures printed from magazines or other paper, they should be wetted, this will reduce the likelihood of wrinkles.
- An applique pasted on a dark background becomes almost invisible, so avoid dark colors or apply a light background under the picture.
- Apply the craquelure with a sponge, then the cracks will be smaller and “run” in different directions.