In the hot summer months, you really want to hide in the shade from the scorching sun, but often the lack of trees near a new private house does not allow this. In winter, the owners suffer from snow drifts in the yard, which they constantly have to clear on their own or with the help of hired workers. A canopy to the house will help to get rid of such problems completely or at least partially.
Ready-made canopy made of metal profiles attached to the house
A canopy is a structure located, as a rule, near a building. The main weight load can be distributed between the wall of a private house and the supports or fall entirely on the constructed supports. In fact, a canopy is a roof without walls or attached to a wall.
Sheds are designed to solve a number of specific problems:
- Shading. In the hot season, canopy structures are designed to create shade in the recreational area, parking area or storage areas for any supplies.
- Rain protection. You don’t want to get caught in the rain and get wet during a picnic, and it will stay cleaner.
- Snow protection. You will be able to spend less of your personal time clearing snow drifts in the yard, in front of the porch, and cleaning your car after a snowfall.
As you can see, the canopy is very convenient.
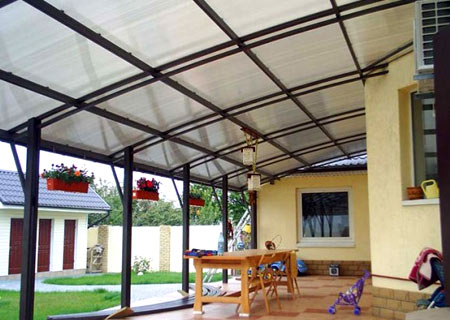 An example of a canopy for a house made of polycarbonate and metal poles
 Thanks to the development of construction, a design can be not only functional, but also very beautiful.
Among hanging structures, several main types are most widespread:
- metal,
- wooden,
- forged,
- stone.
Polycarbonate, slate, corrugated sheet or other roofing material can be used as a covering material.
The shape of the canopies can also be different. Today, there are multi-level decorative canopies, extensions to the house in the form of an extension of the roof, and simple hanging structures.
Visors
A special group worth highlighting is the canopy over the porch or window – the canopy. This is usually a small structure with two supports attached to the wall or ground surface in front of the porch.
Typically, canopies are made in the form of a welded frame made of metal or wood and covered with polycarbonate or corrugated sheets.
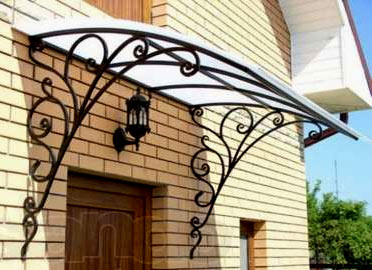
 This is what a canopy for a house made of corrugated board looks like
 Entrance areas can also be decorated with a forged frame, then the canopy looks especially elegant and beautiful.
Material selection
Before making a canopy for your house, you should decide on the choice of basic materials for the structure. Each of them has its own pros and cons.
Wooden structures
Wooden canopies are not uncommon today. For their construction, 10x10 timber is usually used as supports, smaller timber and boards for roof sheathing. A decorative canopy can also be decorated with railings, which also increases the strength of the structure. The advantages of wooden canopies include the following:

On the downside, it should be mentioned that wood is a flammable material, so you need to monitor nearby fire sources. It is unacceptable to locate the barbecue near such a structure.
Wood can also rot when exposed to excess moisture. To prevent this from happening, special coatings are used: primers, varnishes and paints.
Metal constructions
Metal structures are pipes welded or otherwise secured to each other, covered with some kind of roofing material.
As supports, a round or profile pipe of sufficiently large diameter (at least 10 cm) and a metal thickness of at least 2 mm is usually used.
 An example of a metal canopy for a car area
 The advantages of such canopies include:
- High structural strength (provided by welding elements together).
- If you have a welding machine and certain skills, you can make the canopy structure yourself. This will also reduce the final cost of the product, since the price for welder services is quite high.
- The profile pipe bends quite easily using a special device - a pipe bender. Due to this, it is possible to produce quite elegant designs that are attractive in appearance.
- A metal structure will be lighter than a stone or wooden one. Metal does not absorb moisture and does not become heavier after heavy rains or melting snow.
However, the metal is susceptible to corrosion. Periodic painting of the surface of the frame will help to cope with this problem. Before applying a layer of paint, the metal surface must be primed.
Forged structures
Such designs, as a rule, consist of a metal frame base, decorated with forged elements. They are welded to the frame, providing not only an attractive appearance, but also increasing the strength of the structure. Wrought iron canopies have a number of advantages:
- look light and elegant;
- strong and durable (forged products have been standing near various ancient castles for centuries, without losing their visual appeal and pristine strength);
- relatively inexpensive (among the elite structures of canopies, forged can be considered quite inexpensive compared, for example, with a canopy with stone supports);
- design flexibility is another advantage. Due to the increased load, the product will not break, as could happen with a wooden one, but will only bend slightly.
 An example of a canopy for a house using forged elements
 Compared to wood or simple metal structures, a wrought iron canopy will be much more expensive. However, it is worth it when it comes to prestige and creating a representative image of the owner of a private home or a successful company.
Most likely, to build a forged canopy, you will have to resort to the help of a specialist. You can count the number of good blacksmiths on one hand, but if you find such a master, you will be satisfied with his work for the rest of your life.
Stone structures
Only very respectable citizens can afford to make stone structures the basis for a canopy. But such a contribution of funds is justified in some cases.
- Stone is an almost eternal material. It is not afraid of heat, cold, or temperature changes, so the structure will last for many years.
- The stone structures look very respectable and beautiful.
- The high strength of the canopy frame allows you not to worry about reinforcing it with additional elements.
 Stone is undoubtedly a very expensive material. Therefore, many people lay a metal structure as the basis of the frame, and on top of it they cover the surface with a finishing material that imitates the surface of natural stone. Building a canopy using this approach will significantly reduce the cost and speed up the construction process, while the appearance will remain at the highest level.
Preparing for installation
In order to make a canopy in front of the house, you need to prepare for the construction process. For convenience, it is worth dividing the entire preparation process into several stages.
Selecting a location
It should be remembered that if you are going to build a canopy in front of a porch or just against a wall, you will need to install fewer supports than if you were making a free-standing canopy.
 Original canopy for a house made of wood
 This must be taken into account, because an increase in the number of supports entails an increase in overall costs: for the construction of the foundation, for the purchase of material for the supports.
If it is not possible to attach the canopy to the wall, you should choose a place where it will be convenient to dig holes for the foundation (without plantings and asphalt or sidewalk paths). You need to try to find a free space between the already landscaped area and a private house, if possible, and only then start arranging the yard.
Purchase of materials
Before purchasing material, it is worth carefully calculating how much of something you will ultimately need. For this purpose, possible structural designs are being considered. If you wish and have the ability, you can prepare projects yourself, but you should remember that this requires certain engineering knowledge. Otherwise, the structure may turn out to be flimsy and will not last long.
 Canopy for a cottage made of metal profile
 If you are not confident in your abilities, it is better to play it safe and order projects from a special construction organization. The price of the issue is high, but health and life are more expensive.
Having chosen the base material, supports, additional connecting elements, and fasteners are purchased. For wood and metal surfaces, it will be necessary to purchase a certain type of primer and paint (or varnish) to protect the frame from the harmful effects of sunlight and moisture. To construct the foundation you will need sand, crushed stone and concrete, as well as reinforcement if the base is solid. For welding you will need electrodes, for cutting parts you will need grinder discs, and to tie the frame together you will need angles, screws, bolts, etc.
When choosing a covering for a canopy, many people opt for canopies made of polycarbonate or corrugated sheets. Each of these materials has its own advantages.
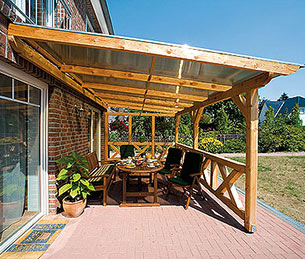 Ready-made canopy for the house made of wood and polycarbonate
 Thus, polycarbonate canopies look lighter and more elegant due to their transparency and high degree of flexibility. Structures made from corrugated sheets are much stronger and are not as susceptible to hail as products made from polycarbonate.
On the other hand, you can buy higher density polycarbonate (8 or 10 mm) to minimize the likelihood of material penetration.
However, corrugated sheet canopies are opaque and provide better protection from the sun in hot weather. Profiled sheets will also cost less. When choosing between these two materials, you need to weigh the pros and cons.
When purchasing material according to calculations, it is always worth adding an additional 10% of the total volume to the required quantity. Practice shows that unexpected costs of materials always arise due to errors in projects or difficulties encountered.
Tool preparation
The list of tools required for the job may vary depending on the selected canopy material.  During construction you may need:
- for pouring the foundation - shovels, concrete mixer, wheelbarrow;
- for level installation of supports and frame elements - level, square;
- for welding metal structures - a welding machine;
- to install a canopy made of metal or wood - a screwdriver, a grinder or a circular saw, a drill (especially if you plan to attach the structure to the wall).
A stepladder or tall ladder may also be needed for working at heights. If you have to lift up a solid welded metal frame structure, you will have to resort to the services of a manipulator.
In small, complex areas, in order to save space and for greater structural stability, sheds are used that serve as an extension to the house. This type of structure is very easy to install and does not take much time or money to install, which explains its popularity. How to install lean-to sheds attached to a house, a photo depicting the stages of installation work, we will consider further.
Important! Before starting all installation work, it is necessary to design the future appearance of the structure: calculate the optimal angle of inclination, length and width parameters, the possibility of connecting communications, determine the location of the fasteners relative to the side of the building, and select blank materials for the roof and frame.
Also, before attaching a canopy to the house, you need to decide on its purpose. If it will be used for household needs (storing equipment, materials, an outdoor office, parking a car), there is no need to spend much money and time on creating an original design. A patio canopy for relaxation involves the choice of more expensive materials and interesting design solutions for the exterior of the structure.

Attention! For an example of installing a lean-to canopy attached to a house, we will choose a wooden structure coated with polycarbonate.
- has good strength, moisture and frost resistance;
- elastic, affordable, has a wide range of colors;
- allows light to pass through but blocks ultraviolet radiation;
- able to withstand significant loads under the weight of snow;
- durable.
Important! The level of roof load under the weight of snow also depends on the angle of inclination at which the awnings attached to the house will be attached. The layout of the rafter beams (wooden stiffeners) relative to the roof, thanks to which the angle of inclination is adjusted and the strength of the installation of pitched roofs depends, is visible in the photo below. The desired option is selected taking into account the climatic conditions of the region.

shed roof diagram
Canopy installation steps:
- dismantle the soil 20-30 cm thick, select an area for wells, the perimeter of the resulting area should be 10-15 cm less than the size of the future roof;
- dig holes for installing structural supports 30 cm deep and 1 m apart, fill the bottom of the wells with crushed stone, cover with waterproofing, place and fix the supports in them, fill with concrete;

- level the supports, make notches 4 cm deep at their tops to install the support strip;
- on the wall of the building and on top of the supports, the upper and lower support strips with notches for the rafters, which determine the angle of inclination of the roof, are installed and fixed with screws;

installation of support strips

installation of support strips
- rafters with ends cut at an angle are mounted on the support strips using nails driven at an angle of 50°;
- a sheathing is installed perpendicular to the rafters, with a board spacing of 10-15 cm, on top of which polycarbonate is attached.


In the process of further design work, depending on the owner’s imagination, beautiful canopies are obtained attached to the house, intended for relaxation. Such work may include installing wooden trellises around the perimeter of the structure, using original lighting, landscaping the adjacent area, partially glazing it, installing flooring, decorating it with furniture, etc.

ready-made beautiful canopy
Important! As a result of decorative finishing works, a canopy should appear, which is a single architectural ensemble with the buildings already existing on the site.
How to attach a canopy to a house: step-by-step instructions
In small complex areas, in order to save space and for greater structural stability, lean-to sheds are used, which serve as an extension to the house
Sheds attached to the house: photos, varieties, installation stages and design features
An important part of the exterior of a country house is the canopy. It is designed to protect part of the yard from precipitation and ultraviolet rays, and also performs a decorative function. A small area, covered with material on top, consists of sheds attached to the house. Photos of similar structures can be seen in this review. In this case, the supports of the structure are brought to the required height. Attaching to the main structure involves attaching one side of the structure to the wall of the house.

The canopy structure allows you to create a magnificent outdoor recreation area
Selection of materials for the construction of canopies
Sheds attached to the house can be made with your own hands. The photo shows the main stages of installation. The frame of the structure is often made of profiled pipe or timber. This structure is adjacent to the wall and takes on the load from the snow accumulated on the roof.

The attached structure can be made of very durable and massive materials
The roof is usually covered with corrugated sheets, slate or galvanized material. The metal for the frame structure has ductility and strength. It suits different design styles. Such structures can be erected with your own hands.

The extensions are distinguished by their original design
The wood frame system combines well with other materials. Wood suits most architectural designs. Before use, this material should be treated with protective agents. Polycarbonate canopies attached to the house are becoming increasingly popular, photos of which can be viewed on the Internet.

Polycarbonate is easy to assemble and comes in a variety of colors
Polycarbonate enjoys the following advantages:
- plastic is characterized by durability. Mechanical impact is not scary for him;
- light weight of the material;
- polycarbonate transmits light well;
- flexibility of the canvas.
Helpful information! When purchasing a design kit for self-assembly, you must check the integrity and strength of all connections.

Convenient designs made from this material can improve the appearance of the main building and cover the area from prying eyes
Sheds attached to the house: photos and design features
Sheds attached to the house, as shown in the photo, can be of two types. These are cantilever models and awnings on supports. The console version can be of any length, but its width should not be more than two meters. Support structures can be used for a variety of purposes.

Awnings on poles are highly durable
Awnings can have different purposes:
- extension of the veranda, which is used as a recreation area;

The veranda is especially valuable in open areas where there are no trees
- terraces have a larger area and can even be located on the second floor of the building. Such structures can be single-pitch or gable;

The terrace can be much more spacious than the veranda and have an unusual shape
- awnings for car protection;

An extension for a car can cover most of the yard area
- various awnings: with posts, retractable or basket.

The folding awning is distinguished by its functionality
Canopies and awnings for terraces and verandas. Examples of different types of awnings and canopies, as well as useful installation tips in a separate publication on our portal.
Features of wooden canopies attached to the house: photos and design solutions
Homeowners often choose wood sheds. Such structures have an excellent set of characteristics:
- are distinguished by ease of construction;
- can withstand long periods of exposure to the open air, especially when properly processed;
- characterized by safety for human health;
- have an affordable price.
Helpful information! For comfortable use of the canopy, it is worth taking care of the installation of light and lighting fixtures.

Wooden structures convey a rural flavor and are massive
Options for canopies attached to a house made of corrugated sheets: photos and design features
An awning made of corrugated sheets can be made in various configurations. Single-pitch, gable and arched structures are created from corrugated sheets. In addition, a structure made from this material has the following features:
- ease of manufacture;
- saving money;
- long service life.
Important! A canopy made of corrugated sheets is mounted only with galvanized self-tapping screws that have a rubber seal.

Extensions made from corrugated sheets are reliable and durable
Creating a Project
When choosing a design project, it is worth deciding on the following parameters:
- dimensions and purpose of the structure;
- plot size;
- snow and wind loads;
- snow depth and expected annual precipitation;
- structural features of the main structure.

A pre-created project allows you to choose the best solution and select high-quality material
Before installation work, a drawing must be completed. Based on the size of the building, the required amount of material is determined.
Helpful information! When creating a carport, it is worth considering the passage of a loaded vehicle.
Preparatory work
Before planned sheds attached to the house are created, photos of which can be viewed on the website, it is necessary to carry out preparatory work. For this purpose, a suitable area is marked out, and trees are uprooted from it. The clean area is leveled. At the same time, sand and gravel are added.

Some durable sheds require a foundation
Recesses are drilled under the canopy supports. And at this stage it is worth considering laying the cable under the lighting sources. A certain step for placing supports is selected. It depends on the weight of the roof and frame part.

The number and placement of racks must be calculated in advance
The stands are lowered into the prepared pits and filled with concrete mixture. The pillars are set according to level.
Important information! If groundwater is located nearby, then the ends of the pillars need to be additionally waterproofed. Metal supports are pre-treated with a primer.
How to make a polycarbonate canopy attached to a house: photos and installation steps
12-15 days after the concrete has completely hardened, you can begin assembling the structure. Brackets are mounted on the wall, and then a transverse beam is mounted on top.

Assembly of the structure requires the preparation of special tools
Creating a sheathing
The top trim is being performed. The end parts of the racks are connected using a transverse beam and to each other. In this case, parallel laid profiles are used. The metal frame system is welded together, and the wooden frame system is tightened with steel corners.

The sheathing is attached to the main beam
Welding areas are cleaned, primed and painted. The rafters are mounted with transverse parts in increments of 600 mm. The structure is attached to the supporting beam using steel angles. The sheathing is laid across the rafters and mounted with self-tapping screws.
Roof installation
Sheets of roofing material are cut to size. Then they are attached to the sheathing. Holes for self-tapping screws are first made in the polycarbonate.

When installing a roof, you may need special insurance.
To facilitate water drainage, the cells should be directed downwards. When working with plastic, do not forget to leave gaps between the panels. The dimensions of the holes should be made with a margin of 2-3 mm. There are some features of installing roofs made of other materials.

Roof elements are attached to the sheathing
Wood beams can be used as beams. Over time, cracks may appear in the material, which will reduce the rigidity of the structure. After installing the beams, transverse boards are installed, and then the metal tiles are fastened. Installation of this material is carried out from the bottom sheets. It is worth considering that there should be an overlap of the upper sheets on the lower ones.
Helpful information! After installing the roof, drain gutters are installed. To do this, the required length of the gutter is measured and the excess metal is trimmed with a grinder.

In some cases it will be difficult to install the roof alone
Useful tips
After installing the main extension, you can make a platform. The easiest way is to fill the area with gravel. To do this, the turf is removed, the curb is dug in and crushed stone is poured. Then it needs to be compacted well.

Stylish and durable coating increases comfortable conditions for using the structure
You can also make a platform paved with paving stones or paving slabs. Equipping the site with concrete will be inexpensive.

A high-quality platform allows you to increase the usable area of the yard area
Using available materials and tools, you can create a beautiful canopy with your own hands. Such designs will allow you to build a wonderful place for a family vacation or reliable protection for a car and garden tools.

A beautiful canopy can become part of the building's exterior
Sheds attached to the house: photos and installation secrets
Sheds attached to the house, photos of which can be seen in this review, come in different types and can be made independently using a wide variety of materials.
How to make a canopy for your house with your own hands quickly and cheaply

Thanks to the ease of installation and low cost of polycarbonate, any garden or summer cottage can be decorated with a gazebo or canopy next to the house, as well as covering a terrace or simply creating a relaxation area in the garden.
But the following materials are also often used in work:

Drawing for wooden structure: 
Canopy in the corner of the house: 
Folding canopy, quite complex design: 
Portable tent-type structure: 
You can also build a multifunctional and multi-tiered canopy on your personal plot, under which you can not only store a car, but also use it as a playground for children, a place where you can simply relax with your family or in the company of close friends. At the same time, you don’t pay any attention to the vagaries of nature and don’t worry about the fact that unexpected precipitation can ruin the mood of vacationers. 
Porch protection: 
Fast and inexpensive installation
It takes very little time to install the canopy structure. Moreover, its cost is quite affordable for a family with an average income.
To assemble it, you will need racks made of round or profile metal pipes. Floor trusses are made from a profile pipe of a smaller cross-section. And monolithic or cellular polycarbonate for roofing.
- The support posts are welded to metal plates installed in pre-poured foundation columns, or they are simply lowered into dug holes and filled with concrete.
- The ceiling forms are electrically welded and mounted on support posts. Their fastening to the racks is also done using electric welding.
- Polycarbonate sheets or a metal profile are attached to the trusses themselves using special self-tapping screws equipped with thermal washers.
Advantages
The type (cellular or monolithic) and thickness of polycarbonate used to cover the canopy depends on the complexity of the design and the area of the canopy for a house or garage building. But in any case, the canopy will be quite light.
Low cost, quick assembly and a fairly aesthetic appearance have brought awnings made of polycarbonate and metal profiles widespread popularity among owners of summer cottages, as well as among owners of prestigious country cottages. After all, a well-built canopy can be an addition to any architectural ensemble as a decoration, or as an independent structure.
- Low specific gravity.
- High impact strength.
- Increased fire and heat resistance.
- High sound insulation.
- Resistant to aggressive weather conditions.
- Durability.
- Wide design possibilities.
Cellular or monolithic polycarbonate today is a material that can be freely used in a personal plot to cover a gazebo, carport, veranda, instead of glass for greenhouses or greenhouses. City services use it to build stops for passenger transport.
This material, as a glass substitute, has high performance properties and is completely environmentally friendly. Polycarbonate goes well with light metal frames, emphasizing their lightness and modern shaped appearance.
When using polycarbonate, it does not require special attention. To maintain its condition, it is enough to wash off the dust from it with a stream of water, and, if necessary, simply renew the metal structure by painting.
More information about corrugated sheets
There are three types of buildings: 
This material has the following characteristics:
- Ideal for fire safety.
- Does not contain substances harmful to humans and animals.
- Strength and durability.
- Temperature changes or aggressive environmental influences are not scary.
- Ultraviolet light is not scary. Moreover, protective paints will retain their colors for a long time.
The only disadvantage is the complexity of some designs. Because for an arch on the roof it is necessary to bend the supporting profile into an arc. Without the necessary equipment, iron cannot be given such a shape, and when faced with such a problem, they give preference to cellular polycarbonate. Approximately, this is the drawing: 
Multifunctional extension to the house
Canopies made of polycarbonate with a transparent roof are very popular among car enthusiasts today. These elegant and quite attractive-looking lightweight structures are designed to protect cars from exposure to direct ultraviolet sunlight, which adversely affects the paintwork.
They also protect the car from the effects of precipitation in the form of snow, hail and rain. Such a shed, built on a personal plot or country house, can completely replace an expensive capital garage. By increasing the area by several meters, you can not only keep the vehicle dry, but also take care of a modest area for children’s games.
Estimated cost
Small turnkey structures for the central region will cost the owners of dachas or cottages in the amount of 60 to 70 thousand rubles.
And the areas covered by such a roof can accommodate up to two cars cost about 130 thousand rubles.
These are quoted prices from popular companies so all the work gets done in a day or two and corresponds to the selected projects.
Due to the ease of installation and low cost of materials, any garden or summer cottage can be decorated with a canopy over a swimming pool or playground, covered with a terrace or just a relaxation area in the garden. All these buildings, covered with transparent polycarbonate or metal sheets, will take on a more attractive and elegant appearance, where you can comfortably spend your leisure time.
But canopies coated with polycarbonate deserve more attention. They are simple frame structures that can be quickly and easily installed either adjacent to a living space or on the site. Polycarbonate, being a rigid but at the same time flexible material, allows you to install canopies of the most intricate shapes.
A very inexpensive canopy option
The video below shows the process of making a quick and very cheap canopy. True, commentators quite rightly noted that this is not an option for the middle zone and will not withstand even an average snow load, and the service life of such a canopy will be no more than a year.
How to make a canopy for your house with your own hands quickly and cheaply
What kind of canopy in the courtyard of a private house can be made with your own hands cheaply and quickly? Let's consider all the materials and designs that will save money and at the same time
Canopy attached to the house: photos of different types and configurations of canopies
Country housing in the modern sense is a combination of privacy, peace and closeness to nature. The design of a good cottage immediately includes a place for a recreation area. This could be a patio, gazebo or canopy attached to the house: photos of canopies can be viewed in our gallery. Utility structures of this kind decorate the estate and expand the usable area of the home.

Canopy on metal supports with sloping roof
Materials for the construction of sheds
Frames for attached structures are made mainly of wooden beams or profiled steel pipe. But often brick, stone, and asbestos-cement pipes filled with reinforced concrete are used for these purposes. It all depends on the purpose of the canopy and the expected load on the frame.
The canopy attached to the house (photo can be found on the Internet) is adjacent to the wall, taking on the weight of the snow rolling off the roof. To withstand such serious loads, the base of the extension must be strong enough.

Canopy with high gable roof made of polycarbonate
The roof of the extension is usually covered with slate, corrugated sheets, or galvanized iron. But today the construction market offers a more interesting alternative - a polycarbonate canopy attached to the house. Photos of similar structures confirm that fiberglass is ideally combined with frames made of any materials. For canopies, cellular sheets with a thickness of 6-8 mm are used.

Massive stone columns were installed for the canopy.
The main advantages of polycarbonate:
- strength. Plastic is 200 times stronger than glass. He is not afraid of hammer blows, hail, stones;
- light weight. The material is 20 times lighter than glass. This allows you to create voluminous but lightweight structures, reduces the labor intensity of work and the cost of construction;
- transparency. Thermoplastic of different thicknesses transmits from 80% to 95% of natural light;
- flexibility. Cellular polycarbonate is the only translucent material that can be bent at subzero temperatures. The main thing here is to take into account the permissible bending radius and the direction of the internal channels.

Polycarbonate canopy over plastic doors
It is also important that the transparent polymer is easy to process. It can be drilled, cut with a saw, grinder, or jigsaw.
Helpful advice! DFor canopies you need to take polycarbonate with U.F.- protection, otherwise the material under the sun will quickly become cloudy and lose flexibility.
Shed attached to the house: photos of structures
Canopies attached to the house (photos are available on specialized resources) are divided into two groups: canopies on consoles and awnings installed on permanent supports.

Sliding canopy structure with steel guides
Cantilever models can be as long as desired along the facade of the building, but should not exceed 2 m in width so that the wind does not tear them out of the wall. The purpose of such products is to protect doors from the sun and precipitation, as well as to improve the appearance of the building. Forged and carved canopies in an ensemble with the entrance group can transform the facade.

The canopy is covered with a soft roof
Support canopies are designed for the following purposes:
- arrangement of a place for summer recreation;
- protection from precipitation of the area in front of the entrance, swimming pool, passages around the house;
- vehicle placement;
- awning over the barbecue area;
- sheds for household needs.
The use of polycarbonate allows you to create roofs of various configurations - single-pitch, gable, pyramidal, arched, concave and convex with a small bending radius. The design of the canopy can be improved by using colored or tinted fiberglass.

Wooden beam canopy
Project development
When planning the installation of a canopy attached to the house, photos of finished projects must be viewed in advance. The choice of design depends on several criteria:
- purpose and intended dimensions of the object;
- total area of the site;
- wind and snow loads;
- annual precipitation;
- snow depth;
- condition of the walls and foundation of the building;
- house design;
- availability of materials, tools and fasteners, as well as construction skills, if the work will be carried out on their own.

Canopy with ceiling lighting
Next, they make a drawing of a canopy attached to the house (photos confirm this), putting down the actual dimensions of the height, length and depth of the structure. Based on this, the amount of material to create the frame and roof is determined.
Standard carport dimensions:
- 250x500 cm for a machine up to 4 meters long;
- 350x660 cm for SUVs and cars longer than 4 m.
Helpful advice! A vehicle with a load on top must be able to drive under the canopy freely. But if the roof height exceeds 230 cm, precipitation will inevitably fall on the car. There is a way out - you need to change the angle of the roof.

Attached carport
Preparatory work
If all the above aspects are taken into account, you can begin preparing the site for construction. The marked area is cleared, trees and bushes are uprooted. The existing turf is removed to the depth of root germination. The cleaned area is leveled by adding sand or small crushed stone and compacted.
 Canopies and awnings over the entrance: photos with impressive style. Original and practical canopies and awnings over the entrance: styles and shapes. Color solutions and advantages. Canopy over the porch.
Under the supports of the canopy attached to the house (the photos clearly demonstrate this), holes are drilled with a cross-section of 20 cm and a depth of 50-60 cm (to dense soil). At this stage, it is necessary to provide for laying the cable under the lighting fixtures. The pitch of the supports depends on the area of the extension, as well as on the frame material and the weight of the roof. The heavier the structure, the more frequent the pitch of the pillars (on average every 1-1.5 m). The advantage of such a base is that it does not need to be connected to the main foundation of the building.

A bucket of crushed stone is poured into the finished recesses, vertical posts are installed in them and filled with concrete. Each pillar is leveled. The second option is to concrete the embedded parts with brackets in the pits, and the pillars are already fixed in them.
The materials should also be prepared before installation: the wood is impregnated with an antiseptic, dried or painted in the chosen color. The lumber is selected dry and must be sanded, otherwise woodworms will quickly appear under the bark.

Canopy on wooden supports
Helpful advice! EIf the house is located in a lowland, the ends of the wooden supports are additionally waterproofed (wrapped in a polyethylene or roofing felt jacket and filled with hot bitumen).
Metal racks must be coated with a primer that contains zinc phosphate. It’s better to immediately purchase a galvanized or aluminum profile.
While the concrete in the pits is gaining strength, you can install a floor covering for the shed.

Canopy using tempered glass
Installation of a polycarbonate canopy attached to the house
After waiting a certain time for the concrete to set (10-15 days, depending on the air temperature), we begin assembling the structure. First, several brackets are attached to the outer wall of the house where the polycarbonate canopy will be attached. A load-bearing transverse beam is mounted on them.

Polycarbonate canopy attached to the house
Canopy sheathing
Next, the top trim is made. The ends of the concreted vertical pillars are connected first to the transverse beam, then to each other. This is done using parallel laid profiles. If the frame is metal, the parts are welded; if it is wooden, they are tightened with steel corners. Welding seams are cleaned, primed and painted.

Installation of crossbar and frame
The rafters are attached to the crossbars in increments of 60 cm. The connection to the load-bearing beam attached to the wall is made using steel angles. The lathing is laid across the rafters, with a distance of 30 cm, and secured with self-tapping screws. Diameter of timber for frame:
- Racks - 120×120 mm.
- Cross beams - 100×100 mm.
- Rafters - 70×70 mm.
- Lathing - 50×50 mm.

Arrangement of sheathing for a canopy
Section of the steel profile for the frame:
Roof installation
Sheets of fiberglass are cut to size and screwed to the sheathing, having previously drilled holes in them for fasteners. In this case, you need to make sure that the plastic cells are directed downward - to drain condensate. Self-tapping screws must have a rubber thermal washer. The sheets themselves are connected to each other by an H-shaped profile.

Laying polycarbonate on the sheathing
When covering a polycarbonate canopy attached to a house (photos can be seen in various magazines), it is necessary to follow the rules for pairing compression seams. Simply put, you need to leave small gaps between the panels so that the polymer can expand freely when heated. The dimensions of the holes for fasteners should also have a margin of 2-3 mm. The protective film is removed from the sheet after installation is completed.

Completing the canopy installation
The finished canopy does not require special care. It is enough to wash the plastic with clean water from time to time so that it will serve its 50 years without fail.
Shed attached to the house: photos of different types of sheds
Canopy attached to the house: photo of cantilever canopies and supporting structures. Installation of a polycarbonate canopy, pouring piles, installing a frame, roofing
What is the secret of the popularity of polycarbonate canopies? Why is this material chosen more often than others? Is it really all about the low cost, or are there other features that are worth knowing about? How not to make a mistake when choosing a canopy for your home for the first time? What might this design look like, and why is it needed at all? We have prepared for you all the necessary information about canopies and canopies made of polycarbonate, and also selected 50 of the best photo examples!
Order a canopy?

There are promotional carport prices - turnkey carport 3.6 x 6.3 = 63,000 rubles!!!
turnkey carport for 2 cars 5.7 x 6.3 = 128,000 rubles!!!
The necessary welding is carried out during the production process using shielding gas, which ensures high quality welded joints.
Painting is also carried out at the factory. High-temperature drying of the painted layer ensures high strength and quality of the protective street coating.
The strength of our structures is ensured by correct load calculations (all calculations comply with the current standard).
Production and delivery times for ordered structures are within 2 weeks. Installation of the structure takes one to two days.
| Canopy No. | roof canopy size, w*d | size according to outer pillars, w*d | 3d sketch with dimensions | covered area | canopy price, including installation and delivery (turnkey) | |
| the width of the canopies is 3.4 m. | ||||||
| 3 | 3,4 * 5,3 | 3,0 * 5,0 | 18 | 61 490 | ||
| 4 | 3,4 * 6,3 | 3,0 * 6,0 | 21,6 | 69 190 | ||
| 5 | 3,4 * 7,4 | 3,0 * 7,1 | 25,2 | 77 990 | ||
| 6 | 3,4 * 8,5 | 3,0 * 8,2 | 28,8 | 82 390 | ||
| 7 | 3,4 * 9,5 | 3,0 * 9,0 | 32,5 | 92 290 | ||
| the width of the canopies is 4.4 m. | ||||||
| 16 | 4,4 * 3,2 | 4,0 * 2,9 | 14 | 46 090 | ||
| 17 | 4,4 * 4,2 | 4,0 * 3,9 | 18,5 | 60 390 | ||
| 18 | 4,4 * 5,3 | 4,0 * 5,0 | 23,2 | 71 390 | ||
| 19 | 4,4 * 6,3 | 4,0 * 6,0 | 27,7 | 80 190 | ||
| 20 | 4,4 * 7,4 | 4,0 * 7,1 | 32,4 | 92 290 | ||
| 21 | 4,4 * 8,5 | 4,0 * 8,2 | 37 | 104 390 | ||
| 22 | 4,4 * 9,5 | 4,0 * 9,0 | 41,7 | 115 390 | ||
| 23 | 4,4 * 10,6 | 4,0 * 10,0 | 46,3 | 120 890 | ||
Why people choose polycarbonate
Let's figure out what this material is. Polycarbonate is a hard polymer plastic. It is widely used not only in construction, but also for the production of lenses, compact discs, and computer parts.

May be:
Cellular polycarbonate is several thin plates connected to each other by jumpers. In cross section, the sheet is divided into cells, and the air contained in them provides good thermal insulation properties of the material.

Monolithic polycarbonate is a continuous sheet of polymer without voids or cells. This is a universal building material that has excellent light transmittance and can replace ordinary glass.
Among the advantages of the material it is worth highlighting:
- Affordable price. Polycarbonate is cheaper than metal, glass and wood.

- Light weight for easy installation. Cellular polycarbonate is 16 times lighter than glass.

- Fire safety. Does not ignite and does not contribute to the spread of fire.

- Resistant to temperature changes. Polycarbonate tolerates operation well in the temperature range from -40 to +120 degrees Celsius.

- Reliability and durability. A properly made canopy from this material will serve you for decades.

- Flexibility and plasticity. You can create structures of various design shapes.

- Variety of colors. Polycarbonate is available in all possible colors, which makes it possible to choose a material that fits perfectly into the style of the building.

- Easy to care for. To clean the cover of the canopy from dirt, you do not need expensive detergents. It washes well with regular soapy water.

It is not surprising that with so many useful properties, polycarbonate is so popular as a material for building sheds. Let's figure out what a canopy for a house can be like?


Canopy over the entrance
The canopy above the entrance serves to protect the porch from rain, snow and other unfavorable factors. It can be attached to the building on suspensions or installed on additional supports. The frame material is wood, steel or aluminum.

Polycarbonate canopies on a forged frame look very beautiful and interesting. Floral motifs and complex geometric shapes of forged elements give the appearance of the visor luxury and chic. Such designs fit well into the style of ancient buildings and classic private houses.

A polycarbonate canopy over the entrance not only perfectly fulfills its main function, but also serves as a harmonious addition to the exterior, and in some cases, a bright accent that can completely change the visual perception of the appearance of the house. Thanks to the variety of colors, the material can be perfectly matched to the color of the building.


Carport
The advantages of building a carport for a house are obvious:

When designing such a structure, the dimensions of your car are taken into account, and a part of the building is selected that is convenient to drive up to.


Cozy terrace
A common option for installing a polycarbonate canopy to a house is to create a terrace for summer recreation. It can be placed directly in front of the main entrance or on the side of the building. Tables and chairs are installed, the high fire safety of the material allows you to place a barbecue on such a terrace.

And this is another example of how a variety of colors allows you to create the perfect design to suit your taste. It is very pleasant to be under a completely transparent roof during warm summer rain. They say that you can watch the flowing drops of water endlessly. The tinted coating will protect against bright sunlight and ultraviolet radiation. An interesting lighting effect is created by bright sheets of colored polycarbonate.


Wood is an environmentally friendly natural material that has a pleasant smell
Where to order a canopy?
There are people who do not trust masters in anything, believing that doing it yourself is easier and cheaper. But this option is only good for those who are professional in construction, clearly know all the technology of the process, and besides, can buy materials from friends cheaper than in a hardware store or on the market. What do others risk:

This is why you should trust professionals! The company Canopy Master has been engaged in canopies, canopies, gazebos and greenhouses for 12 years. Our arsenal includes hundreds of successfully completed projects, the quality of which is confirmed by their service life.
The best craftsmen, who not only know and love their job, but also treat it with the utmost responsibility, will make you a custom-made canopy in just 2-4 weeks. You will be pleasantly surprised by the daily help of a competent person who will answer all your questions.
Don't waste your time and energy. By ordering the product today, you can enjoy a great vacation in the near future.

Message
sent.
Good afternoon - today I have prepared a BIG and NECESSARY article to help everyone who has seriously set out to make a wooden canopy adjacent to a private house with their own hands. That is, I will tell you step by step what simple steps (and they are really simple) consist of building a canopy against the wall of a house. We will make wooden sheds with a polycarbonate roof. We will look at different design options for the same canopy model for a house - that is, we will learn how to create different canopy designs based on one drawing - for any home, for any needs. And after reading the article you will not only LEARN how to make canopies, but also YOU CAN implement any design wooden canopy for a private house.
After all, when you understand the ESSENCE of the design, you will be able to modify this design according to your creative imagination. And who knows, maybe you will even earn a living later as a master of attachment work.
We will consider the following questions in turn.
- The canopy to the house is his basic elements
- How to change the design of basic elements- and get different canopy designs for your home.
- How step by step make a canopy with your own hands.
Let's first look at the classic wood canopy.
CLASSIC SHAPE
CANNOT TO THE HOUSE
So, here (photo below) is a sample of what we will learn to do with our own hands. We see a classic lean-to canopy against the wall of the house. Such a canopy for a house can be made not only at a blank wall - exactly the same canopy structure can be made at the front entrance of the house, in the back yard for gatherings and anywhere, it doesn’t matter, the principle is the same.
GENERAL PRINCIPLE FOR ALL CANNOS the fact that with one edge the canopy is attached to the wall - and with the other edge it stands on support pillars. That is, the canopy to the house must have two types of support - on poles and on the wall.
This is the essence of all outbuildings... however making holes in the wall in order to nail a support beam to it is NOT MANDATORY - below you will see models of canopies where the fasteners do not need to be driven into the wall, but you can install the same SUPPORT POSTS near the wall of the house as on the outer edge of the canopy. So, if you don’t want to make holes in a beautifully plastered wall, don’t rush to leave the article, there will be canopy options for your case too.
4 STAGES OF CREATING A CANOPY
(common to all designs)
The essence of the construction any wooden canopy to the house - consists in four stages.
- Fastening first load-bearing beam on the wall (this is the first support of the canopy)
- We install support pillars at the required distance from the wall.
- Fastening second load-bearing beam on poles (this is the second support for the roof sheathing).
- We lay transverse boards on these supporting beams ( roof sheathing)

How exactly I will tell you how to implement all these stages a little later in the article. Now I want to start by showing you the VARIETY of front awning designs. And to prove to you that all these different-looking canopies near the house are MADE ACCORDING TO THE SAME PRINCIPLE... in exactly the same 4 stages.
I will show - and talk about the design of canopies - STARTING with the simplest ones - and ENDING with more complex versions of canopies... Complex not in the drawings, but only in appearance (in reality they are all simple).
So - let's take the simplest canopy for the house (it requires very few beams).
The simplest canopy for the house.
(CANOPY OPTION No. 1 - with material savings)
If you have few wooden beams, but have a task to make a canopy for the house from these small ones. Then you can make a simple design like this (photo below). A total of 5 beams are needed - 2 for support pillars + 3 for load-bearing beams.

Here, the load-bearing side beams are attached to the wall using METAL FASTENERS (the photo below shows what they are like). Such metal brackets are attached to the wall of the house and the ends of the two side beams of our canopy are inserted into them.

The roof in such a canopy attached to the house can be a sheet of polycarbonate (transparent or darkened) ... or the roof can be an awning-curtain that slides along a stretched metal string (and either moves apart like a tent or gathers against the wall like curtains). I talked more about such a curtain roof for awnings in the article

Let's take a more complex canopy... Although its complexity is purely conditional... The essence is basically the same - but this model is already close to the classic design of a canopy attached to a house. The most understandable drawing, without unnecessary elements. Only the basic elements...
- support pillars
- load-bearing beam on the wall
- load-bearing beam on support pillars
- roof sheathing beams (for laying polycarbonate sheets on them)

This is a classic- A BASIC part of any canopy. And starting from these basic elements, we will create a great variety of canopy designs for the house.
And to start from the very beginning, we must start from the BOTTOM... from the substrate, from the foundation on which our canopy will stand.
Wooden flooring under the canopy.
(flat wooden base)
Before making a canopy, we need to figure out what we want in the final version - A CANOPY ON THE GROUND (so that the support pillars are dug into the ground, into concrete)... or A CANOPY WITH A BOARD FLOOR (where the support posts are attached to a wooden flooring)?... Let's look at the canopy projects and understand our desires and preferences.
Here (photo above) you can clearly see that first the man laid a neat wooden flooring... And then he installed a canopy on it.
If you are making a canopy for gatherings in the shade on the back patio of your private home, then that's reasonable- make a comfortable wooden flooring.
Let's start with the fact that level the soil surface where there will be a canopy near the house.
After this we need to put on the ground sheathing our future wooden flooring...
And then the sheathing-base cover with boards(we nail them to the sheathing)
You can take long boards at full length (as in the photo below)

Or if our boards are short, then they can be laid out at random... in a checkerboard pattern (as in the photo below).

What to do if you need flooring, but the canopy is already on concrete.
Let's say you decided to make a country canopy... and you did... And now you want it to be under the canopy adjacent to the house there was a neat wooden flooring. So that the furniture can be arranged, put a rug. Here is a photo example of how this can be implemented. We lay the sheathing on posts (if you want to raise the flooring above the ground).

If the soil or concrete foundation in front of the house is uneven in height, then the support columns will be of different heights - for different soil levels - somewhere longer, somewhere shorter. Here you will need to clearly calculate height support columns - so that the beams lying on them are all at the same level - in the same plane.
After that, all that remains is to pave it all with boards - and your flooring is ready for the canopy adjacent to the house.
Here is another photo example of a high deck under a wooden canopy near a house. It is built on the same principle - support posts + sheathing + plank flooring. And (what I liked) the side planes of the flooring are sewn up here - special panels with holes for ventilation are nailed on all sides.

If you are making a canopy at the door with a high level above the ground(that is, your house has a high foundation) - then the wooden flooring under such a canopy should also be high + a porch needs to be built into it to go down from this pedestal. This is just such a project for flooring under a canopy - for a house with a high foundation (photo below). A very picturesque picture - a side porch with flowerbeds on the sides and illuminated steps.

Concrete base
under a canopy near the house.
You can also make a BASE UNDER A CANOPY in the form of a concrete blind area (regular or paved with tiles)
And here is the base for the canopy, which I really like - high concrete formwork
We cast a high side from concrete (or lay it out of brick) - we give this side an elegant cladding to look like rough stone. It turns out beautiful.
This option is also good if you have support beams of insufficient height... And such formwork will raise your wooden canopy to the level you need .


Here is a similar principle, where the support pillars of the canopy stand on rocky hills. This allows you to use even short cuts of beams in the construction of sheds.

Here is another example of a canopy, where support pillars that are short in length are used. The support beams were placed on specially built brick walls. The result is a canopy with short legs and a beautiful wall, which can then be decorated in an interesting way and covered with decorative stone. Place a bench and fireplace nearby.

Or such a stone wall-side for our wooden canopy can be decorated in an oriental style - create a fountain there, put flowerpots and pots with plants + stick night lanterns. And what you will get is not just a simple canopy near the house, but a magical corner where you can so comfortably retire or talk about good topics with a friend.

So, we have figured out the BASE for canopies... Now let's see what other canopies there are. And first of all, let's look at the canopy project, for which you do not need to damage the wall of the house.
CANOPY on 4 POSTS
without fastening to the wall of the house.
And remember, I promised to show a wooden canopy near the house, which does not need to be attached to the wall (no need to drill holes and spoil the elegant facade of the house). Here is this model - such a canopy stands on 4 support pillars (or more pillars are possible) ... and it is not attached to the wall - it simply adjoins it, that is, it stands close to it (see options for wooden canopies in the photo below)

And such a free-standing canopy near the house can be decorated with false columns. False columns are available at home improvement stores and can simply be wrapped around your regular wooden shed beams. That is, hide each supporting pillar of the canopy inside such an elegant Greek false column.

Now look at the powerful potential hidden in your new skill of “making awnings with your own hands”...
Large canopy
with a terrace on the second floor.
If you are the owner of a private TWO-STORY house, then why just make a canopy over the porch. Make a canopy along the entire facade of the house - place it on weight on powerful support pillars of thick section - and... MAKE A TERRACE ON THE ROOF OF THE CANOPY.
It's a good idea... Agree.

After all, this is the right idea. Since you have decided to make a canopy near your house... Then why not think about the future. Make a canopy right away on thick powerful beams-pillars. And then next year continue construction on the roof of your shed - attach a railing with balusters- and now you have the opportunity to sit high above the ground - with a cup of tea from a samovar on a wooden terrace made with your own hands. And remember that it all started with your humble desire to make some kind of canopy...

Just my advice: it is better to make similar structures on the south side of the house a (the north side is poorly lit and it is not advisable to additionally darken it with a canopy - there will be less light in the house and the walls will become damp).
... well, stop dreaming - it's time to DO.
So, as I promised - 4 simple steps. Each stage in itself is not difficult, everyone can do it. And all the stages together give a single result - THE CANOPY YOU DREAMED OF.
Making a canopy - stage one
canopy support ON THE WALL.
First, you need to decide AT WHAT LEVEL you need to make a hanging beam on the wall. This is important because...
If you want the canopy roof to be level (not sloped) so that you can walk on it, so that you can make a terrace on it in the future... then the level of your beam on the wall should coincide with the level of the beam on the pillars - that is, they should be at the same height from the ground.
If you are not planning any terraces on the roof of the carport - Do you want this roof to be sloped? so that the snow slides off it itself (that is, you need a canopy with a pitched roof), then you need nail the supporting beam to the wall HIGHER than the beam on the support pillars. Here in the photo below I show an example of this thought of mine. Where is the load-bearing beam near the wall (arrow 1) higher level than the supporting beam on the pillars (arrow 2). And due to this different height, we get a canopy with a sloping pitched roof.

Now, let’s look at the ways in which this beam can be attached to the wall, or what other fasteners (besides the beam) can be used to attach the canopy to the wall of the house.
Method one - Support in the form of a beam.
We simply attach a horizontal beam to the wall (with self-tapping screws) - it will hold the roof of our canopy (we will lay our cross beams directly on it for sheathing the roof).

And so that you do not doubt the reliability of the beam fastening, you can attach a whole beam-holding mechanism to the wall - in the shape of a square (see photo with a red arrow below).

Method two - Vertical racks against the wall.
If you have obtained beams for the support pillars of a smaller diameter... and the load on the roof of the canopy is planned to be more serious (i.e. you want to make the roof sheathing also from heavy beams)... THEN you need ADDITIONALLY REINFORCE your supporting beam on the wall and also the supporting beam that lies on the pillars

We see that the load-bearing horizontal beam (attached to the wall) is reinforced additional vertical support bars(arrow 1). Thus, the canopy attached to the house does not rest its entire weight on the wall beam, but distributes its weight onto the wall posts and beams.
And the supporting vertical pillars from the other end of the pergola (i.e. those from the outer end of the porch) have diagonal short support beams, which hold the second load-bearing horizontal beam (arrow 2).
By the way (in the photo above), pay attention to WHAT THE SUPPORT POSTS STAND ON... They are based on metal bearings on a high thick metal leg, which is screwed into the flooring boards.
Here is another photo where the canopy has support beams right next to the wall of the house A. It’s safer this way: you don’t have to worry about the wall, in case the beam falls off the wall under the weight of time. Additional pillars against the wall will prevent this from happening.

The third method is support in the form of metal brackets.
We attach brackets-holders to the wall (stone or wood or brick)... This is how we see in the photo below... And we place our side cross beams on them (as on model No. 1 of the canopy from this article).

Important condition: Not every wall is suitable for such fasteners. If the wall is tiny, or made of porous material (foam blocks, for example), then the fasteners will not adhere well to the wall. And you must understand that heavy beams will sooner or later fall on the heads of your neighbors.
Therefore, consult with specialists. It’s better to choose the fastening method in which there is not a single bit of doubt - that is, the one where there are additional vertical posts along the wall that support a horizontal beam on the wall (see the second method).
Making a canopy - the second stage
install SUPPORT POSTS.
I described this stage in detail in the article. All 4 methods of installing poles are described there - both in the ground, and on a concrete foundation, and on a wooden flooring... And here I will only show a photo of the options for fastening elements for support poles. Or you can simply dig them into the ground (after tarring them and wrapping them in roofing material so that they do not rot in the ground).

Thrust bearings (or anchors) serve to protect wooden posts from rotting. U-shaped and T-shaped anchors are best suited for this purpose. They allow the beam to rise 2 cm above the surface. Be blown by the breeze and do not retain rain moisture.
If you bury your poles in the ground, it is better to use thrust bearings with long anchors (in the form of a reinforcement rod or pipe) - this way the metal part of the pole will be in the ground, and the wooden part on the surface.
And if you don't want to spend money on steel bearings. And just dig the pillars into the cement foundation the old fashioned way, then don’t be lazy before tar that part of the timber that will go into the ground. Resin will extend the life of the wood, protecting it from rot. Instead of tarring, ordinary roofing felt is often used. They wrap it around the underground part of the timber, and tightly wrap this roofing material “swaddling” with metal wire. Place the end of the post wrapped in roofing felt in the hole and fill it with cement.
And also the support pillars for the canopy can be made OF BRICK MASONRY and lined with decorative stone. Like in the photo below.

Making a canopy - stage three
place the BEARING BEAM on the pillars.
You will decide for yourself how to place the beam on the pillars. I'll show you several ways to attach a load-bearing beam to support posts, and you choose.
Method one (beam on top of pillars)
We place the beam on top of the post and fix it with long screws (central photo) or metal plates (right photo).

To prevent the supporting beam from bending on the support pillars under the weight of the roof sheathing, it can be REINFORCED. To do this, add diagonal beams (see extreme examples in the photo) or add an extended beam in the center (central example in the photo below).
Method two (beam from above into grooves on support pillars).
We cut out a hole-groove in each support column. And we put our load-bearing beam into this groove. Naturally, this method is suitable if our beam has a side that thinner in size than the thickness of the support column.


Method two - instead of a beam there are 2 boards.
This method is remarkable because it saves material (boards are cheaper than beams). And in terms of endurance, 2 boards are equal to one beam. We fill two boards on both sides of the support post and together they act as a regular load-bearing beam - see the photo of the canopy structures below.

I described all these methods of laying load-bearing beams on poles (for the roof of a country canopy) in detail in the article “Canopy for a summer house - 10 WAYS to make it yourself.” So if something is not clear here, you can find additional explanations in this article on how to make a canopy at home with your own hands.
Making a canopy - stage four
canopy roof lathing
The first method is lathing over the beams.
Laying the sheathing boards just on top on the beams. And fasten it with metal corners. Like in the photos of the house canopy below.


The second method is on the grooves.
We cut grooves in the sheathing boards. And we put these grooves on the supporting beam. The difficulty here is that the grooves at the ends of the boards must coincide with the beams (therefore, the boards must first be dragged up, laid out on the roof, marked with a pencil where the grooves will be cut, then removed, cut out the grooves, and lifted onto the roof again).

Method two - joint to joint.
This method is also possible, but the sheathing beams must be adjusted to fit snugly to snugly in order to fit neatly into the metal holder ears.

Roof for canopy
(roofing felt, polycarbonate, slate, tiles)
The most beautiful type of roof is transparent polycarbonate. This way it will always be light under the canopy. Such a roof is required if this side of the house faces north, so that excess darkness does not accumulate under the canopy.

If the canopy is on the sunny side of the house, and you instead want to reduce the sun above your head and sit in the shade of the canopy. Then you can choose any opaque roof - cheap roofing felt and slate, or more expensive soft tiles, or chalkboard.

Important: Don't forget to provide waterproofing the joint canopy with wall. To do this, you need to buy and nail a small iron visor. As in the photo below.

An elegant addition to a canopy.
You can cover the space between the support pillars with panels with sheathing. They are easy to make - a regular rectangular frame made of thin blocks - and a thin strip is criss-crossed onto them. You can plant vines next to such a sheathing - they will beautifully crawl up the pergola.
As a result, you will have a gazebo adjacent to the house. There you can put a table and benches for gatherings with friends and neighbors.

You see how interesting it is to make a canopy with your own hands... believe in your own hands... and continue to create beauty around you... This is very useful. Because when you are doing good things, there is no time to do bad or sad things... And if there is a lot of beauty in life, then there is no room for despondency.
Get busy living or get busy dying...
Take care of your health or take care of your illness...
Deal with fear or deal with courage
Engage in despondency, or engage in the creation of something new
We ourselves choose what to do... So let's choose to create something new and useful...
Because when we create something, we create ourselves. The best version of ourselves.
Forward. You just need to start... then continue... and then finish. It's simple.
If I weren't a girl... I would build this myself. But all I can do is inspire the boys. Therefore, it’s up to you to build))), dear boys.
Good luck with your dacha construction.
Olga Klishevskaya, especially for the site
If did you like this article
And you want to thank the free author for this painstaking work,
then you can send any amount convenient for you
on his personal YaD wallet - 410012568032614
More articles-lessons on the topic
I also have a series of articles on the construction of wooden dacha gazebos - if you made a canopy with your own hands, then it will not be difficult for you to make a cozy gazebo for your dacha using the same principle.
Detailed articles-tutorials on gazebos are already ready and waiting for your love for timber and screwdrivers.
— gazebos with a flat roof.
— cubic arbors.

Planning the arrangement of the courtyard space of a private house often involves making a canopy. This relatively simple and reliable design can be used to protect the car from rain, snow or direct sunlight. Places for outdoor recreation are arranged under it. How to make a canopy in the courtyard of a private house with your own hands at minimal cost?
Choosing a canopy design
At the first stage, you need to choose the right place for the future structure. To do this, the total area of the canopy, its height and configuration are calculated. It should not reduce the natural lighting of rooms in a private house; there must be no direct contact with power lines. The next stage is the choice of design.

The main difference between the models is the roof configuration. According to this parameter, canopies are conditionally divided into the following groups:
- Single-pitch. The easiest option for self-production. It is important to correctly calculate the angle of inclination of the roof and choose the appropriate material for its arrangement. Disadvantage – insufficient degree of protection in case of side winds during rain or snow. Such canopies are most often made close to the house to reduce the influence of this factor.
- Gable. They have all the advantages of a similar roof for a house - uniform load on the snow cap, protection from slanting rain. The complexity of the arrangement lies in the formation of the ridge part and the calculation of the angle of inclination of the slopes.
- Arched. They have the best aesthetic and performance properties. They are used as roofing material. Difficulties arise during the manufacture of the frame - the arched parts must be identical to avoid refractions of the polycarbonate and ensure its tight pressing.
The choice depends on the availability of materials, the possibility of purchasing them, tools and experience in the construction of such structures. Most often they stop at a simple lean-to canopy.
Manufacturing materials
The future design is subject to special requirements - it must be reliable, not subject to change over a long period of time, and resistant to moisture and temperature changes. In addition to the configuration, these parameters are affected by the material of manufacture.

The main elements of a canopy for the yard of a private house:
- Support posts. They must withstand the weight of the roof, and the snow load is additionally taken into account.
- Roofing material fixation system. Most often, a lattice base is made on which the roofing material is installed. If it is polycarbonate, the distance between the fasteners is as large as possible to ensure illumination of the enclosed area.
- Roofing material. You can use any suitable material, from ordinary roofing felt to cellular polycarbonate. It is important to follow the installation technology and provide waterproof protection.

Each of these elements needs to be considered in more detail.
Frame
To save space and reliability, it is recommended to choose round or square pipes as the material for making racks. They are relatively easy to process; after installation, a protective coating of a layer of paint is applied. The connection of elements is done using welding. The mechanical assembly is not reliable enough.

The supporting racks must be made of square pipes with a minimum size of 100 * 100 mm. The support for the roof deck is made from scraps of a smaller section - 50 * 50 mm. The amount of material depends on the size of the canopy and its height.
An alternative to steel pipes is a frame made of wooden blocks and boards. It is less reliable than metal; wood dries out and changes shape under the influence of moisture and temperature.

It is used if consumables are available, in order to create an architectural ensemble that is unified with the house. Before assembly, the elements must be treated with moisture-proof and antifungal agents.
Roof
The use of traditional roofing material will provide protection from moisture and a long service life of the coating. Additionally, you need to take into account the rules of arrangement. Some will require a solid base, which will increase the labor intensity of the work.

Materials used for canopy roofing:
- Polycarbonate. The best choice in terms of quality, installation complexity and reliability. The low specific gravity and windage are compensated by the increased frequency of fastening. ABOUT .
- Sheet slate. An economical option, but it is heavy, so be sure to use a waterproof film.
- Bitumen roofing. It is laid on a solid base and is light in weight. Disadvantage: to ensure tightness, the seams undergo heat treatment, which requires standing on the roof. This is impossible if the structure is not designed to support the weight of an adult.
- Profiled sheeting. Its properties are similar to slate, but it is characterized by low weight and ease of installation.
After selecting all consumables, you can begin construction.
Canopy in the courtyard of a house: step-by-step manufacturing instructions
First you need to prepare the site. It is leveled and filled with concrete. An alternative is laying paving slabs. An option with less labor costs is to arrange a foundation only for support columns. A prerequisite is a flat surface for attaching the racks.

Then you need to do the following.
- Install support columns and secure them. Use a level and plumb to check the correct position.
- Temporary stiffeners can be used to secure the supports.
- Installation of the base for the roof, fastening it to the supporting structure.
- Installation of roofing material.
- Checking the reliability of the canopy.
If profile pipes were used as the manufacturing material, after assembly they need to be primed and painted.