- What is a holiday? - they ask you one day.
And you immediately answer with a smile:
- This is when everyone is happy, says nice wishes, gives gifts...
And in response to you:
- So, if you give someone a gift today and wish them something wonderful, it will be a holiday?
And it’s true... And you can even give a handful of sweets. The main thing is how to do it. Perhaps we should start with unusual packaging. A DIY paper box is a great idea for an original gift or surprise.
Even a purely symbolic gift will be worthy of admiration if you present it in its own packaging.
Materials and tools
So, what may be needed when making all kinds of boxes.
- Paper.
It is best to take paper for scrapbooking - it is good because it can be double-sided, with a different pattern on each side. Thick designer paper, colored paper for pastels, cardboard (density 200-300 g/m2), a simple sheet of whatman paper or watercolor paper, which you can paint or tint yourself, are also suitable.
You can also use “yellow” note paper (or an envelope made from it), wrapping paper... and any other that you can use for decoration. - Corrugated cardboard
- Napkins (preferably thicker)
- Ribbons, ribbons, laces
- Beads, buttons
- Ready-made labels
- Scissors, stationery knife
- Double-sided tape, glue stick
- Superglue or “Moment” universal glue (transparent gel) for attaching beads and other things
- Ruler, pencil
- Compass
- Hole puncher
- Nail file (for creasing)
Useful advice. Before you directly take on the paper that will make up your box, try assembling it from plain paper. You will understand where to cut, how to make folds more conveniently, how to assemble the box. Plus, you can estimate what size box you need. Often the first pancake is lumpy - so let this lumpy be made of simple cheap paper.
Decor. As for the elements for decoration, you don’t have to limit yourself here: make flowers from fabric and paper, combine ribbons and raffia, lace, whatever you can think of. The main rule is not to overdo it.
And now about the boxes themselves. There are a huge number of options, models and schemes for their manufacture. We offer you the most popular ones - from classic round and square boxes at the base to unusual bonbonnieres. But first things first.
Square box
You can give anything in it. From candies and cookies to handmade soaps and jewelry. Naturally, each gift must have an appropriate box decor.
In this case, the packaging is stylized as a postal parcel. This gives it a special romanticism, because the services of traditional mail for sending letters and gifts are used less and less today.
If you use colored paper with a pattern, the box will have a completely different mood. Choose yours!
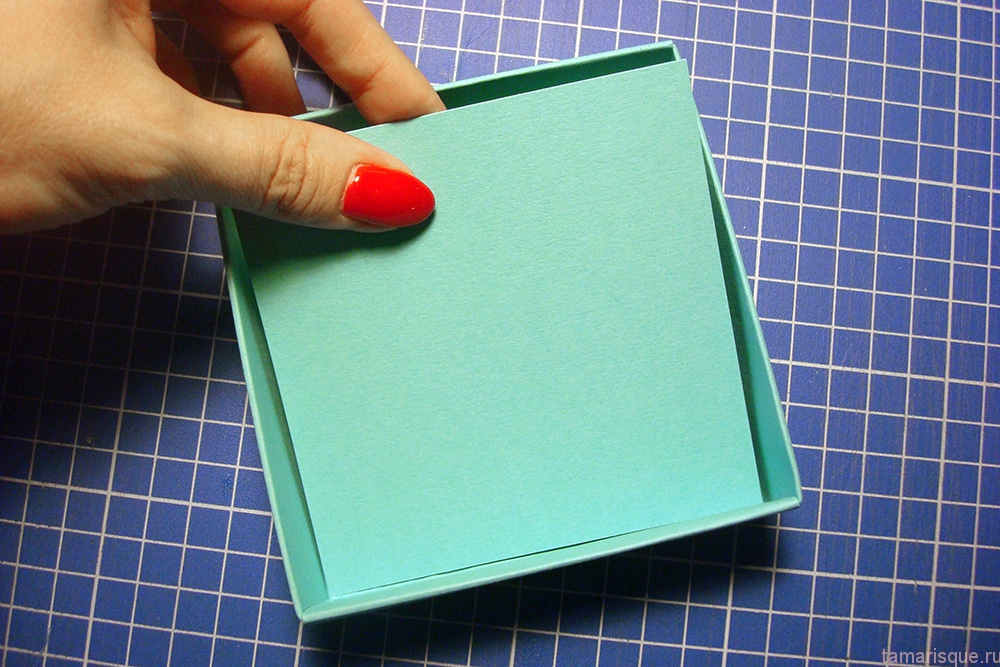
You can create such a beautiful paper box in just a few minutes
This is one of the possible options for making a square box. It will be made from a single sheet, without a separate lid. Let's begin.

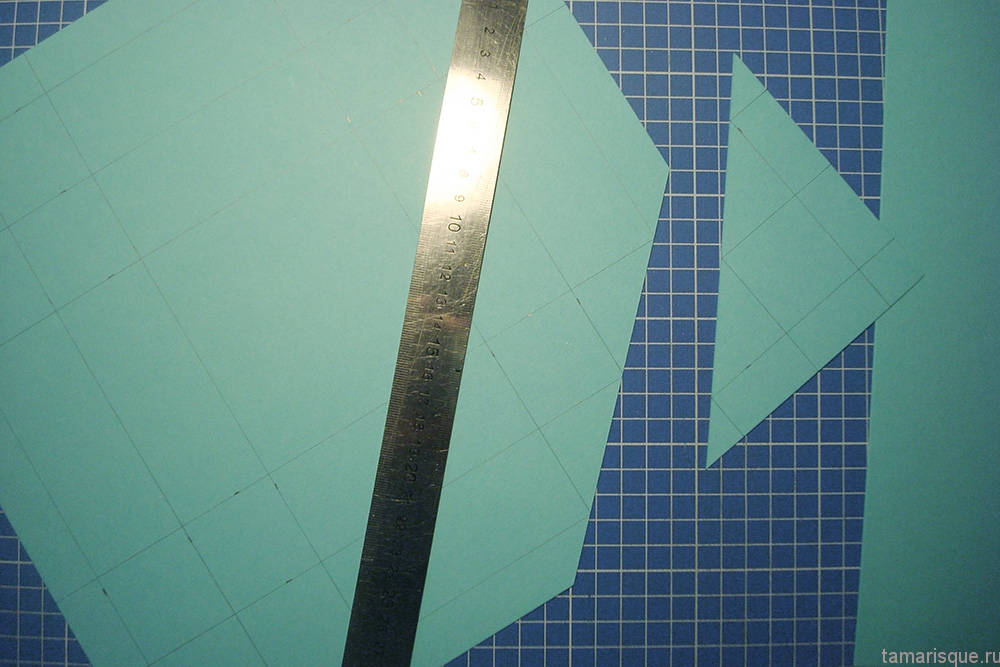
Redraw the diagram of the box onto paper. We think about the right size in advance. Cut it out.

Carefully bend the workpiece along the dotted lines that are drawn in the diagram.
If the paper is thick enough, you can crease it first to make bending easier. To do this, attach a ruler to the fold lines and run a nail file (the tip of a compass, the tip of scissors) along them. There should be a groove - a depression along the line. Now all the folds will be clear.

We glue strips of double-sided tape as shown in the figure. Instead of tape, you can use a glue stick, but tape is still more reliable and more convenient.

We decorate the walls of the box from the outside while the box itself is still disassembled. And then we glue it together. All that’s left is to insert the gift and bandage the packaging!
With round base
The box of this model is more suitable for gifts for women. Although everything again depends on the gift and decor. In it you can present both beads and a tie (if you twist it with a snail), as well as a scented candle, a New Year's ball or even a cupcake!
Such a DIY paper box can later serve as an excellent box for small items (buttons, beads, etc.). 
So let's get started.

Select the desired radius of the circle at the base. Using a compass, draw 4 such circles on thick paper and 2 on corrugated cardboard.
We measure out 3 strips on paper. Their length will be equal to the circumference of our circles (yes, we’ll have to remember our favorite formula 2πR). The widest strip will be the height of the box, another will be 1 cm narrower, and the third strip will be the narrowest - for the height of the future lid.
It’s difficult - only while you’re reading this, you should start doing it - and everything will become simple and understandable! 

We cover the corrugated cardboard circles with paper. We have the bottom and base of the lid.

Glue the first and second strips together as shown in the figure (the vertical shift is approximately the thickness of the bottom of the box, the horizontal shift is 1 cm). The front side of the paper should be facing out. We decorate the future wall of the box.

We cover the bottom of the box with a double strip of paper in a circle. Then we paste the remaining narrowest strip around the base of the lid.
The box is ready! We place the gift inside and close it with a decorated lid.
You don’t have to decorate the lid separately, but tie the entire box with ribbon. For example, like this: 
Elegant boxes and not a drop of glue!
Is it possible to make a paper box with your own hands quickly and without any glue? Voila! There are more examples of such packaging than you can imagine.
Everything is made from one sheet of paper. The main thing is to carefully cut the workpiece and bend it correctly. At first glance, the diagrams of some boxes are complicated, but in reality everything is much simpler. Each subsequent box will become easier to assemble. We recommend that you practice on plain paper first!
When working with thick paper, creasing will again be of great help. Let's try!
1. Strict box – male version.
Although if you make it larger, from paper with a delicate print and decorate it with a flower, it will be just right for giving women’s lingerie. 

Ideal for sweets and anything fluffy and airy.
In order to thread a ribbon or lace, make holes in the workpiece in advance with a hole punch. 
Suitable, for example, for loose aromatic tea. Or for some bottles, candlesticks. 
It looks very laconic, perfect for a men's gift. 

And with brighter decor, it would be a good option for a gift for a woman.


Here is the same case, but a slightly different configuration. This option can be opened and closed thanks to a unique clasp.
Cute bonbonnieres
Bonbonnieres are a special type of boxes. Bonbon in French means candy, and the name of the boxes comes from the word “candy bowl”. It is the bonbonnieres with candies or sweet dragees that the newlyweds give to their guests at the wedding - in response to congratulations.
Ordering a bonbonniere to be made for each guest is not a cheap pleasure. But it won’t be difficult for the bride and her bridesmaids to make bonbonnieres in the style and tone of the wedding.
1. One of the simplest options

2. Elegant.
They resemble a box or a small chest.
Just a little more difficult than the first ones. We make slits in them with a stationery knife, holes, if we want to pull in a ribbon or lace, with a hole punch. 

3. Unusual and tasty.
As a rule, bonbonnieres are located on a special separate table and often on a dish or tray. You can beautifully play with this situation and make bonbonnieres in the form of pieces of cake. And you need to place them together, as if it were a paper cake. 
First, we draw a large circle (the plane of the cake) and divide it into sectors in order to know the parameters of our pieces.
Then, according to the dimensions, we draw a diagram of the development of the piece. We make the required number of developments, cut them out and glue them together. You can decorate before gluing, or after - it all depends on the idea of your decor. 
Today I’ll tell you how you can make a beautiful gift box with your own hands.
There are quite a few master classes on this topic on the Internet, but I don’t think I’ve ever seen my version, but it’s very convenient and the box is thick even from thin paper.
To work you will need:
3 sheets of cardstock measuring 30x30 cm each,
1.5 meters of tape of the desired color and width,
Double-sided tape,
Glue Moment Crystal or Joiner,
Scissors,
Paper cutting knife,
Creasing stick, if available - scoring board,
Ruler,
Pencil.
Working hours:
When your hand is “stuffed”, it takes about 30 minutes FROM and TO the box. But if you don’t have certain skills, making a box can take several hours.
Paper selection:
To make such a box, I recommend choosing cardstock with a density of 200 to 270 g/m2 - this is the optimal density at which it will be comfortable to work with paper. Thicker paper may break and be too rigid and clumsy, while paper that is too thin will not be able to provide the required density to the box.
Description of work:
1. Determine the size
Before starting work, you need to decide on the size of the box - it is important to know its length, width and height. After this, the paper size is calculated.
For the bottom of the box, the paper size should be as follows:
2 cm + box height + box height + length + height + height + 2 cm = length of a sheet of paper
2 cm + box height + box height + width + height + height + 2 cm = width of a sheet of paper
For the top of the box, the paper size should be as follows:
2 cm + (box height - 1 cm) + (box height - 1 cm) + (length + 0.5 cm) + (box height - 1 cm) + (box height - 1 cm) + 2 cm = length of a sheet of paper
2 cm + (box height - 1 cm) + (box height - 1 cm) + (width + 0.5 cm) + (box height - 1 cm) + (box height - 1 cm) + 2 cm = width of a sheet of paper
If the box is square, then measuring one side is enough.
For my box, I chose a size of 10x10 cm with a height of 4 cm. A sheet of cardstock measuring 30x30 cm would suit me.
2. Making the bottom part
We take a beautiful turquoise cardstock and line it according to the diagram and our calculations:


It turns out this is the preparation


This is what the workpiece will look like after the cuts. I make the cuts “by eye”, cutting out very small pieces, only so that later I can “plant” the sides correctly.

And this is a workpiece already with bigs (the reverse side is shown for clarity). Bigs can be made with a scoring stick. If you have a scoring board - just great, the folds will be perfect and the paper will not break.

The next step is to fold the sides. We bend according to the pattern, first inward 1 and 2, then bend outward 3.


You should end up with something like an accordion on each side:

The “extra” valve tails need to be bent as in the photo - inward.

The description is quite complex and may seem confusing, but it is better to try to make a blank using the diagrams and photos - you will immediately see where the cuts and folds should be.
As a result, you should get something like this:


Now we apply a little glue to the short sides, hide the valves inside and, as it were, “cover” the top with the glued part. We press the side panel tightly on both sides and wait a little for the glue to set.

The bottom part of the box should look like this.

There is just a little bit left - you need to cut and glue the bottom. We make the size of the bottom 3 mm smaller on each side than the size of the bottom of the box base. For example, if we calculated the base to be 10x10 cm, then we cut out the bottom measuring 9.7x9.7 cm.

Apply glue to the bottom of the box inside and carefully place the cut out bottom on top. Press with your fingers - the bottom of the box is ready!

3. Making the top part
We do the upper part similarly to the lower one, only the calculations will be slightly different.
For the top of my box the paper size should be like this:

Please note that the height of the top of the box has decreased by 1 cm, and the length and width have increased by 0.5 cm. Half a centimeter is the necessary margin for a comfortable fit of the lid, and the shortened height is for convenient opening of the box.
We make markings on a sheet of 30x30 cm:

After marking, we cut off all excess (marked in red in the photo):


We cut out the bottom, 3 mm smaller than the bottom of the base, in our case it is 10.2x10.2 cm. But we don’t glue it right away, we can only try it on for now.
Now you need to prepare the tapes. Cut 1 ribbon 30 cm long, 2 ribbons approximately 50-60 cm long each. The ribbons must be carefully ironed to ensure they look perfect.

We glue small pieces of double-sided tape to 4 sides of the inside of the lid to secure the tapes.


Carefully glue the edge of the tape first to the bottom of the lid, then to the side.

We wrap the tape around the outer part of the lid and also glue it on the other side inside:

In this case, it is important to monitor the direction of the tape so that there are no distortions, and you also need to ensure its uniform tension so that the tape does not dangle.
Now we glue two pieces of tape on the free sides of the lid. Glue only one end of each segment, leaving the other end free.

Carefully apply glue to the bottom and edges of the ribbons. I deliberately do not apply the glue too close to the sides, so that when gluing the bottom it does not crawl out.

Carefully glue the bottom.

The lid of the box is almost ready, all that remains is to tie a beautiful bow:

The excess length of the ribbon on the bow needs to be cut off, the edges can be processed with a lighter - an almost imperceptible scar will form and the ribbon will not crumble.

All! The box is ready and you can pack the gift!


Probably, many will agree that not only children, but also adults love to receive gifts, and if it is hidden in an original box, then this will leave an unforgettable surprise experience. And we are sure that the time spent creating it will pass quickly and unnoticed, because the result will definitely please you. Here you can find the most original and interesting ideas on how to make a paper box with your own hands with a lid. The step-by-step instructions will help you complete it without much difficulty in a matter of minutes.
Important! Before you start creating a gift box, we advise you to practice on simpler paper, because then you will be able to take into account all the errors and inaccuracies that may arise.
Choosing material
So, how to make a beautiful gift box with your own hands? To do this you need the following materials:
- Corrugated cardboard;
- Laces, ribbons, ribbons;
- Buttons, beads;
- Ready-made labels;
- Scissors, stationery knife;
- Double-sided tape, glue stick;
- Super glue or “Moment” universal glue (transparent gel) for attaching beads and other things;
- Pencil, ruler;
- Hole puncher;
- Compass.
Now there are many ideas for creating original gift boxes; we have selected the most interesting and affordable options for you.
Box with round base:
- You need to cut out 4 circles: using a compass, we draw circles (you choose the diameter yourself) from thick packaging cardboard, or from porous cardboard. Two large mugs and two small ones.
- From tinted cardboard or any other that you have, we cut out two strips so that they match the size of the circles, with a margin for overlap, one of them is wide, the second is narrow.
- Glue together two large circles using Moment glue or double-sided tape. Afterwards, we glue the remaining two circles separately.
- We need small circles for the base of the box. We apply transparent “Moment” glue to the sides of the circle, gluing a strip of cardboard; for reliability, you can also glue another strip on top of this.
- We do the same with the lid for the box: we glue a narrow cardboard strip along the edges of the large circle.
Important! To make your box look more festive, you can create a beautiful bow from colored or printed ribbon. To do this, you need to cut the ribbon in half, glue its ends to the inside of the lid, and tie the remaining long ends into a bow on top.
Classic gift box
And for lovers of the classics there is this option: a small box for a small gift. We will need the following materials:
- Ruler;
- Scissors;
- Thick colored paper or cardboard (soft).
Let's look at the whole process step by step on how to make such a paper box with your own hands. For the blanks you need two squares - large and small. The difference in size is 1 cm, for example 15:15 and 14:14. Let's format them:
- We select the lines of the squares diagonally, then bend the corners to the center.
- Next, the corners bent towards the center need to be folded to the opposite fold line, and then to the nearest fold line. A square should form in the center, which will subsequently become our future bottom.
- After this, on both sides of the formed diagonals, along the first deflections, we cut to the designated square in the center.
- The edges that we cut are folded along the curves, so we get the walls of the box.
- We bend the sharp ends of the walls inward, towards the center of the square.
- Using the remaining uncurled paper tongues, we grab the curved ends, thereby wrapping them inward.
We have a box-lid. 
We perform the same manipulations with the second square, and due to the fact that this square differed in size by one centimeter, the box comes out smaller and will fit freely under the previously made lid.
To secure the gift inside, place a napkin or light crumpled paper on the bottom. As you may have noticed, making a gift box with your own hands is quite simple. The colored braid with which we will tie our box will help to add originality and an interesting accent.
Box with a secret
And now we invite you to make small gift boxes with a surprise. The so-called fake box: when the lid is removed, it swings open. You can see how to make a lid in the second option described above.
So, let's start making a gift box with a secret.
Materials for work
For this we need:
- Scissors, glue, thick paper;
- Old cards, beads, ribbon;
- Decorations, decorative ribbons.
Important! If you decide to make the bottom 18x18 cm, then for the lid you need 1 cm more, that is, 19x19 cm.
Step-by-step master class:
- The box itself is made in this way: we divide the sheet into nine equal squares; we don’t need the corner ones, they need to be cut out. We bend the remaining squares inward, forming a box.
- We decorate the inside as your imagination desires (with pleasant wishes or poems), glue beads, rhinestones, buttons, drawings from postcards, a small bouquet.
Important! Don’t go overboard with the decor so that the gift remains the main focus of your surprise.
- Now you can put the gift in the middle, put the walls of the box together and cover it with a lid, you can also tie it with ribbon.
Felt box
Felt is a miracle material from which you can create not only handbags, jewelry, toys, but also beautiful gift packaging.
Materials
To create it we will need:
- Colored felt - its density varies, depending on the thickness of the sheet, choose the most convenient and flexible one so that it is convenient to sew;
- Threads with a needle;
- Ruler;
- Glue (super or hot glue),
- Scissors;
Master class step by step:
- Draw the canvas with a pencil to leave fewer marks and not stain the fabric, into 9 squares. You can also use rectangles, cut out the corners.
- Decorate the outside with colored appliques; if desired, you can embroider simple patterns, decorate with beads or seed beads.
- Carefully bend the walls and sew them together. Seams with contrasting threads will give a more interesting and unusual look. In general, there are no restrictions, so you can experiment freely.
Important! Felt boxes can later also serve as a box for various small items or decorations. It is also possible to use them during competitions for children and all kinds of holidays.
Beautiful box in the shape of a flower
If you need a minimum of costs and time spent, then there is an option for you: a simple box without glue:
- We print it out or you can redraw the template on colored paper.
- We cut out the workpiece, create folds along the lines, and use a ruler.
- If your paper is white, then turn the workpiece over to the front side and tint it over the entire surface or just the edges using a sponge and a stamping pad (you can also use pastels or watercolors).
- We hide our present in the middle, and we can collect the “petals” from above.
Box with a heart
For special occasions, we can make such a delicate and romantic paper box with our own hands.
Materials
For this you need to take:

Making a box out of paper - master class step by step:
- Print and cut out the template, follow the indicated lines with a blunt knife or scissors to make neat grooves in the right places.
- Transfer the heart template to the lid part and cut it out with a stationery knife.
- We make folds along the lines and fold the box, then fix it with glue.
- From the wrong side, carefully close the window with film.
- We decorate the lid with flowers made of paper or fabric, stripes with beads.
- We do the bottom the same way.
- At the end of the work we supplement the composition with ribbon.
Cardboard gift packaging
To make cardboard gift packaging we need:
- Sheet of cardboard;
- Scissors or compass;
- Scheme;
- Double-sided tape or glue.
Let's get started:
- We cut out a rectangular box template from a single sheet, as shown in the diagram.
- We draw along the fold lines with scissors or the tip of a compass to fold the sides of the box evenly.
- Afterwards we glue it with pieces of double-sided tape as shown in the picture.
- We decorate with color pictures or inscriptions - it depends on the event for which you are preparing.
Cardboard carrots
It sounds intriguing - it will be a wonderful and unexpected surprise where you can hide a small gift, for example, decoration, sweets, small toys.
Important! If you are thinking about what to put in such packaging, here are some ideas:
- A friend or sister can pack nail polish and lipstick in this way.
- You can put a bracelet, earrings or a chain in a “carrot” for your spouse or girlfriend.
- Gifts such as cufflinks, tie clips or money clips are suitable for a father or brother.
Materials for work:
- Orange thick paper;
- Green dense threads;
- Scissors;
- Transparent moment;
- Green fabric (felt will do);
- Box template;
- Hole puncher.
Progress
So, the stages of creating a carrot box:
- Print the template on orange thick paper.
- We cut out the blank. We fold our product along the dotted lines.
- We assemble and glue the workpiece. Use a hole punch to create a hole in the upper parts of the workpiece.
- We cut out leaves from green fabric, tying green strings to them. Five of these leaves will be enough.
- We tie the leaves to the holes that we previously cut with a hole punch.
Important! On green paper or a ready-made cardboard tag, you can create an additional leaf on which you can leave a congratulatory inscription.
Video material
To make such a simple paper box, you don't need any glue or scissors. Just a piece of paper and your skill. The paper can be either thin or thick, square or rectangular. If you want to make a large box, take a large sheet of A3, A2 or A1. If the paper is too thin, fold it in half or even 4 times.
How to make a simple paper box using the origami technique:
 1. A sheet of paper must be visually divided into 3 parts. It is desirable that all 3 parts are the same. Bend the paper as shown in the picture.

 2. Bend the side parts in half, left and right.
We obtain such a part as shown in Fig. 4.


 5. Bend the corners. Please note that on one side the corner should be made of double paper, on the other side it should be made of single paper.
You should get 8 bent corners. 4 on one side and 4 corners on the other side. The process is shown in detail in Figures 5, 6, 7, 8, 9.
 10. Straighten the resulting part symmetrically relative to the center.
 12. We look into the resulting pocket and straighten it into a box shape. This is the most important stage in the work.
 13. We make folds with our hands in all corners of the box to give rigidity to the structure.

14. This is what a finished simple origami box looks like. A4 box size: 10 cm x 10.5 cm.
Depending on the original paper size, the boxes may be larger or smaller. They can also be narrow or wide. The narrower and longer the sheet of paper, the narrower the box will be. Now you know how to make a paper box with your own hands in just 5 minutes.
Having learned how to make boxes, you can move on to boxes made of thick paper and even thin cardboard. The finished box can be painted with gouache or covered with multi-colored paper. From the boxes you can make boxes for children’s “jewels”, cribs for small dolls, original vases for cookies, store buttons, or change from pockets..
If you are busy sewing, cutting paper, and you need a temporary trash can, you can very quickly, whip up, create a trash container from a sheet of paper.
The boxes can be used as disposable tableware at a picnic, in the car, they can be made from literally anything you can get your hands on, even newspaper or napkins.
When you need to give something small, it is always very difficult to decide on packaging. The item does not fit into the bag and may become damaged or wrinkled. A paper box is best suited for such gifts. You can do it yourself.
How to make a box out of paper - what you need
To make your own paper box, prepare:
- a sheet of double-sided paper (with a pattern), cardboard, designer paper - one to choose from;
- decor: beads, ribbons, buttons;
- sharp knife;
- scissors;
- glue;
- tape on 2 sticky sides;
- ruler;
- pencil.
How to make a box out of paper
In order not to spoil a sheet of beautiful multi-colored paper, try making the same box only from a regular sheet of white paper or a sheet of cardboard to understand the principle. At the same time, you will also understand the size of the box; the patterns may have to be enlarged.
We suggest making a regular square box out of paper. You can put candy in it, soap you made yourself, handmade jewelry, hair clips and ties, cookies, etc.
How to make a paper box:
- transfer the drawing to a sheet of plain paper and cut it along the line;


- If the size suits you, then apply the pattern to a sheet of paper, outline it along the edge with a pencil, and cut it out along the intended contour with scissors. The lines should be straight. We take the workpiece and bend it along the dotted line. If your paper is thick, then you need to use a file or any sharp object to walk along the fold line to make an indentation. This way you will see clear folds and know where to bend the workpiece. Glue 2 strips of double-sided tape;


- We assemble the box and glue it together. We decorate the top with decorative elements.


How to make a case box
This box option is also suitable for packing a small gift. It is easy to do; you will need a minimum of tools and materials - a sheet of paper, a ruler and scissors.
How to make a case box:
- Make a pattern from a regular sheet of cardboard or a thick sheet of white paper;
- attach the blank to a sheet of paper, outline the contours with a simple pencil;
- cut along the contour;
- bend the paper along the fold line;
- collect the box.

How to make a paper bonbonniere
A great idea is to make a cake from separate paper boxes, and inside each box you can put a treat for guests.
The decor of each box can be done both before assembling the blank and after. It all depends on the idea.


How to make a box with a heart
What's so good about this paper box? It is beautiful, can be done in just a few minutes, and the result exceeds all expectations, because the gift is presented in an individual and unusual box. For a gift to your beloved girl, you can make a beautiful paper box with hearts.
Boxes with hearts 2 options:
- the first option is to cut a blank out of paper along the contour and bend it along the fold line;


- the second version of the box is simpler, made in the same way;

