Based on the results of many experiments, it is clear that making unique and non-standard souvenirs with your own hands is a very exciting and interesting job. It promotes the development of flexible thinking, creative taste and aesthetic imagination.
Even small children can take part in such a cognitive process, because making crafts from improvised materials with their own hands takes a long time even for those who are not assiduous and not very obedient.

For production, any materials of natural and artificial origin are used. After all, available raw materials are always available and do not require any waste.

And masterpieces that are made from unnecessary or unsuitable materials are fully competitive with store-bought analogues, since they have no analogues. Such products will organically fit into any interior, which will add exquisite originality to it.

What crafts can be made from improvised materials?
- a variety of photo frames;
- coasters for hot cups;
- many different toys;
- decorations for every taste and color;
- key holders;
- original souvenirs using quilling technique;
- various candlesticks;
- skillful crafts for flower beds and garden plots;
- designer suits and dresses for matinees;
- design of a playground for children;
- graceful decorative flowers;
- interesting decorations;
- and many other various design masterpieces.


To make it easier to make souvenirs with your own hands, photos of crafts from improvised materials that can be found on the World Wide Web will help with this. There is no need to copy, you just need to understand the technique and do something of your own.

Using the same principle that postcards are made, it is possible to make a bright panel from paper and cardboard. But in this case, to make the souvenir look complete, you also need to think about a frame that can be made from various materials.

Instructions for crafts using improvised materials
Let's take a closer look at the example of crafts made from plastic bags - a kite, which kids love so much. For manufacturing, you need to prepare:
- 2 polyethylene bags;
- 2 skewers;
- scotch;
- black marker;
- scissors;
- fishing line, which can be seen with strong threads.

The process of creating a masterpiece:
Straighten the bag and place skewers on it, as if in a cross, but the longitudinal one should be a third higher, from the middle. Now, using a marker, you need to draw lines that connect the ends of the skewers.

Then, it is advisable to cut out the resulting figure. The skewers are glued to the bag with tape.

From the second plastic bag, you need to cut a piece, 4-5 cm wide, of any length - for the tail of the snake. It is possible to make a tail from several short pieces of bags, first combining them with tape. After this, you should tie the tail to the lower half of the flying kite.


At the end, you need to make a hole in the place where the skewers intersect, and securely tie the fishing line there. Ready!

Step-by-step making of crafts for beginners
To make a craft - a goose made from Kinder eggs, you will need:
- yellow eggs from kinders;
- buttons: 1 for the nose, 1 for the tail and 2 for the eyes;
- ribbon;
- awl;
- elastic thread;
- glue.

The process of creating a masterpiece:
Using a preheated awl, all the eggs are pierced, one opposite hole at a time.

Then the elastic is threaded from the ponytail to the head. Next, you need to put on the nose button and thread the elastic in the opposite direction, through the other hole.

Since both ends of the thread appear in the tail, it is advisable to secure them using a button. Now you need to glue in the eyes and strengthen the button on the tail of the caterpillars. In this way it is possible to produce a whole family of similar caterpillars.


Master classes on crafts from improvised materials
For a cardboard Christmas tree you need to prepare:
- cardboard;
- glue;
- scotch;
- paints, markers, pencils;
- scissors;
- glitter, stickers, or something else - for decorations.

The process of creating a masterpiece:
The cardboard must be folded in half and cut where it bends. The halves that came out are folded in half again.


On one piece, on the opposite side of the fold, half of the Christmas tree is drawn.

The sheets are folded together and cut along the drawn line; This is how you get two identical Christmas trees. Then you need to secretly mark the centers of both Christmas trees.

On one Christmas tree, an incision is made from the top to the middle along the midline, and on the second, from bottom to middle. Now, it is advisable to insert the Christmas trees into the cuts, and you get one lush Christmas tree.


To make the Christmas tree more stable, tape is used to glue both halves together.

Pencils, felt-tip pens, glitter, paints, etc. are used to decorate the Christmas tree. At this stage, everything that only the imagination suggests is done.


Conclusion
Every parent who loves their child sooner or later thinks that it is useful for the child to do at least something with his own little hands.

After all, gadgets take up more and more space in children’s lives, while real, exciting activities are of much higher value. That’s why making crafts from scrap materials will be an ideal activity for kids and adults.

Photos of crafts from improvised means


How can you make crafts from scrap materials for your garden with your own hands? Yes, very different. Undoubtedly, each of us, if we look hard enough, will find a lot of things that we don’t use and should have thrown out long ago. But think about the fact that these things can become useful in everyday life, and perhaps they should be given a “second life.”
Do-it-yourself crafts for a dacha using scrap materials Many unnecessary things can be transformed and used as decor or furniture in a dacha or country house. Let's now try to find out what crafts can be made from old things and how to use them.


Before we proceed directly to making our crafts, think about what advantages they have.  Idea for a garden craft made from old shoes

Video: country crafts from scrap materials
To begin with, I suggest you watch the video - what kind of crafts can be made from certain available materials.
DIY crafts from scrap items
As you can see, there are quite a lot of good qualities that will bring not only benefits, but also pleasure. Therefore, let’s move directly to practice and try to find out what you can come up with for your dacha using scrap materials.
Read also: alterations for a summer house from old and unnecessary things.
Crafts from bottles for the garden
Agree that there is always a lot of this goodness, but not everyone knows how to reuse it. The material is popular and practical, so it can be used in different ways.  Crafts from bottles: funny minions in the country
Here are some ideas on what crafts you can make from bottles:


More ideas for crafts made from plastic bottles: cottage decor, birds and animals, greenhouses and greenhouses.
Considering that the material is quite practical, it has a number of advantages that are important to consider:
- Since the bottles are mostly made of thin plastic, it will be easy to cut with regular scissors.
- You can use any parts, from the bottom to the regular lid.
- The parts are connected in various ways. You can use glue, wire, fishing line, thread.
And here is one idea for you: what kind of crafts can be made from bottles to decorate your dacha.
Flowerbed "pig" from a bottle
By the way, this is also an interesting use of an ordinary old bottle. In this case, it is a piglet. But in fact, the bottle can become anyone!
 Flowerbed "pig" from a plastic bottle
We will plant flowers or their seeds there. An interesting fact is that our flower garden is mobile and can migrate from any place in the country house or garden.
Wood crafts for the garden
No less creative crafts can be made from ordinary wood. This is a handy material that can be found at any dacha. The first thing that comes to mind is the design of the table and benches. Note that they don't have to be classic. Furniture crafts made from stumps or logs of wood can look quite interesting.  Crafts made from wood Some of the elementary but very useful crafts that can be made from wood include:
- Birdhouse.
- Swing.
- Box for storing materials.
- Fence.
- Candlestick or flashlight.


It is clear that there are a lot of ideas for crafts from scrap materials for the garden, the main thing is to start and do it!
Read also: garden furniture made from driftwood and branches and crafts from twigs and branches.
Crafts from tires for the garden
Recently, it has become very popular to make various crafts from old tires.
 Crafts from tires and other scrap materials for the garden
In first place among the things that are made from tires:
- Ottomans.
- Benches.
- Tables.
- Decoration for the garden or beds.
- Swing.
- Sandboxes for children and much more.


Basically, they are still used to decorate the design of our dacha, so try to find old tires and make something interesting by following the master classes that you will find below. And also do not forget to use other available materials for country crafts, combining them with each other - in this case you can create real masterpieces.
More ideas: crafts from tires and car tires for the garden.
DIY master class “Parrot made from tires”
Agree, it is unlikely that motley colorful parrots will be able to leave anyone without attention and will definitely cheer you up for the whole day!
 DIY parrot made from tires
Progress:
- First you need to make a cut on both sides of the tire, leaving a very small strip of the inner circumference. As a result, you should get a small radius of the tire, and divide the large radius in half.
- Next you need to make a cut along a small radius on both sides, after which the tire will become the desired shape and you can continue decorative work with it.
- Along the edges of our cut we need to make the tail and head of the future parrot. To do this, you need to unravel the tire so that several strips come out, and sharpen them at the end - this will be our tail. We make the parrot's head approximately according to the shape that our imagination draws.
- The finishing line will be painting the parrot in different colors. Usually green and yellow or red and blue shades are used. But these are classic options, and your parrot can transform into any color of the rainbow.
Master class “frog princess” made from tires
We already have a colored parrot that can be hung on a tree so that it will please the eye. Now let’s try to decorate not only the “air space”, but also the “earth space”.
 DIY frog made from tires
Having a few old tires, we can create a beautiful image of a frog sitting or looking out from the lawn.
The work process will not take much time. All you need is a couple of extra hours and a can of green paint.
Progress:

DIY tire flowerbed
Another popular idea is a flower bed made from tires. It’s easy to do, you just need to dig a small hole in which we place our tires. It is better to first paint them in a single color, or make interesting sketches. We plant several flowers in the middle, and do not forget to water them on time. Our flower garden is ready and will delight us for a long time. We also use other available materials, such as wood or bottles, to decorate this flower bed.
 DIY tire flower bed
Garden figurines from scrap materials
Well, here you can have a blast, because there are no limits to your imagination. You can make entire sketches on the theme of your favorite animals or cartoon characters.
To implement the idea we will need one of the materials. It could be plaster, foam, clay, or something like that. We choose our favorite animal and begin to sculpt it from the material. When the character is ready, you can paint it and secure it with clear varnish.


Such figures actually cost very well in specialized stores. And this way we will not only save money, but also get real pleasure from work. The work may seem quite complicated, but when you take on it, believe that everything is far from what it seems at first glance.
Photos of crafts from scrap materials for the garden
In conclusion, we can say that from such simple materials as a bottle, wood or old tires, you can make real works of art. The main thing is that this does not require a lot of money, only our imagination and a couple of unnecessary things. Let's see a photo of what else can be made for a dacha from various scrap materials - you can use not only the most popular ones, but also polystyrene foam, metal, old dishes, shoes and clothes, unnecessary furniture, records and CDs and other unnecessary things.
 Well from other crafts for the garden from scrap materials
  Cute daisies from plastic bottles
  Chic homemade garden lamps - bottle candles
  Garden figurine from various scrap materials
  Cottage decor from garden gnomes
  Hanging planters made from old teapots are a very beautiful idea.
  An old teapot can easily be turned into an outdoor planter in the country
  Pond with swans made from plastic bottles
  Funny donkey made of tires, wood and threads
  Decor of a small area in the country from scrap materials
  We decorate old tree stumps with bright crafts
  Decorations for the dacha from basins, helmets and other things
  Original country crafts made from different materials
  Pond with a frog made from a tire, basin, bucket and bottles
  Bright snails made from scrap materials to decorate your garden
  Garden gnomes made from ordinary plastic bottles
  Crafts for the garden made from tires and wood
  An idea for a simple garden figurine made from scrap materials
  We use an old wheelbarrow or cart for garden decoration
  Old rubber boots will make a beautiful flowerbed on the fence
  Crafts for the garden from CDs
  Chic flowerpots made of wood and clay flower pots
  Bright old shoes can easily be turned into an original flowerbed
  Water barrel gentleman and lady
  Funny cow from an old bathtub
  Unusual flowerpot made from a basketball ball
  Lots of crafts for the garden from various scrap materials
The idea of making a bouquet of paper flowers is very good. To make paper crafts, we will need to purchase colored paper, cardboard, markers, a stationery knife, tape, scissors and PVA glue.
Paper bouquet
First you need to make three blanks for each flower, two of which should be the same color, they should have six petals.

Place one blank in front of you and glue a circle on top of it.

On the mug, first make holes for the eyes and mouth in the form of a smiley face.

After gluing the mug with the flower, you need to color the eyes with a black felt-tip pen, and then bend the petals inward.

The next step is to cut out the stem, which we then attach to the flower, and on the other side of the flower we need to attach the same blank.
You can also make leaves for the bouquet, which can be made from green paper.

First you need to draw an oval and cut it out, and then use scissors to make notches.

In order for individual pieces of paper crafts to become a single whole, tie the flowers with ribbon or some other fabric to decorate the bouquet.

This bouquet will never fade and will be an excellent decoration for your home.

Simple crafts from plastic bottles
The simplest crafts for children include bottle crafts.

For example, from a bottle you can make a piggy bank, which requires only a marker, a stationery knife, dice (4 pieces), a small bottle, glue and colored paper.

The first step is to cut a straight line, the width of which can be 5 centimeters, and the length of this line should be enough to encircle the bottle.


We draw eyes with a marker, and draw nostrils on the bottle cap. Using a utility knife, cut a hole for coins.

As legs for the pig, you need to attach the dice using glue.
Note!


This craft develops a child’s imagination and is also useful in everyday life.
Ball of thread
The craft can be used as a lampshade for a lamp or simply hung as a decoration.

A ball of thread is made very simply; to make it you will need colored threads, a ball, and transparent glue.

First, we need to inflate the balloon and tie its tip so that the air does not escape.

Then you need to wrap the inflated ball with threads, then apply glue to the surface of the ball and wait until it dries.

Note!

Now you need to separate the ball from the threads, to do this, just pierce it with a needle and the craft is ready.

Plasticine gnome and pine cones
As a simple DIY craft, you can make a gnome. For the craft you will need a pine cone, light-colored plasticine, pieces of fabric, glue and a brush.
First of all, the child should roll a ball out of a piece of plasticine, after which, using a brush, they need to make indentations for the nose, eyes and mouth on the ball.


At the next stage of our craft, we need to attach the resulting head to the top of the cone.

Then the child must cut out a triangle from the fabric and glue it on the sides, resulting in a cone. The cone will act as a hat for our character.
Note!


Finally, you need to make mittens from fabric, and then attach them to the pine cone using plasticine and our gnome from the pine cone is ready.
Paper bookmark
A paper bookmark is perfect as a simple craft for kindergarten. For children to be able to make this simple craft, they will need a pencil, ruler, colored paper, scissors and glue.

To begin, children must draw a square measuring 20 by 20 centimeters.

Then divide the resulting square into 4 equal parts using a pencil and ruler, resulting in 4 squares measuring 5 by 5 centimeters.

The second step is to divide the upper right and lower left squares in such a way as to obtain triangles, that is, you need to draw a line diagonally from the upper corner to the lower corner.

We don't need the triangles with the outside and can cross them out.

Then you need to cut out a figure from paper without taking into account the crossed out triangles.

The top triangle needs to be trimmed. If everything is done correctly, the paper will be in the shape of a diamond, to which two triangles are glued.

The next step is to fold all the triangles in half, and then one by one place them on the tip of the rhombus. You should end up with a pocket that fits over the tip of the book page.

To make a bookmark original, you can advise children to cut out some kind of applique from colored paper.

Photos of simple crafts


If you want to decorate your home without spending money, you can make a craft with your own hands from available materials. It is not difficult to do the work at home. First, you need to conduct an audit of your dacha, balcony, garage, and select old and unnecessary things.
If you have a lot of paper bags in your house, you can make an original fake. It will help decorate flower pots and make them more colorful.
Materials for work:
- paper bags;
- wooden skewers;
- glue gun;
- plastic container;
- scissors;
- nail;
- leg-split.
- Take paper bags and make markings on them. You should get 8 strips measuring 7x30 cm. Cut out the blanks.
- Wrap a strip of paper around a skewer and secure the tube. Do the same with the rest of the blanks.
- Take a plastic container, apply glue to it, and wrap it in paper. Glue paper tubes to the bottom.
- Cut strips measuring 7x45 cm from the bags and make tubes. Wrap them so that they are pressed against the walls of the container.
- Glue a long tube to the bottom, and wrap a smaller tube around it. Wrap all the tubes in this way, then change direction and continue weaving.
- Make 2 holes in the top of the pot walls. For convenience, you can use a hot nail.
- Thread twine through the holes and tie knots at the ends. To hide the ends of the twine, you can weave 1 more tube.
- The flowerpot is ready, you can use it to decorate your home.
Another unusual craft from improvised materials, made with your own hands at home. This candlestick can be a gift for a loved one or can be used as a decorative element.

Materials for work:
- dried leaves;
- alcohol;
- glue;
- jar;
- ribbon;
- candle;
- brush.
Execution sequence:
- Take a jar and wipe it with alcohol. This will get rid of greasy stains.
- Apply glue to the walls and attach the leaves.
- Decorate the neck of the jar with ribbon.
- Place a candle inside.
- The candlestick is ready, it will warm your soul in the fall and remind you of pleasant events on cold evenings.
The child will definitely like the toys. Colorful characters will make the game more interesting and entertaining. To make dolls, you will need a minimum amount of time. You can involve children in the creative process. They will be happy to take part in the work.

Materials:
- disposable paper plates;
- dye;
- brush;
- scissors;
- glue;
- felt-tip pen;
- cardboard;
- wool;
- stapler
Execution sequence:
- Bend the paper plate on both sides, this will be the doll's cloak. Paint it with a bright color.
- Cut a cone from the plate; this will be the cap. Paint it the same color as the cape.
- Cut out arms, legs, and a face from cardboard.
- Place the parts in their places and glue them.
- Draw the character's face.
- Instead of hair, attach wool and place a cap on top.
- Fasten all the parts together with a stapler, the doll is ready.
flying bird
Another DIY craft that can be made using improvised materials at home is a flying bird.

Materials for work:
- disposable paper plates;
- scissors;
- stapler;
- colored paper;
- disposable spoon;
- feathers.
Execution sequence:
- Take a paper plate and cut it in half.
- Cut one half into 2 more pieces.
- Fasten the parts with a stapler so that you get a bird.
- Cut out eyes and beak from colored paper.
- Attach a disposable spoon to the plate, glue on the eyes and beak.
- Decorate the bird with feathers.
Original organizer

To make a product you will have to spend a lot of time. However, the result is worth it. The result is an amazing organizer designed for storing office supplies.
Materials for work:
- tubes of thick cardboard;
- round wooden board;
- a can of black paint;
- tape base;
- acrylic contours;
- brushes;
- clear acrylic varnish;
- glue.
Execution sequence:
- Take cardboard tubes and cut them into several pieces. The result will be small cups of different sizes.
- Paint the cutting board, adhesive tape base, and the resulting blanks black. Let it dry, this will take a few days.
- Decorate the resulting products. Apply drawings using acrylic contours. The patterns can be anything.
- To ensure that each glass is individual, it is advisable not to repeat the designs.
- Make a bottom out of black cardboard and attach it to all the pieces.
- Glue the resulting cups to the cutting board, cover everything with colorless acrylic varnish.
- The product is ready, you can use it to store pencils, pens and other office supplies.
An original DIY craft can be made from any available materials. Doing work at home is interesting and entertaining. The creative process will bring a lot of pleasure and positive emotions.
Materials for work:
- clothespins;
- glue;
- wooden shelf;
- hooks;
- rope.
Execution sequence:
- Take a wooden shelf and attach hooks to the sides.
- Glue clothespins along the entire length of the shelf.
- Attach the rope to the hooks.
- The shelf is ready, it will become an excellent holder for scarves and scarves.
Making an accessory from ordinary newspapers is not difficult. This basket can be used at home. It is suitable for storing linen and small items.

Materials for work:
- cardboard box;
- newspapers;
- cardboard;
- knitting needle;
- scissors;
- paints;
- glue.
Execution sequence:
- Take a sheet of newspaper and divide it in half.
- Wind the newspaper obliquely onto the knitting needle. You need to twist it tightly and glue the end of the newspaper. You will need a lot of these tubes.
- Take thick cardboard and cut out the bottom of the basket. You can make any shape: square, rectangle, circle.
- Attach newspaper tubes to the base.
- To make the structure durable, cut out the same shape from cardboard and glue it on top.
- You can start weaving. To do this, you need to wrap each tube around the one next to it. The last tube in the row should be twisted.
- Glue a new tube and continue weaving.
- Attach the tubes one into the other, weave to the desired height.
- Fold the ends inward, cut off excess, and singe.
- Paint the basket and let dry.
You can make any craft with your own hands using available materials. Even at home you can create an unusual product. An original rug can be made from corks. However, you will have to prepare the plugs in advance.

Materials for work:
- linoleum;
- glue gun;
- wine corks;
- scissors.
Execution sequence:
- Cut a rectangle from linoleum, the size may vary.
- Take the cork and cut it in half lengthwise with a knife. Do the same with other plugs.
- Glue the corks to the linoleum.
- Allow the product to dry.
- This rug is suitable for a bathroom or hallway.
A DIY craft made at home from available materials can be an excellent gift for a loved one. An original magnet will decorate the refrigerator and remind the recipient of wonderful moments.
You can use anything to create a magnet. Ground coffee, vanilla, cinnamon, lace, buttons, and beads will make excellent decorations.

Materials for work:
- coffee beans;
- leg-split;
- glue;
- glue gun;
- scissors;
- cardboard;
- glitter;
- magnets;
- dried orange slices;
- dry flowers.
Execution sequence:
- Take cardboard and cut out any shape from it.
- Glue the twine to the workpiece and secure the tip with a glue gun.
- Decorate the product with bows, flowers, dry oranges, coffee beans.
- Sprinkle glitter on top. To do this, you need to dilute water and glue, add glitter. Apply them to the product using a brush.
- Attach a magnet to the reverse side.
DIY crafts are very popular. They become an excellent decoration in the house, act as a decorative element, and can serve as a gift for a loved one. The main thing is to put your soul into your work and do everything in a good mood. The whole family can be involved in the creative process. This will help you have fun and recharge with positive emotions.
Today, handmade gifts are popular. The souvenirs look luxurious, they are of high quality, the crafts are unique, and their creation is incredibly fun. You can create gifts using different materials. The main thing is imagination, a little patience and sincerity with which souvenirs will be created.
It’s especially nice to receive and make crafts for the New Year. This holiday is loved by adults and children. We invite you to familiarize yourself with the gifts that you can make with your own hands. For each craft, the necessary list of materials is indicated. It is very easy to create an exclusive and original gift. Crafts can be used as decorations for a Christmas tree, apartment, or as souvenirs for friends and family.
New Year's paper crafts
It's easy to make crafts out of paper. Lanterns, garlands and snowflakes, as well as other products, are made from it. Paper is a simple and affordable material, so it is widely used to create New Year's crafts. When asked “What to make from paper for the New Year,” the first thing that comes to mind is a snowflake that will decorate a Christmas tree, a window, or become a pleasant souvenir. Well, that's what we'll do. But we will not make a simple snowflake, but a three-dimensional one! To do this you will need materials: paper, scissors, stapler or glue.
Find more paper crafts in the article:

Time runs inexorably forward and now white flies are flying outside the window, slowly falling to the ground and covering everything around with a snow-white fluffy blanket. However, despite the cold, my soul is warm and joyful. And all because suddenly appearing snowflakes herald the coming of the New Year. The most important holiday of the year is already very close, which means it’s time to think […]
New Year's crafts from pine cones
The best material for creating New Year's crafts is pine cones. There is practically nothing you need to do with the pine cones. They are already an excellent decorative material in themselves. You can decorate the Christmas tree with cones or put them in a vase and place them on the table to create a festive atmosphere. We suggest making a garland of pine cones. For this we will need: cones, glue, glitter, ribbon.

We have other crafts made from pine cones for the New Year:

New Year's holidays are approaching - time to give and receive gifts, decorate the Christmas tree and decorate the house. Perhaps we no longer believe in the good old man Santa Claus, we don’t expect gifts from him under the tree, but we definitely expect a miracle, especially on New Year’s Eve. A miracle is of course good, but the realities of life dictate their own rules to us. Job, […]
New Year's crafts from dough
Everything is clear with cones! But what should those who don’t have the opportunity to look for bumps do? We'll have to improvise. Don't worry, we know you still have plenty of craft materials at home that you don't even know you need. For example, many gifts for the New Year can be made from salt dough. To prepare it you will need only three ingredients: flour - 1 cup; salt – 0.5 cups; water – 0.5 cups. You can also add sunflower oil (2 tablespoons) and dye (a few drops). We suggest making a “knitted” heart from the dough.

You will find more dough crafts in a separate article:

A wonderful, festive and magical time is the New Year, for which adults and children prepare gifts and souvenirs for friends and loved ones. You don't have to shop at the store; you can make delicious gifts yourself from scrap materials, such as puff pastry. The crafts are original and bright. Unique toys decorate Christmas trees and are used as original and unusual souvenirs. […]
New Year's crafts made from felt
In your search for improvised materials for New Year's crafts, you may well come across felt scraps. In fact, felt is a type of felt, so if felt is not available, you can use a similar material. We suggest making a penguin from felt. We will need: felt, thread, needle, cotton wool or padding polyester, buttons.
New Year's crafts are created with pleasure using felt. The souvenirs are colorful, touching and delightful.
See also other ideas for felt crafts:

The New Year holidays are approaching, which means that very soon a forest guest will appear in almost every home in our country. Some people prefer to put up an artificial Christmas tree, some prefer to put up a real forest spruce from a Christmas market, and some even confine themselves to pine branches. However, this is not so important, because the most important feature of the New Year tree is the toys. Since ancient times, people in [...]
New Year's crafts from disks
Surely everyone has unnecessary CDs; they can be used to create original New Year's crafts. The simplest craft option is a snowman. For this we will need materials: CD, felt, scissors, glue, felt-tip pens, buttons or beads, ribbons.

A child can make such a snowman; he will be captivated by this activity. The craft can be hung on the Christmas tree or given as a gift.
For more ideas on New Year's crafts from old CDs, see the article:

Winter is already sweeping through the city, the days have become shorter, but the evenings last forever. What to do with your children besides tablets, computers and TVs? Well, of course, New Year's crafts. In addition, this type of activity will engage not only children, but also adults. The main thing is to approach this activity with enthusiasm! What are New Year's crafts made from? […]
New Year's crafts from bottles
Ordinary plastic bottles can be used as a handy material for crafts for the New Year. We suggest making an original craft - feathers that will look great on a Christmas tree, window or as a keychain. We will need: a plastic bottle, scissors, felt-tip pens or markers. Plastic feathers will be a wonderful New Year's decoration.

New Year's crafts from tubes
For creativity with children, cocktail straws are suitable as a material for New Year's crafts. Surely on the eve of the New Year holidays you have already managed to purchase several sets. Great! Then let's get started!

New Year's crafts from cotton pads
So, what else can you find at home as material for New Year's crafts? Of course, cotton pads. By the way, if there are no disks, ordinary cotton wool will do. It makes an excellent imitation of snow. There are a lot of options for crafts made from cotton pads or cotton wool, but we suggest making a New Year's ball. You will need: cotton pads (a lot), a stapler, a needle, thread and a small ribbon. The process of creating a New Year's ball will take no more than 15 minutes, but such a Christmas tree toy looks truly wintery!

New Year's crafts made from cardboard
You can use cardboard as a material at hand for New Year's crafts. Don't know where to find cardboard? But what about old postcards, which are probably gathering dust without use. Of course, you should not use memorial cards, for example from dear and close people. But postcards that mean nothing can be used for a good cause. We suggest trying out a pine cone as a trial craft!

New Year's crafts from threads
What else can be used as improvised material for crafts for the New Year? Threads. These can be thin threads or thick yarn, depending on what exactly you want to do. We propose to build a New Year's star. We will need: threads, PVA glue, matches or safety pins, disposable container.

New Year's crafts made from fabric
A very cool New Year's craft can be made from fabric. If you are comfortable with a needle and thread, then you should start with something simple, for example, sew a nice Christmas tree using materials: fabric (you can take calico, cotton, chintz, silk, linen, satin); strong threads; needle; safety pins; scissors; filler (sintepon, holofiber, cotton wool); wooden stick; decorative elements (optional).


You can decorate a fabric Christmas tree with different objects, snowflakes. Crafts, ribbons.
In addition to the Christmas tree, you can make other New Year's toys from fabric:

Tilda is a beautiful doll that has a soul. Making such a toy yourself is very simple, the main thing is to purchase the necessary materials, show imagination and a little patience. The doll is filled with warmth and comfort, and will be an excellent gift for family and friends. Tilda's story The doll appeared at the end of the 90s in Norway. It was invented by a Scandinavian needlewoman named Toni Finanger. Then […]
New Year's crafts from candies
On New Year's holidays, every home is full of all kinds of sweets, mainly candies. Well, let’s not let the goodness go to waste, let’s make an excellent New Year’s craft that will be an excellent gift for friends and acquaintances. We suggest starting with the Christmas tree. For this we will need: thick paper, candy, double-sided tape, ribbons and tinsel.
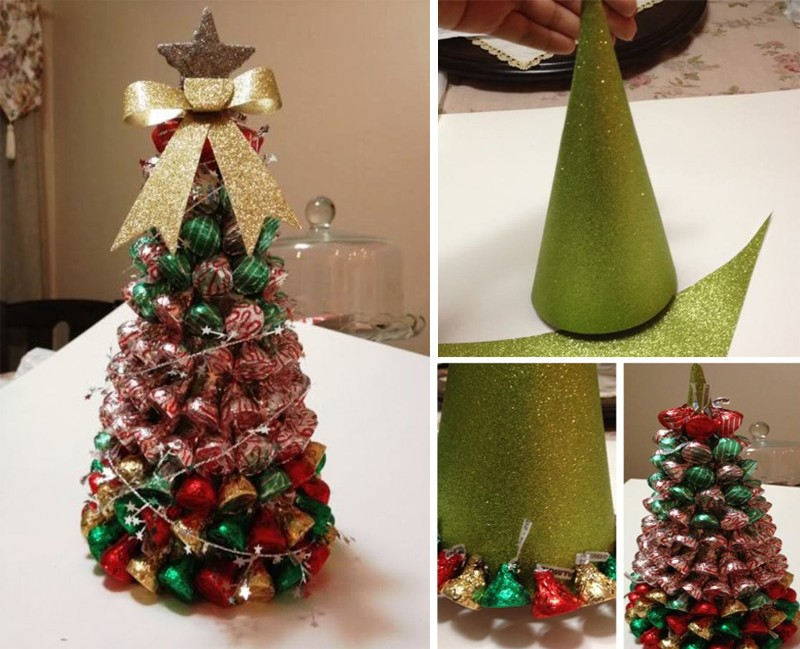
By the way, if you need to add other candies, we have ideas for this:

What would New Year be without sweets and candy?! We've been good all year, so on the last day of December we look forward to some sweet treats to make the coming year as sweet as these candies. However, candies in the New Year can be used not only as a sweet treat, but also as decoration, for example, […]
New Year's crafts from cups
Plastic cups will also be used. If there is a lot of plastic containers, you can make a big snowman. By the way, if there is no snow outside, and the little one really wants to make a snowman, plastic cups will come to the rescue. By the way, you can also attract neighbors. In any case, crafting with a large group is more fun! We will need: plastic cups, stapler, glue, decorative elements.

New Year's crafts from disposable tableware
You can create real New Year's masterpieces from disposable plastic tableware. Suitable materials include plates, spoons, forks, and knives. There can be a lot of ideas, but we suggest making a Christmas wreath from plastic spoons. For this you will need: 201 spoons, glue, wreath blank ∅45 cm, red paint (preferably spray), white ribbon. Break off the handle of each spoon. Then glue the round parts of the spoon to the wreath blank in four circular layers. It is better if the workpiece is made of MDF, but if not, then thick cardboard will do. After this, paint the wreath and let it dry completely. Now all that's left to do is thread the ribbon and you're ready to hang it!

New Year's crafts from sticks
Did you have a children's New Year's party with a lot of ice cream? Great! We urgently collect sticks and get ready to create a New Year's craft. Let's make a snowflake. For this you will need: sticks, paints, glue, buttons. The craft can decorate the refrigerator or become a toy for the Christmas tree, or it can also be given as a gift.

By the way, snowflakes can be made from other materials:

What is it difficult to imagine the New Year without? Of course, without a Christmas tree, Santa Claus, and for us, residents of northern latitudes, it is extremely difficult to imagine the New Year without snow and snowflakes! If you want to create a truly New Year's atmosphere in your home, then don't be lazy and decorate everything around with snowflakes. Snowflakes can be flat or voluminous, carved or not. In addition, it is worth abandoning the stereotype [...]
New Year's crafts from cotton swabs
When all the obvious options have been considered, it's time to use the magic cotton swabs! We will use them to make a magical winter applique! For this we use: cotton swabs, glue, cardboard, paper!

New Year's crafts from pasta
So, what else do you have at home that can be used for New Year’s crafts? Pasta would be an excellent option. Yes, yes, regular pasta for cooking. True, you don’t need to cook them for this. By the way, pasta of any shape is suitable: horns, spirals, shells, bows. We suggest using pasta to create New Year's cards. For this we need: pasta, paints, glue, glitter.

For more ideas on New Year’s pasta crafts, see the article:

New Year's holidays are approaching, which means it's time to think about creating a festive atmosphere. You don’t have to use store-bought accessories for decoration. It's time to unleash your creativity and make original crafts with your own hands. If you are one of those people who are creative about once a year, then New Year’s crafts from [...]
New Year's crafts from buttons
Absolutely any materials that you can find at home are suitable for New Year crafts. Surely everyone has such a box in which spare buttons from clothes are stored. The shirt has long been thrown away, but the buttons are still there. Great! You can usefully get rid of this goodness by making cute New Year cards. In addition to buttons, you will need thick paper, glue and various decorative elements for this craft. You can decorate a card with buttons in the shape of a snowman, a New Year's garland, or a wreath.

Need more postcards? We have!

The best gift for the New Year is, of course, a gift made with your own hands. And if socks or a sweater are not an option for you at the moment, then even a child can handle a postcard. A DIY New Year's card is suitable as a gift for absolutely everyone: friends, relatives, dearest and closest people. New Year's cards can be complicated […]
New Year's crafts from toilet paper rolls
Go ahead. In search of scrap materials, you should literally look around the entire apartment. You especially shouldn’t bypass the place where everyone likes to think! Yes, yes, you can also find materials for New Year’s crafts in the toilet. Don't be alarmed. They're just toilet paper rolls. Let's make owls! For this we will need: toilet paper rolls, paint, brush, colored paper, scissors, glue.

Don't rush to throw away the bushings! We have over 100 more craft ideas!

The New Year holidays are approaching, there is less and less time left, and there are more and more worries and hassles in preparing for the holiday! It is especially difficult for mothers during these pre-holiday days. Little fidgets are looking forward to the holiday, so mothers have to come up with interesting games and activities every day. If your imagination no longer works, our cool master classes on making New Year’s crafts from […]
New Year's crafts from napkins
I think there are napkins in every home. Moreover, before the New Year, they are bought without fail for the festive feast. You can make incredibly cool crafts from ordinary napkins. We suggest choosing a Christmas tree. For this we will need: thick paper, napkins, a stapler, glue or double-sided tape, beads, rhinestones.

Another cute Christmas tree made from napkins will be a wonderful holiday decoration.
New Year's crafts from boxes
What else can be used as improvised material for New Year's crafts? Boxes, friends, boxes! And absolutely any: from shoes, milk, oatmeal, cereal, etc. The first thing that comes to mind when looking at a cardboard box is a house. You can decorate a windowsill with cardboard houses or hang them on a Christmas tree. And if you put an electric candle inside the house, you will get a magic lantern!
New Year's crafts from satin ribbons
If you have satin ribbons lying around, get them out immediately! You can’t even imagine what valuable material you have in your hands. True kanzashi professionals (this is the name for the technique of making crafts from ribbons) work wonders. Well, beginners should try something easier, for example, making a Christmas tree. For this craft we will need: thick paper, satin ribbons, scissors, glue, beads.

New Year's holidays are ahead and it's time to start decorating. You can make decorations for the New Year from a variety of materials, such as paper, beads, pine cones, and even old CDs. But in this article we will talk about New Year’s crafts made from satin ribbons. Crafts can be simple or made using a special Japanese technique - kanzashi. Christmas tree Let's start our crafts [...]
New Year's crafts from old light bulbs
Well, do you think all the ideas are over? Nope! We are urgently looking for old light bulbs. Of course, both incandescent and energy-saving lamps are suitable. But we suggest using the good old Ilyich light bulb. Let's do “winter in a jar”! You will need: an old light bulb, glitter, mini Christmas tree, glue, ribbon.
