If the foundation of the house is constantly located in wet soil, this will lead to unpleasant consequences - walls may sag, windows and doors may become warped. Fungus may also appear on the interior walls. This can be avoided if you arrange foundation drainage yourself.
Before you begin the actual drainage work, you must first thoroughly waterproof the foundation. In order to carry out this work, it is necessary to prepare the foundation.
- A ditch is dug around the perimeter of the house in order to reach the foundation of the house. The excavated soil is deposited next to the trench so that it can be filled back in after the work is completed. The width of the trench should be approximately 1 m.
- After excavation work and exposure of the foundation, it is carefully cleaned of soil, and the old waterproofing is also removed.
- Then the foundation needs to be thoroughly dried. To do this, you can use different types of hair dryers and burners, but it will be best if the foundation dries in natural conditions.
- To prevent anyone from accidentally falling into the hole, the trench is fenced around the entire perimeter and illuminated at night.

Depending on the type, foundation waterproofing can be: roll, pasted, coated and penetrating. The type of waterproofing chosen will dictate the principle of drainage design.
- In practice, the most popular is adhesive waterproofing, in which the foundation is treated with bitumen mastic. This method ensures long service life and reliability. When draining the foundation, such waterproofing is combined with gravel material, which is used to fill the trench under the drainage.
- Waterproofing plays an important role, but even without it, a gravel backfill will allow water to pass through well and drain it away from the foundation. This means that the gravel layer for drainage plays a significantly larger role than treating the foundation with bitumen. The gravel is very important because it will allow water to seep through to the perforated pipes. In addition, this material additionally ventilates the foundation.
- The wrapping material called geotextile is of great importance in the drainage system. This material should be a completely wrapped layer of gravel to avoid silting and clogging of fine particles. In the absence of geotextiles, the drainage system will quickly cease to fully perform its functions.
- Gravel has another important advantage over other types of drainage material - it does not shrink. This positive quality can be used the next time a blind area is installed, so you don’t have to wait long for the filter material to completely settle down. Gravel does not shrink yet because each layer of it is carefully compacted. For better compaction of the filter bed, a special machine is used.

Although gravel is expensive, it is still advisable to give preference to it. You can, of course, use cheaper material, but as they say, “the miser pays twice.” This means that with cheap filter material, the longevity of the system cannot be guaranteed and, most likely, the drainage system will have to be redone in a short time. With gravel backfilling, durability and reliability are guaranteed.
Other materials have less influence on the quality of operation of the drainage system, but their choice should still be given due attention. Drainage perforated pipes must be of high quality. Drainage must be protected with geotextile material. Plastic manholes and pumping equipment must also be high-quality and reliable.

A ditch has been dug around the perimeter of the house’s foundation, the waterproofing has been done - drainage can be installed around the foundation.
- A distance of 1 m is measured from the foundation and a recess is made along the contour around the house with a mark slightly below the foundation. The width of the recess should be based on the diameter of the perforated pipe of 110 mm and the backfill on both sides of the drainage product measuring 10 cm. The total is about 30 cm.
- Then the bottom is covered with sand, the layer of which should be up to 10 cm thick. In this case, the slope per 1 m should be 1 cm.
- Geotextile material, the width of which is 1.3 m, is laid on a layer of sand. The edges of the geotextile are fixed at the top. The material is covered with a 10-centimeter layer of gravel.
- Drainage pipes with a perforated surface are laid with a known slope.
- Another portion of gravel is poured over the pipe, which should cover the drainage product by 10 cm.
- The gravel is covered with geotextile on top, the edges of which are fastened together.
- The pipe is taken away from the building at a distance of at least 5 m and a water intake is installed in this place. It should lie 1 m below the pipe, and not reach groundwater.
- Geotextiles are placed in the water intake and a plastic container with holes made in the bottom is installed in it.
- The sides of the container are sprinkled first with gravel and then with soil.
The installation of the drainage system is completed by installing an inspection well.
Video
This video will not only help you properly drain the foundation, but will also tell you about waterproofing:
Closely located groundwater or a large accumulation of moisture in the soil have a negative impact on any buildings, especially on the foundation. Therefore, to eliminate excess moisture, it is necessary to take measures related to the installation of a drainage system. Making foundation drainage is not so difficult if you know the features of its installation and the technology for carrying out the work.
The need for drainage for the foundation and its function

Even deep groundwater in some cases requires the arrangement of drainage; a large number of factors are considered in each specific case. In some situations, drainage around the foundation must be done anyway. Here are some of them:
- When the basement is deep, when it is below the groundwater level, or less than half a meter from the basement floor to it;
- If the basement is built in loamy or clayey soil, the groundwater level is not taken into account in this case;
- When the depth of underground premises is more than 1-1.5 meters in loamy or clayey soil conditions;
- If the place where the building is located is an area of capillary humidification.

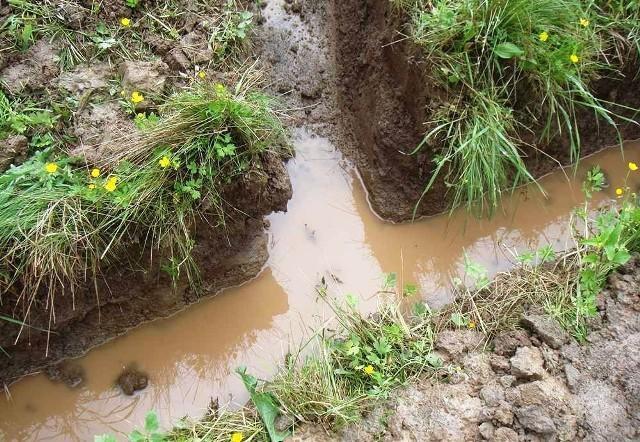
Based on the above, we can conclude that drainage is necessary when groundwater is located in critical proximity to the building, or passes high enough, creating the impression of a swampy area with no vegetation. There is no need to develop such a system when the soil is dry, and even during the rainy season the groundwater level does not rise to critical levels.

Important! The need for foundation drainage in clay soil is a correct and reasonable decision.
The main functions of the drainage system include:

If the correct choice of drainage type is made, and the design is carried out in accordance with the design, then the pipes and wells included in the drainage system will significantly reduce the likelihood of the formation of gaps and cracks in the foundation, improving its strength characteristics.
Types of drainage
Depending on the depth of installation of the drainage system, wall foundation drainage is distinguished:

Each of these types of drainage can be either ring type or sheet type.
The ring type scheme is a closed loop that encircles the perimeter of the building. With a deep laying system, such a structure can also be laid radially along the entire plane of the structure.

It is most advisable to build reservoir drainage in the case of a “Swedish slab” type building foundation. It is laid at a level lower than the foundation plane. The peculiarity of its laying technology is that drainage pipes are laid on a sand and gravel bed, which are covered with a foundation slab on top.

Required tools and materials
To make foundation drainage with your own hands, you will need tools and materials such as:

You can get some valuable tips that will help answer the question of how to drain the foundation by watching the video
Work technology
Making foundation drainage with your own hands is quite simple; to do this, you need to adhere to certain rules for its design, depending on the type of foundation of the building.
Slab foundation
Drainage of a slab foundation consists of the following stages:

Columnar (pile) foundation

Drainage of a pile foundation is done in this way:
- A layer of 20 cm of sand and crushed stone is placed in a ditch dug around the perimeter of the building, and a drainage pipe is placed on top;
- A layer of crushed stone of 30 cm is again poured on top, and geotextiles are laid;
- Everything is covered with earth.
Rules for organizing the drainage system
After completing all the work, it is necessary to make wells into which excess water will flow. There are some rules for installing them.
The fact that the foundation of any structure bears maximum loads does not make this structure invulnerable to external factors. Regardless of the type of base and degree of waterproofing, the foundation is very sensitive to moisture attacks. Its natural enemies: groundwater, high water, and precipitation - under certain conditions, all this negatively affects the freezing and thawing cycles of the foundation material and its resistance to corrosion. To remove excess moisture from the base of the building, a simple but effective solution is used - a foundation drainage device.
When is foundation drainage appropriate?
The main difficulties with draining water from the base of a building appear in places where the site has water-resistant soil that prevents the natural filtration of liquid from top to bottom. As a rule, it is clay, loam, sandy loam. Another threat comes from groundwater when it is too high. This may be due to the terrain features of the site - its location in a lowland. Over-moistened heaving soil is also subject to changes in volume during freezing and thawing: the impact can be so great that the safety of the entire building is threatened. Drainage around the foundation in such cases is necessary, because sometimes only it can ensure safety from water for basements, as well as elements of the foundation itself. The main task when installing drainage is to collect excess moisture around the perimeter of the base of the house and direct it in the right direction.
Composition of the foundation drainage system
Drainage is a set of special perforated pipes dug around the perimeter of the building, drainage wells and a collector. Drainage pipes are used to collect and drain liquid from soil layers that enters the plane of the pipeline system. The movement of water in them is ensured by artificially setting a slope towards the collector well. From the latter, liquid is forcibly removed using a submersible pump - it can be used for irrigation. Every second turn of the pipeline system is equipped with a drainage well, which is used as an inspection and sludge tank. As sludge accumulates, it is pumped out with a special pump; if necessary, silted drains are cleared with a powerful stream of water.
Carrying out work on foundation drainage
As a rule, when building a new house, the installation of a drainage system is immediately provided, because... It is much easier to carry out this work precisely at the stage of foundation construction. If the house is built, then you will have to lay trenches around the perimeter of the building, taking the low and high points of the drainage system. The depth of the trenches is determined based on the depth at which the base of the foundation is located. After the formation of the crushed stone and sand cushion, the drainage pipes should be located below the base of the house. They are laid with a slope of 5-10 mm per meter. Crushed stone is poured around the pipes in a layer of at least 20 cm. To ensure that silting of the crushed stone occurs more slowly, a layer of geotextile is laid before filling it. At every second turn of the pipeline, drainage wells with a diameter of at least 315 mm are installed. From the “lower” (last) well, pipes are laid to a collector well (a waterproof container made of plastic, metal or reinforced concrete rings), which serves as a collector for the discharged liquid. Water is forcibly removed from it using a pump that turns on automatically due to the float level. This is what the drainage arrangement around the foundation looks like in a nutshell.
Are there situations where, to protect foundation drainage not needed?
Water can destroy any organic structure. The foundation of a house is no exception to the rule. Flooding of a plot of land around the foundation or the basement of a building may cause changes that are dangerous to the structure of the building:
- Reducing the bearing capacity of the foundation;
- Complete destruction of the foundation of the house;
- Capillary saturation with moisture of the walls of the first floor of the building;
- Flooding of the basement;
- The failure of their building maintenance systems located on the ground floor.
Therefore, the construction of a drainage system is necessary for the normal functioning of any facility.
To protect a building from the destructive effects of groundwater, melt or rainwater, specialists use foundation drainage. First, you need to familiarize yourself with a brief description of the types of water that destroy the foundation:
- Water resulting from precipitation, seasonal snow melting, or flooding. It is not capable of causing serious damage to the foundation of the house. Removed using storm sewer or point drainage system;
- Water found in layers of the earth. Its impact on the foundation leads to complete destruction of the structure. There are several types of groundwater:
- Groundwater. Characterized by seasonal changes in level. More dangerous in the spring when the snow melts;
- Water in the lenses. Appears when a material capable of absorbing a large volume of liquid is laid on a layer of waterproof base. For example, a sand cushion on a layer of clay;
- Water in a sand bed. It is formed when pouring monolithic foundation slabs, in the absence of a gravel layer. The underlying sand cushion becomes saturated with groundwater and the foundation begins to get wet.
Types and device drainage under the foundation
How rule, to prevent flooding and destruction of the foundation by groundwater, several drainage systems are used:
- Reservoir outlet. This is a comprehensive protection system consisting of both ring drainage and drainage from the base of the foundation.
- Wall outlet. Typically used as strip foundation drainage. It consists of laying pipes along the entire perimeter of the foundation, at a short distance from the base.
- Ring outlet. Allows you to protect large areas from groundwater. Suitable for protecting not only the foundation, but the entire site.
- Point outlet. Used for local collection of rain and groundwater.
Let's see how drain the foundation with reservoir water drainage
This method of drainage is used in difficult conditions, in combination with other options. Its use is relevant: in the presence of a large volume of retaining water; when placing a water lens directly above a building; with low efficiency of other methods of drainage.
It is often used as a preventive measure against flooding of basements on clay and loamy bases.
- Filling the pit with sand. A sand cushion 250–300 mm thick is poured over the entire base area. It is important to fill cavities beyond the boundary of the foundation slab. This is done for the subsequent connection of the reservoir and wall drainages.
- Installation of “inserts” made of crushed stone or gravel. They cut through the sand cushion in increments of 6 - 8 m. The depth of crushed stone backfill is 200 mm.
If necessary (due to too intense flooding), reservoir drainage is arranged in 2 layers. The first is a sand cushion with a thickness of 250 - 300 mm. The second is a gravel cushion with a thickness of 200 - 250 mm.
- Protection of reservoir drainage from pouring concrete and mortar. Before pouring the concrete base, the entire area is covered with water-repellent material. Otherwise, the concrete may fill all drainage pores. In this case, the efficiency of the drainage structure will deteriorate.
Important! Reservoir drainage does not drain water on its own. It accumulates it in the thickness of sand and rubble. To drain groundwater under a sand cushion, you can lay mine additional row of drainage pipes. If the foundation area is small, then the construction of a wall tubular drainage connected to a reservoir drainage is sufficient. All practical information on issues how to make drainage can be found in numerous video, posted on the pages of Internet portals.
Wall-mounted DIY foundation drainage
This The technology makes it possible to locally lower the groundwater level. The basements will remain dry, the foundation of the house will not collapse, made cosmetic repairs will not be affected. Pipes are installed along the entire perimeter of the house at a distance of no more than 1000 mm from the external walls. The depth is just below the base of the foundation.
Important! Foundation drainage diagram, made using any of the technologies, implies the installation of high-quality waterproofing. As well as insulation of the basement floor. Otherwise, dampness may appear even if there is a reliable drainage system.
- Sand cushion installation. The trenches along all the walls of the building are covered with a layer of sand. To create a natural slope, a level or hydraulic level is used. This is important, if you do not make a slope for groundwater flow into the receiving well, then the drainage system will turn out to be a useless structure.
- Laying permeable fabric. Geotextiles are usually used; they cover the entire area of the sand cushion. This helps prevent the sand cushion from spreading and eroding.
- Filling the first layer of crushed stone. It is laid on top of geotextiles. Furrows are made for the installation of plastic drainage pipes.
- Pipe laying. For the construction of a wall drainage system, plastic sewer pipes with a diameter of 100 - 150 mm are used. Holes are drilled in them in advance through which groundwater will flow into the collection well.
Important! The pipe system should be built with a minimum slope of 20 mm per 3 – 4 m of pipe
- Connecting individual pipes into a single system. For this, additional elements in the form of doubles and tees are used. It is easier to insert the pipes into each other if you coat the ends with soap. Using a hydraulic level, you must carefully monitor the overall slope of the system.
Important! Vertical inspection wells must be installed at the junction of two pipes at an angle. If the system becomes clogged, it will be possible to remove the blockage through them, restoring the operation of the wall drainage.
- Insulation of drainage pipes. After installation is completed, the entire system is wrapped with geotextile and synthetic rope. This is done to protect the holes in the pipes from clogging with crushed stone or gravel particles.
- Filling the second layer of crushed stone. The drainage system is covered with a layer of gravel 150 - 200 mm thick. A layer of geotextile is laid on top.
- Final sand backfill. The last stage of work on the construction of the wall drainage system of the foundation.
The main sewer pipe, which collects all the drainage branches, may freeze. The reason is its possible shallow location. Therefore, the pipe must be insulated.
Ring drainage of house foundation
Its structure is similar to the wall drainage method, but it is performed for other reasons:
- When an already built house needs to be equipped with a drainage system;
- When the house does not have a basement;
- When a residential property or a group of them is built on a sandy or sandy loam foundation that drains groundwater well;
- When other types of drainage systems fail to cope during peak periods of flooding.
The ring drainage system should be built at a distance of 3 m or more from the external walls of the building. There is a dependence: the more sand in the soil, the further the pipes are located from the house. The more clay there is in the soil, the closer they are placed.
- Digging a trench. It is made 400 - 500 mm deep below the lowest point of the foundation.
- Preparing the base. It is filled with sand (layer 100 - 150 mm), gravel (layer 100 - 150 mm) or geotextiles are laid.
- Installation of drainage pipes. Perforated pipes are laid on the prepared base and connected to each other. Their diameter is 100 - 150 mm.
Important! A slope of 20 mm should be observed for every 2 - 3 m of pipe length.
- Insulation of pipes with geotextiles. It is tightly wrapped around each section of the ring drainage system. Then the winding is secured with a nylon cord.
- Installation of inspection wells. Vertical wells are installed at the junction points at the angle of the drainage pipes. They are needed to clean the entire system from possible blockages.
- Backfilling the trench. After all installation work is completed, the trench is filled with sand or gravel. It all depends on the financial condition of the customer.
A ring drainage system can work in conjunction with other drainage options. You can always watch a training video on how to properly make a ring drainage for the foundation.
Point drainage system
Helps collect rainwater from house roofs, auxiliary buildings, paths and sidewalks. Performed in the form:
- Storm water inlets. These are plastic tanks for collecting water from roofs. Connected to storm sewer;
- Drain drains. Small plastic containers installed along the paths, covered with bars and connected to the storm drain.
House foundation drainage system
One of the options for protecting the foundation of a house from moisture is installing drainage. How to do it yourself - technology for doing the work.
Excessive amounts of water negatively affect the quality and durability of foundation support structures, lead to flooding of basements and create significant inconvenience during various landscaping activities. In view of this, the construction of a drainage system is a mandatory stage in the development of any site.
The main function of drainage is to protect the supporting structure of a building from the harmful effects created by groundwater. The drainage system reduces the likelihood of basement flooding and reduces the risk of waterlogging and flooding of the area.
By neglecting the drainage system, the owner risks significantly increasing the likelihood of a decrease in the service life of the supporting structure due to waterlogging and exposure to frost heaving forces.

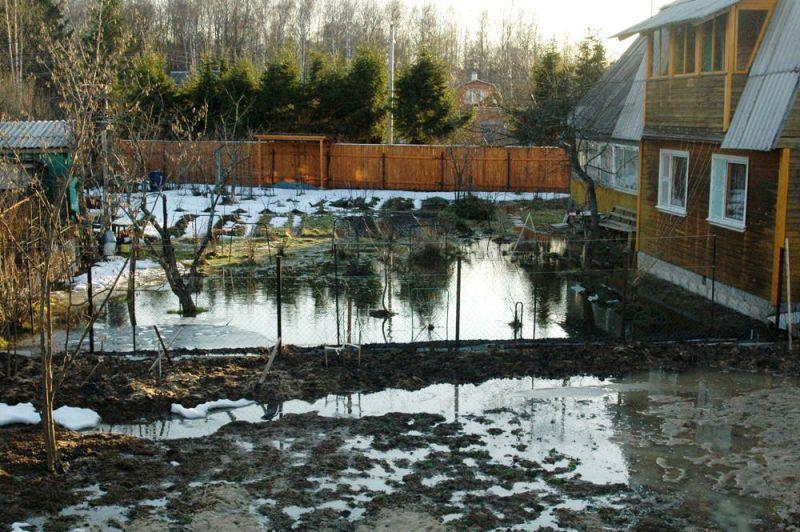
Water in the basement is a consequence of errors in design and construction, lack of a drainage system
Many developers are interested in: is it necessary to install drainage if the groundwater is quite low and the soil on the site is not subject to frost heaving to a high degree? The answer is: each case is subject to individual consideration. The unconditional need to create drainage arises in the following situations:
- if the basements are buried below the groundwater level or if the floor of the basement rises above the groundwater level by less than half a meter;
- if the basement is located in clay or loamy soil. The level of groundwater passage in this case does not matter;
- if technical undergrounds in an area with clay/loamy soil are buried more than 150 cm in relation to the horizon. The peculiarities of the passage of groundwater in this case are not taken into account;
- if the building is located in a zone of capillary humidification.
The conclusion from the above is as follows:
- a drainage system is needed if groundwater is critically close to the supporting structure of the building, or if it runs so high that the site area looks swampy and almost nothing grows on it;
- a drainage system is not needed if the site is dry and the groundwater level does not rise to a critical level during the rainy season and flood periods.
The best option for a drainage system
There are several types of drainage systems. It is advisable to use 2 of them in combination with the foundation structure.
First, ring drainage.


This system is designed to protect basements from groundwater flooding. It is based on tubular drains laid along the contour of the supporting structure.

The operating principle of ring drainage is based on reducing the groundwater level in the protected circuit, thereby reducing the risk of flooding of underground structures. The depth of the pipes in relation to groundwater directly determines how much the level of the latter will drop. Laying of ring drains is carried out at a certain distance from the building (usually 1.5 - 3 m from the foundation), which makes it possible to arrange drainage after the construction of the building.

Secondly, reservoir drainage. The disadvantage of such a system compared to the above-considered option is the possibility of its arrangement only at the stage of construction of the building, because it is installed under the base of the foundation at the level of the sand backfill. Excess moisture through perforated drains (pipes) enters the receiving well, from there to a place chosen by the developer (sewage system, reservoir, some depression in the terrain of the site, or it is pumped out and used for economic needs, for example, for watering plantings).

When arranging reservoir drainage, simultaneous protection of the foundation structure from groundwater and capillary moisture is ensured. Reservoir drainage is especially effective when constructing buildings with basements on low-permeability soils. Such drainage is also appropriate if the site is located in an area with a thick aquifer. Reservoir drainage must be installed if the building is located in a zone of capillary soil moisture and has a basement.

Reservoir drainage – innovations
To ensure that the drainage of your home is as efficient as possible, we will tell you about the procedure for arranging both the ring and stratum systems. If the building has already been erected, you will have to be content with only the ring drainage - no one will destroy the building for the sake of constructing a reservoir drainage system.
Prices for drainage pipes
drainage pipes
What does drainage consist of?

The main elements of the drainage system are pipes, inspection wells and a well for collecting water. The installation of the latter is carried out if the building is located on a flat area in the absence of the possibility of draining water outside the site.

Drainage pipes
Previously, mainly metal, asbestos-cement and ceramic pipes were used to equip the drainage system.

Such products were used solely due to their wide availability and had a number of disadvantages, including:
- frequent blockages and siltation;
- relatively short service life;
- the need to independently prepare holes for water inlet.
A much more effective, convenient and modern solution is plastic pipes - we recommend using them when arranging a drainage system.


The drainage system is best assembled from perforated pipes with stiffeners that ensure uniform distribution of loads on the products.
The advantages of plastic pipes are obvious:
- long service life;
- high strength indicators. The presence of stiffeners, as noted, contributes to the uniform distribution of loads, which allows the pipes to effectively withstand the resulting pressure;
- resistance to rotting, corrosion and various adverse effects;
- ease of transportation and installation. Plastic pipes for drainage installations weigh little and bend well, which allows them to be installed without the use of additional compensating elements;
- ability to self-clean. The internal walls of the pipes in question, unlike the external ones, are smooth, which eliminates the possibility of accumulation of contaminants;
- optimal ratio of cost and quality indicators.

Plastic pipes are the best ratio of quality and price
Plastic pipes can be laid at a depth of up to 5-6 m, i.e. with their help it will be possible to arrange drainage for any foundation.
Helpful advice! Perforated plastic pipes with pre-installed filters are available for sale. When choosing these, it is necessary, first of all, to focus on the characteristics of the soil on the site. Recommendations are given in the table.
Table. Selection of filters depending on soil type
| Soil type | Recommendations for arranging filtration |
|---|---|
| Perforated plastic pipes are suitable for arranging drainage in such soils without the use of additional filters. | |
| In this case, filtration is provided by the forces of geotextiles and crushed stone backfill. | |
| In this case, it is possible to arrange drainage without using additional filter material, but after laying the pipes, a minimum of 20 cm of crushed stone backfill must be carried out. | |
| In order to prevent siltation of pipes, geotextile filtration is installed. |
When choosing the diameter of drainage pipes, they are guided, first of all, by the degree of soil moisture. According to the technology, an extensive hydrological calculation must be performed, but in practice, in the conditions of private land, everything is usually limited to standard values, namely:
- for high water – 10-centimeter pipes;
- for ring and reservoir drainage - 16.5 cm pipes.
The depth of laying pipes is determined in accordance with the level of soil freezing - drainage should be below this point.

When arranging a drainage system, 2 types of wells are used.
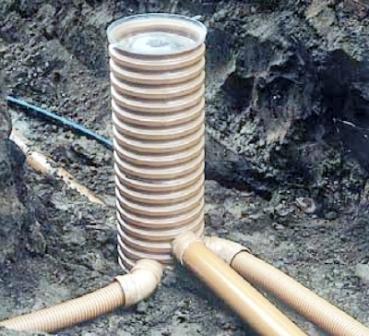
Firstly, inspection (revision) wells. Installed to monitor the condition of the system and clean it from blockages. When these form, a pump is lowered into the well and the pipe is cleaned. Installation of inspection wells is carried out at the intersection of pipes, at every 2nd turn and in 50-meter increments on straight pipelines. The standard diameter of such products is 60 cm. Additionally, inspection wells take on the function of sand catchers. To do this, the lower part of the structure is equipped with a special catching mesh, and the product is installed so that its bottom is 10-30 cm deeper than the pipes (the specific value is selected in accordance with the height of the outlet fittings for connecting the pipes).

Secondly, a collector well. It is the final reservoir of the system - this is where the collected moisture flows. The sealed design is equipped with a solid bottom. The collected water can be used for irrigation or taken to a pond, ravine or other suitable place.

If the land plot is located on sandy soil or other soil with good water permeability, instead of a collector well, you can install the so-called. filter well. This container does not have a solid bottom. Instead, a layer of permeable material, usually crushed stone, is backfilled. The water entering the filter well through the pipes of the drainage system is discharged into the ground.

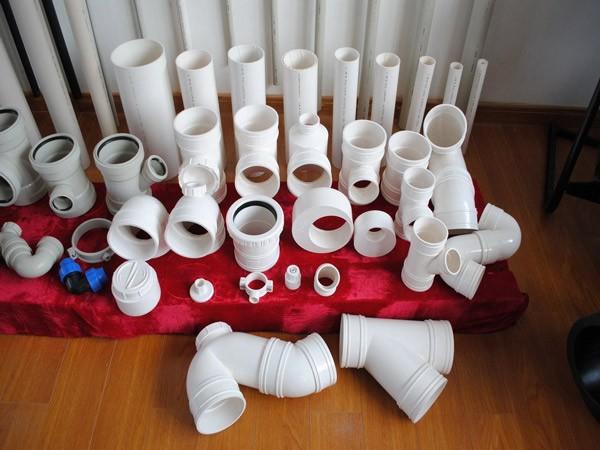
Additionally, the system includes plugs, adapters, fittings and elbows. The connection is made through the sealing gaskets included in the kit. The range of available components is shown in the photo.
Prices for drainage wells
drainage well
Preliminary calculations
When arranging a private drainage system on your own, calculations come down to determining the depth of pipes and wells, as well as the optimal slopes of pipelines.
The depth of laying the drainage is determined by the depth of the supporting foundation. The principle is simple: drainage is installed 0.3-0.5 m below the foundation base.

The slope of the pipelines must be such that water moving through them can be drained quickly and efficiently into the receiving tank. Traditionally, a slope of 20 mm per linear meter is maintained.
First find the highest and lowest points of the site. In the first, you will arrange a water collection area (most often this is the highest corner of the house), in the second, you will install a receiving well. Thanks to the natural slope, there is no need to buy additional pumping equipment for pumping groundwater.
For a better understanding of the situation, check out the example of calculating foundation drainage.

An example of a specification for a 6x6 m rectangular bathhouse, drainage wells - 3 pcs.
- building dimensions – 9x6 m;
- the distance between the collector well and the building is 10 m;
- the protrusion of the upper edge of the well above the ground is 0.3 m.
To determine the length of each individual section of the trench to the water intake, you need to add up the lengths of the sides of the building. In this example, the result will be 15 m. The total distance to the receiving well in this case will be 25 cm. The total slope of the system under consideration is 0.5 m (a couple of centimeters for each of the resulting 25 m).

Important! The distance between the foundation and the elements of the drainage system must be at least 3 m. Backfilling of sand and gravel is carried out at a depth below the freezing level of the soil.
Do-it-yourself reservoir drainage
The main function of such a system, as noted, is to protect the foundation from the harmful effects of groundwater and basements from flooding. Formative drainage can be used as an independent means or as part of a comprehensive drainage system. In the second case, pipelines are used to connect reservoir drainage with external drains.
The minimum thickness of the reservoir drainage layer installed under the foundation, taking into account backfill, is 30 cm. The dimensions are selected so that the perimeter of the drainage system extends 20-30 cm beyond the perimeter of the building.


Important note! In practice, a special need for the use of reservoir drainage arises only when building on clay soil. In other cases, a ring drainage system is usually more than sufficient.
Determine the depth of the pipes so that they are located below the clay ball of soil.
Important note! Information on preliminary marking, excavation and subsequent arrangement of the foundation after laying drainage pipes is not provided, because all this was previously discussed in detail in the corresponding publication on our website.
The work on arranging the reservoir drainage system comes down to the following.
- Having prepared the foundation pit for the supporting structure, you further deepen it by at least 20 cm. At this stage, as noted, you need to remove a wider layer of soil compared to where the foundation passes.
- Next, the bottom of the resulting pit is covered with a 20-centimeter layer of crushed stone. The backfill is carefully compacted and leveled in compliance with the slope (in this case, it is advisable to make a 3-centimeter slope for each meter of the site) in the direction of the receiving well.
- Next, flexible perforated plastic pipes with stiffeners are laid along the perimeter of the crushed stone base. The ends of the pipes are led to the location of the receiving well.
Further arrangement of the foundation is carried out in the standard manner.
As a result, moisture penetrating under the foundation base will penetrate into the pipes through perforated holes and be discharged through them into the receiving well.
As for the receiving well, in the case of reservoir drainage it is advisable to use its filtration variety. The dimensions of finished round filtration wells are on average 150 cm, rectangular - 280x200 cm. Height - more than 200 cm.

For a well, preferably at a distance of at least 3 m from the future foundation, a hole is dug of such a depth that the bottom of the receiving tank is located at least 1 m below the entry point of the drainage pipe. This is ideal. In practice, they make sure that there is at least a 1 m difference between the groundwater and the bottom of the well. Compliance with these rules will ensure the most efficient and correct operation of the drainage system.
The length and width of the pit are selected so that after installing the well, at least 200-300 mm of free space remains on each side. The well is installed in a hole. The bottom of the tank is covered with a 30-centimeter layer of crushed stone and compacted.

The space between the container and the walls of the pit is also filled with crushed stone to a height of at least 1 m. The drainage system pipes are inserted into the tank. From above, all this is covered with geotextiles and covered layer by layer with sand and soil with careful compaction.

Water from the well will be drained into the deeper layers of the soil.
Helpful advice! Do not fill the well completely - leave the possibility of carrying out inspection work. To do this, bring the backfill to the top edge of the well, install the seal, neck and hatch from the kit.
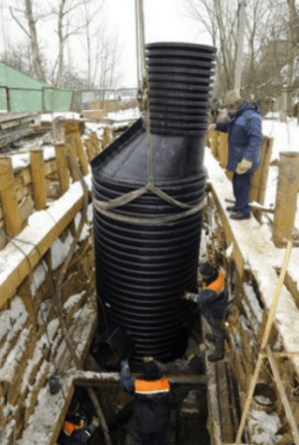
Important! To install the well, you will have to involve special equipment and/or several assistants - it is unlikely that you will be able to cope with a two-meter volumetric structure on your own.

DIY ring drainage
Such a system can be installed after the construction of the building is completed. Recommendations regarding setbacks between structures and drainage remain the same.
There are a couple of additional important notes to make first.
Firstly, regarding the depth of the drainage pipes. The dependence is simple: the pipes are laid half a meter below the foundation of the building.

Secondly, regarding the storage well. In the case of a collector system, it is more advisable to use a type with a solid bottom. The installation procedure differs from the instructions for the filtration well only in the absence of bottom crushed stone backfill.
Inspection wells are installed on the same principle as storage wells. Only the dimensional characteristics of the products change (selected depending on the conditions of a particular situation) and the location of the drainage pipes.


Thirdly, regarding the size of the trench. To determine the optimal indicator, add 200-300 mm to the outer diameter of the pipe. The remaining free space will be filled with crushed stone. The cross-section of the trench can be rectangular or trapezoidal - whichever is more convenient for you. Stones, bricks and other elements that could damage the integrity of the pipes being laid must be removed from the bottom of the pits.
The operating procedure is presented in the table.
For your own convenience, you can make markings in advance. To do this, step back 3 m from the walls of the house (ideally. In the absence of sufficient space, many developers reduce this figure to 1 m, be guided by the situation), drive a metal or wooden peg into the ground, step back from it further to the width of the trench, drive a second peg, then install similar landmarks opposite, at the opposite corner of the building. Stretch ropes between the pegs.
Table. DIY ring drainage
| Work stage | Description |
|---|---|
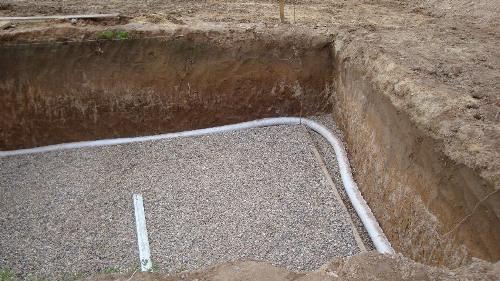
| Dig trenches around the perimeter of the foundation. Do not forget about the slope of the bottom - maintain it within 1-3 cm per meter. As a result, the highest point of the drainage system should be located lower in relation to the lowest point of the supporting structure. |
|
| Fill the bottom of the trench with a 10 cm layer of river sand. Compact thoroughly, maintaining the specified slope. Lay a layer of geotextile on top of the sand (if the soil is clean sandy) of such a width that you can subsequently cover the pipes, taking into account the thickness of the crushed stone backfill. Fill a 10-centimeter layer of crushed stone on top of the geotextile, remembering to maintain the specified slope. Lay the pipes on the crushed stone. The image shows ordinary orange sewer pipes - here the developer made the holes himself. It is more convenient to use the initially recommended flexible perforated pipes, but if you don’t have them, you can go the route of the developer from the photo. Maintain a 5-6 cm step between the holes. Recommendations for connecting pipes were given earlier. |
|
| Place a 15-20 cm layer of crushed stone on top of the pipe. Wrap the geotextile with an overlap. As a result, the pipes will be surrounded on all sides by crushed stone, separated from the soil and sand by geotextiles. |
Finally, all that remains is to install inspection and storage wells, connect pipes to them and backfill the soil.
Typical mistakes when installing foundation drainage
Check out the list of the most popular mistakes made by private developers, avoid them during the work process, and the drainage of your foundation will serve for as long as possible without any complaints.
- First of all, don’t put your hopes on a wall foundation. Its functions are reduced primarily to the removal of atmospheric precipitation, rather than groundwater.
- Secondly, do not use geotextiles as a filter if your site is located on loam or sandy loam - after a few years the filter will clog, which will worsen the efficiency of the drainage system.
- Thirdly, when controlling the angle of inclination of trenches for laying pipes, if possible, work with a theodolite and a level instead of a level - this is more correct.
- Fourthly, use drainage wells instead of storm water wells. The latter are designed to collect precipitation.
- Fifthly, do not place all your hopes on the drainage system alone. To ensure the most effective removal of moisture from the supporting structure and structure, a drainage system must be installed in the direction of the storm drain.

This point deserves separate consideration. First of all, remember: drainage and storm water should not be connected to the same pipe. In practice, with this solution, the effect will be the opposite of what was expected - during the rainy season, the drainage will not cope with the removal of moisture. As a result, the soil near the supporting structure will become waterlogged; in winter, excess moisture will freeze and the soil will swell. This can lead to deformation of the blind area, movement of the supporting structure and its further destruction.

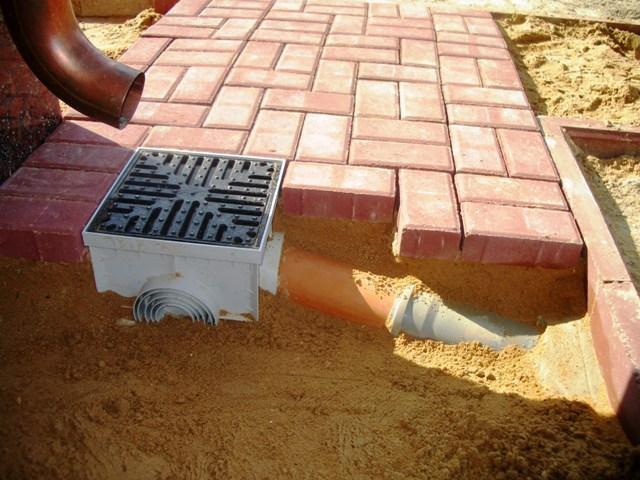
To make a storm drain, you can use ordinary orange sewer pipes. The system includes water receiving trays. Water is discharged into a storage well. Detailed instructions for arranging a storm drain are not provided, because This is a topic for a separate voluminous publication not related to the drainage system.
Stormwater prices
storm drain
Video - Do-it-yourself foundation drainage