Button centipede
Materials and tools:
Buttons with two holes
2 black buttons with a diameter of 0.5 cm
3 red buttons with a diameter of 0.4 cm
Cotton ball 4 cm in diameter
1 mm thick insulated wire
Multi-colored felt
Yellow and bright red pad paint
Black felt-tip pen
Brush, needle
Scissors, nippers
Universal glue
1. For the body, “bite off” a wire 20 cm long with wire cutters. Bend one end into a loop and twist it. The head will be attached to it.
2. Cut 10-15 circles with a diameter of 3-4 cm from felt. Make a hole in the middle with a needle. String felt circles and buttons onto the wire in a multi-colored sequence.
3. When you reach the desired torso length, pass the wire through the second hole of the last button and twist.
4. For the paws, you need 5 pieces of wire approximately 10 cm long. Place small buttons on the wire, leaving 3 cm at the ends. Pass the ends of the wire into the second hole of the last buttons and glue.
5. Bend the legs in half and use wire cutters to wrap them tightly around the body. Distribute the paws at an equal distance from each other to avoid skewing and sagging. Make sure that the tab wires do not move between the body buttons, otherwise the body wire will be visible.
6. To make the head, paint a cotton ball yellow. After the paint has dried, make two holes in the ball for the antennae and glue 2 cm long pieces of wire into them with universal glue. Place a button on the ends of the wire and twist the wire.
7. Glue 2 small black buttons on the head - the eyes and a red one - the nose. Draw the mouth and cheeks with red paint, and highlight the eyes with white paint.
8. Make a hole at the back of the head. Insert the twisted loop of the body into this hole and glue it with universal glue.
Guys, we put our soul into the site. Thank you for that
that you are discovering this beauty. Thanks for the inspiration and goosebumps.
Join us on Facebook And In contact with
You don’t have to spend a lot of money to make your apartment look stylish and cozy. All you need are simple materials at hand, a little imagination and a desire for change. And of course, you can peek at interesting ideas for the home that are shared from time to time website.
So, what can you do to decorate your interior inexpensively and tastefully?
1. Use bands instead of rings and clips
2. Update your curtains with edging
3. Hand-paint flower pots
4. Draw a pattern on the lamp with a marker
A little patience and a marker that writes on different surfaces - and the modern lamp is ready. How to draw a picture on a lampshade is shown in this blog.
5. Decorate the lamp with improvised materials
6. Make a handmade watch
An original wall clock in the best traditions of expensive decor stores can be made at home in a few hours. It's not as difficult as it might seem. instructions for creating a clock in the style of a school board. And it shows how to make a pin-up style watch.
7. Organize a real minibar from an old sideboard
The era of sideboards with tons of crystal is irrevocably a thing of the past. But many still have the sideboards themselves. So why not turn your old furniture into a modern home minibar (not necessarily alcoholic). It turned out very well.
8. Use corner shelves
9. Make an additional shelf for spices
10. Use cabinet doors
11. Attach the magazine holder
12. Paste fabric “wallpaper” on the door
Using patterned fabric and cornstarch glue, you can decorate a boring door in an original way. Such “wallpaper” is easy to remove, so when the picture gets tired, it can be easily removed or replaced with a new one. You can look at the process of decorating a door in this blog.
13. Paint the front door rug in unusual colors.
A doormat can be fun too. To do this, it is enough to paint it in bright, non-standard colors. How to turn an ordinary rug into an original thing, see this blog.
14. Make a bath mat from natural materials
Cork is an excellent natural material that dries quickly and retains heat well. It is pleasant to step on such a rug with bare feet. And its creation from wine corks will certainly make you remember many good moments. You can see how to make such a rug.
15. Hang a wall panel
16. Organize a photo exhibition
17. Add a color accent to the door
This idea is ideal for cases when you want to liven up the interior a little, but there is no way to change anything radically. This trick can be done even in a rented apartment; in the end, you can always return it to how it was. How it's done is shown.
18. Paint old linoleum
19. Turn a table shelf into a wall shelf
Often there is not enough space on the table to store various small items. In this case, the table shelf can be easily turned into a wall shelf, and a folding one at that. It will not only allow you to organize the space, but also decorate it. Simple instructions can be found.
20. Decorate coat hangers

You really want your house to look stylish and expensive, but doing this with your own hands is actually easier than you might think. From the most ordinary, and sometimes unnecessary things, DIY crafts for the home look great.
Expensive furniture, works of art, modern gadgets will undoubtedly make your home look luxurious, but sometimes very little money, a little creativity and neatness are enough to get an interior that looks expensive and stylish, and all this attractive splendor is very inexpensive.
If you want to put your hands and soul into decorating your home, here are some ideas on how to do it.
DIY crafts from jars
Use jars to organize small items such as cotton balls, ear buds, and bath salts. This useful decor is ideal for a bathroom or bedroom. The jars may be the same or not, this is not very important here. The important element here is the handles. These are furniture handles. When I visit hardware stores or furniture workshops, it is difficult for me to tear myself away from display cases with handles; I am especially attracted to transparent ones in the form of crystals. It truly looks luxurious. I always regretted that I didn’t have furniture where I could attach such luxury.
And here it is, a godsend for beautiful hands. Naturally, the lids on the jars originally came in all sorts of colors, but they were painted with simple white spray paint. And the luxurious handles were glued with metal glue.
From bottles
Such an exquisite decoration of the simplest bottles can be made using decal paper with transparent film. Of course, first you need to paint the bottle in the desired color, and then start decorating the surface.
You need to find an interesting pattern that suits your interior in shape and color and transfer it to the surface of the bottle. The design is printed on decal paper for a laser or inkjet printer.

By the way, such paper is called differently. Decal paper, gummed paper, decal and even transfer paper are all the same thing.
Then, the drawing is cut with scissors and lowered into the water. After 10-12 seconds, the picture will separate from the substrate. You can watch the video, a very interesting way to accurately transfer a design to the surface of a cup.
Read the guidelines for printing on decal paper carefully. Find out the paper type for your inkjet or laser printer; in the printer settings, check whether the paper type is specified correctly. Before applying to the surface, it must be degreased with alcohol. The treatment liquid should not contain acetone. Dry the applied design with a hairdryer or in the oven. Attention! The oven temperature should not exceed 150 degrees.
After application, coat with acrylic matte or glossy varnish, depending on the purpose of decoration.
With this paper you can make designs that will last for many years, such bottles and vases can be washed, nothing will happen to them.

Anyone who has a creative streak is sorry to throw away empty “glass containers”.
And this is a right regret, because even the simplest glass bottles look magical in the interior.
Serving napkins
Great idea! I talked about such exquisite home decoration in a previous article about. And I liked Lyudmila Sanzharovskaya’s comment that such table setting gives status to the owners of the house.

From newspaper and magazine tubes
I never thought that such practically free material would be so flexible. I was a guest at a children's creative center with a surprisingly cute name “White Rabbit”. The hostess showed me the children's handicrafts, I was amazed, here is a dish woven from newspapers. After all, you can’t tell it from a vine. This dish will be varnished, it will not be afraid of water, and it can be used perfectly in the kitchen or in the garden for fruit.

This craft requires more skill and experience. But, as they say, the worst is the beginning.

Stylish crafts made from cord
The pleasant natural color of cotton cord is a favorite material for DIY crafts. Flower pots and organizers look elegant and noble, especially in combination with brightly colored tassels made from floss threads or natrul materials such as leather.


You can make rugs and baskets from scraps. But if the rugs can be made only from shreds, cut into ribbons and tied together into one thread for knitting. It is better to make a basket on a cord around which the shreds are wrapped. The basket should keep its shape. You can put tangles, scraps and everything a needlewoman needs in her handicraft corner.

From an old sweater
You can make a craft box look stylish using just an old sweater that no one wears anymore.

Book holders
I found such a cute guy on the Internet, I already have an article about holders, but it’s hard to pass by such a charmer. An ordinary stone, so skillfully painted and doing its functional task so well. Although in the article about holders the idea of a silver or gold polyhedron looks very expensive, the painted stone looks very nice and homey.

Beans and brushes for stylish crafts for the home
This proposal looks more like a life hack, but it looks so stylish that I decided to place this photo in crafts for the home. The truth about “making” here is only the process of pouring beans into a transparent vessel of suitable size.

Crazy Shred
A wonderful technique for crafts for the home - crazy patchwork or crazy patchwork. The good thing about this technique is that all kinds of fabric scraps are used. Every girl who sews more or less has somewhere a treasured bag with scraps and leftovers. In the technique of real, academic patchwork, special attention is paid to the selection of fabrics. They even sell sets. But there are no restrictions in this technique and it is easy to do.
Here, a guest of my site, Luda Strakovskaya, shows how to sew a potholder using this technique, everything is simple and clear.
In fact, potholders are a very necessary and beautiful detail of the kitchen interior.

But there are also options for this technique in the living room. Decorative pillows for beauty, comfort and as a cohesive color element of the interior.

A scattering of puzzles
I don’t know about you, but I have a huge number of puzzles that have migrated from one box to another, got mixed up, rearranged, and now it’s no longer possible to assemble anything worthwhile from them. And here is such a nice and beautiful idea for a nursery.

Crafts from buttons
This is a classic of the genre. Anything can be made from buttons, and there is practically no person who does not like to look at buttons. And in hardware stores there are always crowds of people near the scattering of buttons sold at discounts.
Recently I went into a store, there was a table with high sides and inside there were piles of various buttons that were left in the store one or several at a time, leftovers and illiquid items. A special scoop is stuck into the slide; you can pick up buttons directly with the scoop.
Mom and daughter, daughter, about 5-6 years old, are collecting buttons in bags, their faces are happy, overjoyed. I ask what you will do with them. Mom, hurriedly, - Oh, we don’t know yet.
I really want to see what they came up with with their buttons.
Maybe such beauty, for example.

Cinder candles
Candles are always needed in the house. To create a romantic mood, for relaxation and release from the negative energy of the past hard working day, and, of course, for cases when there is an emergency power outage in the house.
Oh, this incident is perhaps the most favorite in our family. Especially when the children were little. Everyone pulls up to the kitchen, the kettle is turned on, the candles are lit and moments of happy family unity begin. It would be nice if everyone’s phones were dead by this time.
After such gatherings, a decent amount of cinders remains, or rather, this amount depends on the time needed by the emergency service to fix network problems.
The cinders need to be melted and poured into cups left over from sets or for some reason not used for their intended purpose.

Or you can make the “cup” itself from the same molten mass.

More ideas for a wooden nursery
A kind of stadiometer, or rather an age meter made of wooden square planks, will decorate and allow you to observe changes in the size of the hand of the owner of the room.

Well, or just decorate a children’s room on a budget, involving both kids and adults in the creative process.

Friends, decorating your home with your own hands is a pleasant thing when ideas have been formed and all that remains is to select materials and tools for crafts. When your soul is rushing and you want both this and that, there is no need to rush. I hope this article helped you decide, or at least was simply useful.
Every home owner wants to feel as comfortable as possible in their home. This becomes the reason why there is a desire to decorate the interior not only beautifully, but also in an original way.
However, often the funds for this are not enough, because the services of professional designers, like beautiful things, are not cheap. Therefore, recently, an increasing number of homeowners prefer to decorate the interior of their home on their own using crafts from improvised materials that are inexpensive.
It is worth noting that the main advantage of such crafts is not the cheapness of the materials. The most attractive thing is that every item you create is unique. But it is the uniqueness of the design that attracts attention.

Products that were created with one’s own hands emanate a special energy. And thanks to this, an atmosphere of comfort and warmth appears in the house.

An important circumstance is that such structures can act not only as ordinary decorative elements. With their help, you can organize your space much more conveniently. After all, they can be used to store a variety of small items that are necessary for the household.
Do you think this is impossible because you need to have any special skills? No, even a child can handle this job of creating crafts.

Pay attention to the photo of crafts from improvised means, which is presented below. It shows an example of creating a key holder, which is not only a beautiful addition to the interior, but also serves as a small hanger for keys.

And the process of its creation is not complicated. Let's look at it in more detail.
Key hanger
Surely, many people are familiar with the situation when they have to raise the whole family to look for keys. After all, people often do not burden themselves with buying special small shelves for storing keys and other small things.

And since the key is a fairly small item, it is easy to lose it among larger things. To avoid having to constantly look for keys, many people keep them in their purses.

However, we can offer you a more interesting and original storage method. And for this we will build a key holder.

Its main feature is that in appearance it will resemble a product decorated with brickwork.

We will tell you step by step how to make a craft in the form of a key holder from available materials. But first, let’s look at exactly what tools and materials will be needed to create it: a thick sheet of cardboard or plywood, thick napkins, hooks, glue, varnish, paints.

Stages of performing a key holder
At the first stage, you need to cut out the back wall of the future key holder. As a material, you can use either thick cardboard or a not too thick piece of plywood.

In the second stage, you should cut out small rectangles from cardboard that will imitate brick. Please note that they must be the same size.

In the third step, you must glue the cut out “bricks” to the base using glue. Remember that there should be a small gap between them. You should also not cover the entire surface of the product with them. After all, in the central part there should be a small sign with an inscription, and in the upper part there should be a picture.

Note!

At the fourth stage, you should start lubricating the bricks with glue. Do not skimp on the glue at this stage, because it is necessary so that you can place the crumpled napkin on top of it. It can also be covered with a small layer of glue on top for better impregnation.

Using a stick or the back of a brush, press the tissue into the gaps to create corners. Leave the product to dry.

Please note that any crafts made from improvised materials at home must be durable. Therefore, we strongly recommend not to skimp on binding materials.

At the fifth stage, the process of creating a visual resemblance to natural brickwork begins. Once the panel is dry, coat it with paint. The seams must be painted with bronze paint.

At the sixth stage, you should coat the bricks with paint a second time. However, this time you need to use a dry brush. To do this, dip it in bronze masonry, wipe it on paper so that it becomes dry and then dip it again in the color with which you painted the bricks.

Note!

Remember that to achieve maximum similarity, you should only move the brush in one direction.

At the seventh stage, which is the final one, you should coat the finished product with clear varnish and attach the hooks on which the keys will hang.

Crafts for the garden
If you are the owner of a country house, then for you the decorating process is not limited only to the area of the home. Therefore, to improve the area around the house, you should use garden crafts from improvised means that will decorate any garden or vegetable garden.

To make them, you can use plastic bottles, hemp, tires and old soft toys. In this case, it all depends on what set of tools and materials you have.

Crafts made from tires are extremely popular because they are quite simple to create, but at the same time they look original and interesting.
Note!


For example, you can create a real cup from tires, which will become a wonderful flower garden. To create it you will need one tire, a round board (the diameter of the board must be larger than the tire), paint, and a small piece of rubber.

The tire and board must be painted the color you like. If you have artistic skills, you can use them to decorate the product with beautiful images.
If you do not have such drawing skills, you can paint the design one color or polka dots. The handle of the cup should be secured with a large stapler. And now your product is ready.

We draw your attention to the fact that even children’s crafts made from improvised materials can become a worthy decoration for your garden. Use crafts your kids made from plastic bottles and cups. Despite their simplicity, they look quite original.

If they are small in size, use them to decorate the porch or window sills. This way, you can focus on them, and they will not get lost in a large area of the garden.

Photos of crafts from improvised means


Today, handmade gifts are popular. The souvenirs look luxurious, they are of high quality, the crafts are unique, and their creation is incredibly fun. You can create gifts using different materials. The main thing is imagination, a little patience and sincerity with which souvenirs will be created.
It’s especially nice to receive and make crafts for the New Year. This holiday is loved by adults and children. We invite you to familiarize yourself with the gifts that you can make with your own hands. For each craft, the necessary list of materials is indicated. It is very easy to create an exclusive and original gift. Crafts can be used as decorations for a Christmas tree, apartment, or as souvenirs for friends and family.
New Year's paper crafts
It's easy to make crafts out of paper. Lanterns, garlands and snowflakes, as well as other products, are made from it. Paper is a simple and affordable material, so it is widely used to create New Year's crafts. When asked “What to make from paper for the New Year,” the first thing that comes to mind is a snowflake that will decorate a Christmas tree, a window, or become a pleasant souvenir. Well, that's what we'll do. But we will not make a simple snowflake, but a three-dimensional one! To do this you will need materials: paper, scissors, stapler or glue.
Find more paper crafts in the article:

Time runs inexorably forward and now white flies are flying outside the window, slowly falling to the ground and covering everything around with a snow-white fluffy blanket. However, despite the cold, my soul is warm and joyful. And all because suddenly appearing snowflakes herald the coming of the New Year. The most important holiday of the year is already very close, which means it’s time to think […]
New Year's crafts from pine cones
The best material for creating New Year's crafts is pine cones. There is practically nothing you need to do with the pine cones. They are already an excellent decorative material in themselves. You can decorate the Christmas tree with cones or put them in a vase and place them on the table to create a festive atmosphere. We suggest making a garland of pine cones. For this we will need: cones, glue, glitter, ribbon.

We have other crafts made from pine cones for the New Year:

New Year's holidays are approaching - time to give and receive gifts, decorate the Christmas tree and decorate the house. Perhaps we no longer believe in the good old man Santa Claus, we don’t expect gifts from him under the tree, but we definitely expect a miracle, especially on New Year’s Eve. A miracle is of course good, but the realities of life dictate their own rules to us. Job, […]
New Year's crafts from dough
Everything is clear with cones! But what should those who don’t have the opportunity to look for bumps do? We'll have to improvise. Don't worry, we know you still have plenty of craft materials at home that you don't even know you need. For example, many gifts for the New Year can be made from salt dough. To prepare it you will need only three ingredients: flour - 1 cup; salt – 0.5 cups; water – 0.5 cups. You can also add sunflower oil (2 tablespoons) and dye (a few drops). We suggest making a “knitted” heart from the dough.

You will find more dough crafts in a separate article:

A wonderful, festive and magical time is the New Year, for which adults and children prepare gifts and souvenirs for friends and loved ones. You don't have to shop at the store; you can make delicious gifts yourself from scrap materials, such as puff pastry. The crafts are original and bright. Unique toys decorate Christmas trees and are used as original and unusual souvenirs. […]
New Year's crafts made from felt
In your search for improvised materials for New Year's crafts, you may well come across felt scraps. In fact, felt is a type of felt, so if felt is not available, you can use a similar material. We suggest making a penguin from felt. We will need: felt, thread, needle, cotton wool or padding polyester, buttons.
New Year's crafts are created with pleasure using felt. The souvenirs are colorful, touching and delightful.
See also other ideas for felt crafts:

The New Year holidays are approaching, which means that very soon a forest guest will appear in almost every home in our country. Some people prefer to put up an artificial Christmas tree, some prefer to put up a real forest spruce from a Christmas market, and some even confine themselves to pine branches. However, this is not so important, because the most important feature of the New Year tree is the toys. Since ancient times, people in [...]
New Year's crafts from disks
Surely everyone has unnecessary CDs; they can be used to create original New Year's crafts. The simplest craft option is a snowman. For this we will need materials: CD, felt, scissors, glue, felt-tip pens, buttons or beads, ribbons.

A child can make such a snowman; he will be captivated by this activity. The craft can be hung on the Christmas tree or given as a gift.
For more ideas on New Year's crafts from old CDs, see the article:

Winter is already sweeping through the city, the days have become shorter, but the evenings last forever. What to do with your children besides tablets, computers and TVs? Well, of course, New Year's crafts. In addition, this type of activity will engage not only children, but also adults. The main thing is to approach this activity with enthusiasm! What are New Year's crafts made from? […]
New Year's crafts from bottles
Ordinary plastic bottles can be used as a handy material for crafts for the New Year. We suggest making an original craft - feathers that will look great on a Christmas tree, window or as a keychain. We will need: a plastic bottle, scissors, felt-tip pens or markers. Plastic feathers will be a wonderful New Year's decoration.

New Year's crafts from tubes
For creativity with children, cocktail straws are suitable as a material for New Year's crafts. Surely on the eve of the New Year holidays you have already managed to purchase several sets. Great! Then let's get started!

New Year's crafts from cotton pads
So, what else can you find at home as material for New Year's crafts? Of course, cotton pads. By the way, if there are no disks, ordinary cotton wool will do. It makes an excellent imitation of snow. There are a lot of options for crafts made from cotton pads or cotton wool, but we suggest making a New Year's ball. You will need: cotton pads (a lot), a stapler, a needle, thread and a small ribbon. The process of creating a New Year's ball will take no more than 15 minutes, but such a Christmas tree toy looks truly wintery!

New Year's crafts made from cardboard
You can use cardboard as a material at hand for New Year's crafts. Don't know where to find cardboard? But what about old postcards, which are probably gathering dust without use. Of course, you should not use memorial cards, for example from dear and close people. But postcards that mean nothing can be used for a good cause. We suggest trying out a pine cone as a trial craft!

New Year's crafts from threads
What else can be used as improvised material for crafts for the New Year? Threads. These can be thin threads or thick yarn, depending on what exactly you want to do. We propose to build a New Year's star. We will need: threads, PVA glue, matches or safety pins, disposable container.

New Year's crafts made from fabric
A very cool New Year's craft can be made from fabric. If you are comfortable with a needle and thread, then you should start with something simple, for example, sew a nice Christmas tree using materials: fabric (you can take calico, cotton, chintz, silk, linen, satin); strong threads; needle; safety pins; scissors; filler (sintepon, holofiber, cotton wool); wooden stick; decorative elements (optional).


You can decorate a fabric Christmas tree with different objects, snowflakes. Crafts, ribbons.
In addition to the Christmas tree, you can make other New Year's toys from fabric:

Tilda is a beautiful doll that has a soul. Making such a toy yourself is very simple, the main thing is to purchase the necessary materials, show imagination and a little patience. The doll is filled with warmth and comfort, and will be an excellent gift for family and friends. Tilda's story The doll appeared at the end of the 90s in Norway. It was invented by a Scandinavian needlewoman named Toni Finanger. Then […]
New Year's crafts from candies
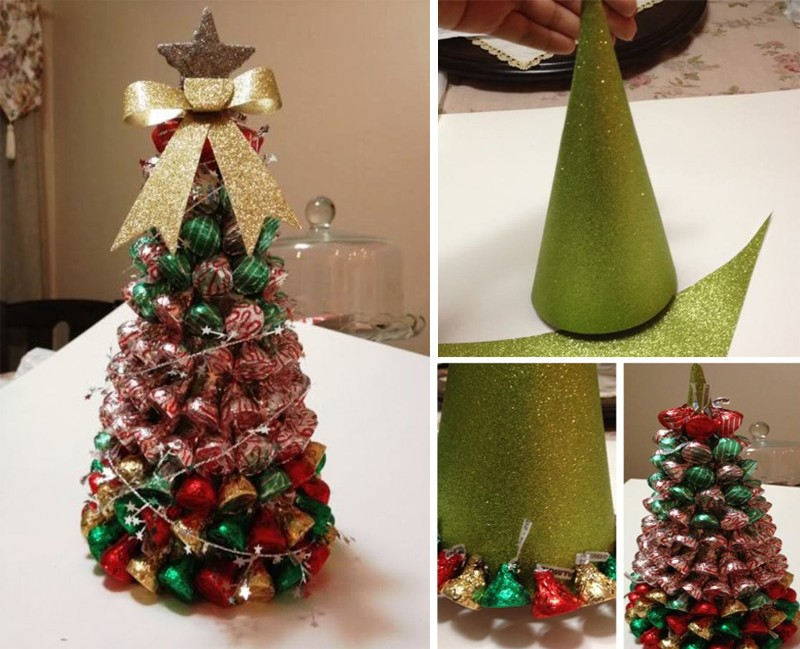
On New Year's holidays, every home is full of all kinds of sweets, mainly candies. Well, let’s not let the goodness go to waste, let’s make an excellent New Year’s craft that will be an excellent gift for friends and acquaintances. We suggest starting with the Christmas tree. For this we will need: thick paper, candy, double-sided tape, ribbons and tinsel.
By the way, if you need to add other candies, we have ideas for this:

What would New Year be without sweets and candy?! We've been good all year, so on the last day of December we look forward to some sweet treats to make the coming year as sweet as these candies. However, candies in the New Year can be used not only as a sweet treat, but also as decoration, for example, […]
New Year's crafts from cups
Plastic cups will also be used. If there is a lot of plastic containers, you can make a big snowman. By the way, if there is no snow outside, and the little one really wants to make a snowman, plastic cups will come to the rescue. By the way, you can also attract neighbors. In any case, crafting with a large group is more fun! We will need: plastic cups, stapler, glue, decorative elements.

New Year's crafts from disposable tableware
You can create real New Year's masterpieces from disposable plastic tableware. Suitable materials include plates, spoons, forks, and knives. There can be a lot of ideas, but we suggest making a Christmas wreath from plastic spoons. For this you will need: 201 spoons, glue, wreath blank ∅45 cm, red paint (preferably spray), white ribbon. Break off the handle of each spoon. Then glue the round parts of the spoon to the wreath blank in four circular layers. It is better if the workpiece is made of MDF, but if not, then thick cardboard will do. After this, paint the wreath and let it dry completely. Now all that's left to do is thread the ribbon and you're ready to hang it!

New Year's crafts from sticks
Did you have a children's New Year's party with a lot of ice cream? Great! We urgently collect sticks and get ready to create a New Year's craft. Let's make a snowflake. For this you will need: sticks, paints, glue, buttons. The craft can decorate the refrigerator or become a toy for the Christmas tree, or it can also be given as a gift.

By the way, snowflakes can be made from other materials:

What is it difficult to imagine the New Year without? Of course, without a Christmas tree, Santa Claus, and for us, residents of northern latitudes, it is extremely difficult to imagine the New Year without snow and snowflakes! If you want to create a truly New Year's atmosphere in your home, then don't be lazy and decorate everything around with snowflakes. Snowflakes can be flat or voluminous, carved or not. In addition, it is worth abandoning the stereotype [...]
New Year's crafts from cotton swabs
When all the obvious options have been considered, it's time to use the magic cotton swabs! We will use them to make a magical winter applique! For this we use: cotton swabs, glue, cardboard, paper!

New Year's crafts from pasta
So, what else do you have at home that can be used for New Year’s crafts? Pasta would be an excellent option. Yes, yes, regular pasta for cooking. True, you don’t need to cook them for this. By the way, pasta of any shape is suitable: horns, spirals, shells, bows. We suggest using pasta to create New Year's cards. For this we need: pasta, paints, glue, glitter.

For more ideas on New Year’s pasta crafts, see the article:

New Year's holidays are approaching, which means it's time to think about creating a festive atmosphere. You don’t have to use store-bought accessories for decoration. It's time to unleash your creativity and make original crafts with your own hands. If you are one of those people who are creative about once a year, then New Year’s crafts from [...]
New Year's crafts from buttons
Absolutely any materials that you can find at home are suitable for New Year crafts. Surely everyone has such a box in which spare buttons from clothes are stored. The shirt has long been thrown away, but the buttons are still there. Great! You can usefully get rid of this goodness by making cute New Year cards. In addition to buttons, you will need thick paper, glue and various decorative elements for this craft. You can decorate a card with buttons in the shape of a snowman, a New Year's garland, or a wreath.

Need more postcards? We have!

The best gift for the New Year is, of course, a gift made with your own hands. And if socks or a sweater are not an option for you at the moment, then even a child can handle a postcard. A DIY New Year's card is suitable as a gift for absolutely everyone: friends, relatives, dearest and closest people. New Year's cards can be complicated […]
New Year's crafts from toilet paper rolls
Go ahead. In search of scrap materials, you should literally look around the entire apartment. You especially shouldn’t bypass the place where everyone likes to think! Yes, yes, you can also find materials for New Year’s crafts in the toilet. Don't be alarmed. They're just toilet paper rolls. Let's make owls! For this we will need: toilet paper rolls, paint, brush, colored paper, scissors, glue.

Don't rush to throw away the bushings! We have over 100 more craft ideas!

The New Year holidays are approaching, there is less and less time left, and there are more and more worries and hassles in preparing for the holiday! It is especially difficult for mothers during these pre-holiday days. Little fidgets are looking forward to the holiday, so mothers have to come up with interesting games and activities every day. If your imagination no longer works, our cool master classes on making New Year’s crafts from […]
New Year's crafts from napkins
I think there are napkins in every home. Moreover, before the New Year, they are bought without fail for the festive feast. You can make incredibly cool crafts from ordinary napkins. We suggest choosing a Christmas tree. For this we will need: thick paper, napkins, a stapler, glue or double-sided tape, beads, rhinestones.
Another cute Christmas tree made from napkins will be a wonderful holiday decoration.
New Year's crafts from boxes
What else can be used as improvised material for New Year's crafts? Boxes, friends, boxes! And absolutely any: from shoes, milk, oatmeal, cereal, etc. The first thing that comes to mind when looking at a cardboard box is a house. You can decorate a windowsill with cardboard houses or hang them on a Christmas tree. And if you put an electric candle inside the house, you will get a magic lantern!
New Year's crafts from satin ribbons
If you have satin ribbons lying around, get them out immediately! You can’t even imagine what valuable material you have in your hands. True kanzashi professionals (this is the name for the technique of making crafts from ribbons) work wonders. Well, beginners should try something easier, for example, making a Christmas tree. For this craft we will need: thick paper, satin ribbons, scissors, glue, beads.

New Year's holidays are ahead and it's time to start decorating. You can make decorations for the New Year from a variety of materials, such as paper, beads, pine cones, and even old CDs. But in this article we will talk about New Year’s crafts made from satin ribbons. Crafts can be simple or made using a special Japanese technique - kanzashi. Christmas tree Let's start our crafts [...]
New Year's crafts from old light bulbs
Well, do you think all the ideas are over? Nope! We are urgently looking for old light bulbs. Of course, both incandescent and energy-saving lamps are suitable. But we suggest using the good old Ilyich light bulb. Let's do “winter in a jar”! You will need: an old light bulb, glitter, mini Christmas tree, glue, ribbon.
