Plastic bottles are a familiar material, and you won’t surprise anyone with crafts made from them. Another thing is the caps, which many people unknowingly throw away along with the bottles. But you can make so many useful and interesting crafts from them, including mosaics, refrigerator magnets, wall panels and massage mats!
Plastic cork magnets
You will need:
- Lids;
- Small magnets;
- Glue or double-sided tape;
- Medical alcohol;
- Markers.
Instructions:
- Degrease the plastic lid with medical alcohol and glue a magnet inside. On the front side, draw a funny face.
- If you glue special decorative elements with a moving bead in a plastic shell to the lid, the eyes in the image will turn out to be more alive.
Mosaic made of plastic corks: manufacturing rules
More skill requires mosaics made from plastic corks, which can be either an independent craft or a decorative element. Thanks to the strength of the material, you can decorate your garden patio or the facade of your house with this product.

During manufacturing, the covers are fastened together using a special adhesive for gluing polyethylene BF-2 or BF-4. For more complex drawings, it is worth making markings on a primed sheet of plywood in advance, and then using acrylic paints to draw the desired figure. When the paint has dried, you can begin gluing the corks using a glue gun. To make a cork mosaic you will need a large amount of material of different colors and some drawing skills.
If you decide to make a mosaic on the surface of a wall, the technology for its implementation is somewhat different. First, you need to select a pattern or design that will be applied to the surface of the wall. After selecting a surface, it needs to be marked. When marking, place marks at the height and width of the pattern. It is also necessary to divide the proposed wall into equal squares - this will help control the shape of the pattern and design. Additionally, you can mark the colors of the plugs that will be attached in the marked squares.
After applying the markings, you can begin placing the plugs. You can nail the plugs to the wall with the front or the inside. If you decide to attach the plugs with the front side, you will encounter difficulty in cleaning the wall surface, since debris and dust will collect in the plugs. Fastening with the inside is convenient because after work you can mask the mosaic seams using cement-sand mortar.
If the wall on which you plan to lay the mosaic is concrete or brick, it is recommended to use special compounds for fastening. The wall surface is plastered at the same time as the covers are applied. After completing the mosaic, wait until it dries, then you can eliminate any defects. Nailing is considered the optimal method of attachment to wooden structures. You can use self-tapping screws or regular nails.
How to make a rug from plastic bottle caps?
You can make a massage mat from corks quite quickly. The finished product looks beautiful, especially if you use multi-colored lids. You can get a lot of benefits from a lid massage mat. Firstly, it is wonderfully relaxing. Secondly, doctors advise walking on such mats every day for about 10 - 15 minutes. It improves health.
The effect of a massage mat made from lids is explained by the fact that the feet have a large number of sensitive nerve endings that are responsible for different organs and systems of the body. During the massage, the whole body is charged.

You will need:
- Caps from plastic bottles;
- Awl;
- Thick and durable line.
Instructions:
- There should be approximately 10 - 15 caps on each side of the hexagonal mat. To correctly calculate their number, you need to multiply the number of caps on the 1st side by the number of sides and subtract the number of caps that are repeated.
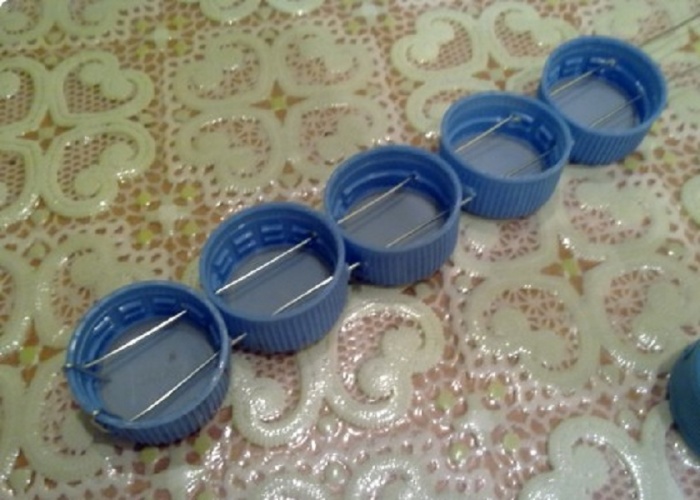
- When you have collected the required number of parts, pierce six holes in each lid with an awl. All the extreme ones are collected on 1 strong fishing line. Then, the lids must be braided with a piece of fishing line so that they hold tightly. Thus, assemble the blanks into a hexagon, securing with fishing line.
- To make the massage mat beautiful, use multi-colored covers and lay out a specific pattern. You can design it in advance, and then just start assembling it.
Crafts made from plastic bottle caps: photos

Recently, handmade things and crafts, the so-called handmade, which can be made from anything, have become increasingly popular. Plastic plugs did not stand aside and received their second use in original design ideas.
Plastic bottles are available to everyone without exception and are certainly found in every kitchen.

Many people try to immediately throw them away, but there are also creative individuals who, using various life hacks, use them for decoration or useful devices for the home or garden, as in the photo of crafts made from corks.

Today we will talk about crafts made from plastic corks.

Using plastic caps in children's creativity
Children are great dreamers by nature. Give them any object and they can easily transform it into another image. After all, from a very young age, both at home and in the children's group, children are instilled with an interest in handmade crafts.
Plastic bottle caps are an excellent material for children's creativity. Corks can be easily glued, thanks to which various panels, figures and decorative things can be created.

The kids love to tinker with traffic jams and fantasize about various topics: appliqués, toys and figures.

Types of applications
The most favorite craft made from plastic corks among children is a caterpillar. Delight your child by making it out of colorful corks and lengths of his own, and he will play with it all day long.

The caterpillar's face can be made funny, which will inspire the subject. The caterpillar is made very simply, a hole is made in the center of the corks, a fishing line is threaded through it, on which the corks are strung, the muzzle can be made from a Kinder Surprise cone.

Using the same principle, you can make a person, a cat, a dog, etc.

To make a “bird” craft from bottle caps you need: two caps, cardboard, light fabric or natural feathers, such as pigeon feathers. The head and body are made from corks, and the wings are made from cardboard, fabric or feathers.

The “rabbit” applique is made in the same way as the “bird”, the body and head are made of caps, one of them should be of a larger diameter, the ears are made of cardboard and the tail is made of a piece of fur. Children are delighted with such toys. The main thing is that you can do this together with your child.

A three-dimensional “turtle” craft made from corks with your own hands will interest a child more than an applique. It's not difficult to do.

The necessary materials for creativity you will need: a large diameter lid, cotton swabs and an ice cream stick. A lid is glued onto an ice cream stick and green-colored cotton swabs placed crosswise on top.

Specks are drawn on the lid and eyes are made. Your masterpiece is ready. In the same way, you can create spiders, ladybugs, bees, etc., using various available materials.

Mosaic of traffic jams
You can build a mosaic panel from a large number of multi-colored corks. To do this, in addition to corks, you will need good glue or a glue gun so that the composition does not fall apart in the future.
Note!


First of all, choose a surface for creativity, decide on the image and get to work. The panel parts are attached by gluing them one by one to the prepared surface. If you want to mount them from the reverse side, then you will need screws to secure them.

An interesting solution for the panel would be the option of folding lids of different sizes one into one according to the matryoshka principle. For example, a yellow sun made from such folded lids looks great.

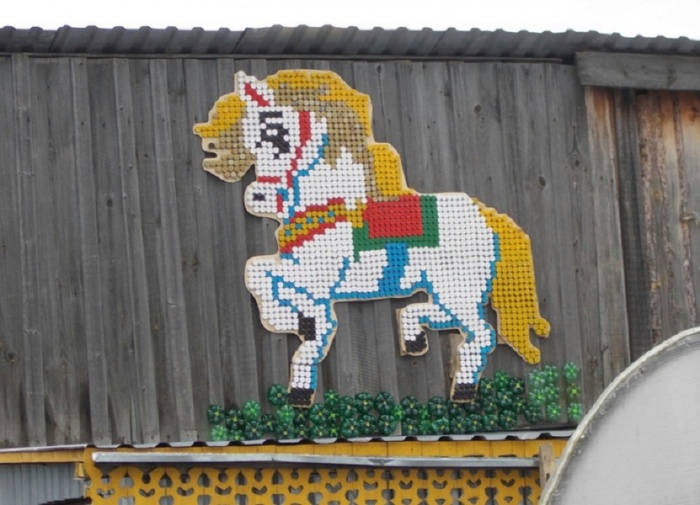
The “cockerel” craft is also entertaining, but requires some skills and time. To do this, you need to make a plywood base, prime it, apply an outline and use glue to fix the plugs according to the image diagram. The result is an original creation.
Magnets
An ideal option for beginners would be making refrigerator magnets. Nowadays, almost all refrigerators are decorated with all kinds of magnets and not only to hide any defects.

Making them will require very little time and the following materials: corks of different colors, magnets themselves, glue, alcohol solution, paints, multi-colored paper, felt-tip pens.

Note!

First, degrease the cork with alcohol. Glue a magnet inside the cork. We cover them with circles of colored paper, cut out in advance.

You can decorate multi-colored circles with names, drawings, letters or bows ahead of time too. Use letter circles to create a fun alphabet. You can also make a picture using certain Internet resources as assistants.

Foot massage mat
One of the most popular craft options is a foot massage mat. Making a rug is an easy and simple process using multi-colored corks. And subsequently the rug looks bright, unusual, and its use is good for health.

Walk on it for about 15 minutes a day to achieve relaxation and general strengthening of the body, due to the impact of walking through traffic jams on the nerve endings of the feet.

Prepare multi-colored corks, an awl, and thick fishing line. For a hexagon-shaped rug, you will need 10-15 pieces of corks on one side. The total number of stoppers per product can be calculated as follows: multiply the number of stoppers on one side by the number of sides of the rug and subtract the number of repeating stoppers.

Note!

Then make 6 holes in all the corks with an awl. Next, using the weaving method, starting with the outer plugs, you should braid all the parts to form a hexagon. A rug made of multi-colored corks in the shape of flowers will have a beautiful appearance.
Hallway rug
A hand-made hallway rug would be practical for everyday use. Using a glue gun, bottle caps are glued together in any shape and form; colored caps are used to add brightness. It is easy and simple to clean from dirt.

But it also has its drawbacks: it can scratch the linoleum surface, so it is better to use it for tiles.

For example, in the bathroom. If the mat will slide on the surface, it should be secured with rubber circles on the back side of the mat.

Country curtains for doorways
At the dacha you can find many options for using both bottles and the corks themselves. Here fantasy has no limits. But the most popular idea is to decorate doorways with curtains made of plastic corks; this is financially economical and easy to manufacture.

And as a result - beautiful unusual curtains. To do this, you need a large number of multi-colored caps, fishing line, an awl, a hammer, a nail and a needle.

The step-by-step scheme for making curtains looks like this:
- Holes are made in the lids on both sides.
- If the curtains are made according to a pattern, it is necessary to lay out the covers in accordance with it.
- The corks are strung on a fishing line of a certain length, you should start from the bottom of the 1st row up, and then immediately move to the 2nd row.
- Secure with knots, singeing the edges of the fishing line.
- String row 3-4, row 5-6, etc., as in step 2.
- Be sure to mark the transition from one row to another to make the work easier.
- Markings are made on the doors for attaching curtains with equal intervals between them.
- The curtains will be secured to the wooden door with stoppers for fastening, according to the markings.
- The first thread (row 1-2) and fix it on the door with a hammer and nails.

Crafts from corks for the garden
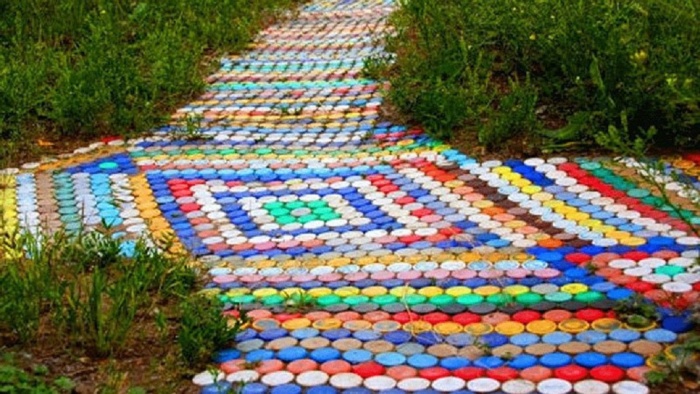
You can decorate your summer cottage with paths made of plastic corks. But do not forget that such paths have a decorative function of paths, and not a fundamental one. In winter they are very slippery.


For this you will need: large quantities of corks and different colors, sand, construction glue, boards, cement.

The procedure for creating garden paths is as follows:
- The first step is to make markings for laying the plugs according to certain sizes and in the designated place.
- The top layer of soil is removed and a trench is dug 10 cm deep. Formwork made of wooden boards is installed in the trench, into which about 5 cm of sand is poured.
- A cement mortar is made from sand and cement (1:4) with the addition of glue.
- The solution is poured into the trench, and plugs are pressed into it according to your sketch image. This is done carefully and evenly, at the same level, leaving only the top of the plugs without cement.
- After the cement mortar has been adhered, its remains are cleaned from the surface of the path with a stiff brush.
- At the end of the work, the formwork is removed.
- Curbs are being installed.

Using the same principles, using your multifaceted imagination, you can make other crafts using wine corks, but that’s another story.

Photos of crafts made from corks


But also using plastic covers from them.
From absolutely waste material you can create a simulator for developing fine motor skills, organize a board game, create original wall clocks and panels, make flat and three-dimensional toys. Are you still throwing away plastic lids?
Animal and insect figures made from plastic caps
With children of primary school age, you can do mixed appliqué: glue several lids to cardboard and get creative with their decor. They make wonderful birds, pets, wild animals, fish, and insects.


If you string plastic caps onto fishing line, thread or wire, like beads, you can make three-dimensional figures of animals and insects. Now they are already able to move and it becomes interesting to play with them.


Flowers made from plastic lids
Bright plastic bottle caps can turn into the core of a magical flower. We glue them to cardboard in the same way and decorate them. If you glue not only the plastic cap itself, but also the neck of the bottle, then you can hide a secret for the child inside. For example, a butterfly or a bee. Then he will be interested in “working” with such objects.


Pictures made from plastic caps
If you have accumulated several bags of plastic lids, then you should move on to large-scale art projects and installations. The covers can be glued and nailed. The main thing, as always, lies in the brilliant idea.

Flat people made from plastic caps
Similar to making simple animal figurines, you can make silhouettes of various characters and flat dolls from caps. We fantasize and glue them onto a base made of cardboard or thick fabric, decorate and rejoice at the result!


Details from caps that match the color will add originality to the design, making it voluminous and interesting. These can be elements of the face, buttons on a suit, flowers, balls and much more. For example, like this funny clown!

Transforming robots made from plastic caps
It turns out that it’s easy and simple to please your boys with a creative robot. To do this, we string the lids onto a wire base and assemble all the parts together. Now our robot can move, different types of weapons, wheels or even a car, antennas can be attached to it, and unusual or completely ordinary tubes, boxes and cans can be used in its design.


Transport based on plastic covers
Traffic flows can be extensive and stationary if you choose to create traffic scenes on large format paper or cardboard. For such a project you will need: find a base from a large box, select the necessary decorations and cut them out from magazines and newspapers, draw the necessary objects yourself, glue everything onto the base, and then start making lids. To do this, we take a variety of lids: small ones for juices, medium ones for mineral water, large ones for canisters and five-liter plastic jars. Get to work!
Spending time playing with such a “simulator”, the baby will involuntarily train his fingers, opening and closing the lids, looking for the second picture under them.
Please note that the caps can be not only the core of a flower or the wheels of a car, but also a door or window hiding interesting details and photographs.


You can make fantastic cars from scrap materials. Almost anything is suitable for this: a toilet paper roll, a jar of yogurt, other containers, canisters, cardboard boxes of dairy products.


Other items from lids
Indeed, there are no limits to human imagination! It turns out that you can use plastic lids to create stylish watches, organize a game of checkers, make toy musical instruments, sweets, and even decorate a children's kitchen for games.


Sources of photographs in the selection: foto-tur.ru/?p=8773, womanadvice.ru, fotostrana.ru, subscription.ru, armama.ru, ayamama.ru, podelkilegko.ru, uckomp.ru, forgetfullino.blogspot.ru, boombob.ru, lestnica.info, cinesoft.ru, everything.kz, www.awd-auto.ru, handmadehelp.ru, dou98.zlatoust.me, thebestartt.com, mirfb.ru, boltayanozhkami.blogspot.ru/2012/ 09/pirozhnie-iz-probok.html, horoshaya-mama.ru/, stranamasterov.ru/, solium.ru, faberena.blogspot.ru/2012/07/ein-lernspielzeug-aus-den.html, morburybeverly.blogspot. ru/2012/12/blog-post_8408.html, photo-bazar.ru/?p=8855/, fotohomka.ru, handmade.jofo.ru, studon.ru, stranamam.ru, searchmasterclass.net, allriddles.ucoz. ru
Did you know that cork is a very popular craft material in other countries? They are used to make paintings, figurines, rugs, decorations, frame furniture and create non-standard decorative elements. Therefore, do not rush to throw away corks after the past holidays - they can be used very interestingly!
At first glance, a cork seems like a banal and useless thing. However, fans of interesting DIY ideas can easily refute this statement by demonstrating intricate products.
Crafts made from cork corks
80% of the material for wine corks is produced in the southern countries - Portugal and Spain. The local climate promotes the growth and prosperity of cork trees, which serve as material.
The properties of wine corks can hardly be overestimated. Thanks to the tannins they contain, the development of microorganisms is suppressed. Suberin makes them durable, and wax provides water resistance.
If you have accumulated enough material, we suggest you use it wisely.
With their help, you can create interesting and beautiful things that will be useful to you or will appeal to children.
Advice
If you haven’t managed to accumulate the required amount of material, you can purchase them online. The price for 100 pieces fluctuates around 300 rubles.
Draw an interesting image on one side of the cork. It can be a heart, a number or any other symbol. Cut out its outline in such a way that the drawn element protrudes. Now you can paint it with any color and use it. Kids will love putting their own stamp on cards or notebooks, decorating their walls with it, and much more. Make a signet with your child - he will be interested in choosing his own distinctive sign.
Paintings
Thanks to the texture, you can get an unusual 3-D picture. It will be difficult to make a letter or a whole word without the proper skill, but anyone can build a three-dimensional heart. All you need is superglue and a little time. The resulting painting will be a great addition to your home interior. Another interesting use is a stylish background for a photo shoot. It's easy to paint the front of the corks in your favorite color or make a smooth transition from white top to crimson bottom.
Chandelier
Animal toy
Knit or sew a small cover for a wine cork and tie a thread to it. This will be great entertainment for your pet. If you want to diversify your cat's life, make a mouse! A fur cover with ears and a tail (which can be tied and sewn) will distract the cat from your shoes and possibly leave the furniture intact.
Holder
An openwork and unusual holder is useful for themed and special events; it can be used to decorate your desktop. They can be used to hold notes, reminders, business cards and cards for guests. The “wine holder” is made in two ways. Take a metal wire, decorate it with beads and wrap it around the cork. You can also fasten several corks at once. A small cut is made along the top ones, where you can stick paper.
Candlestick
You can add warmth to your home with a homemade candlestick. Take two glass containers of different sizes - you need one of them to be twice the size of the other. Place one container inside another. Fill the space between them with wooden elements. Place a scented candle inside a small bowl. You can also make a candle yourself in advance - from the remains of old candles.
Panel for notes
Very often we need to leave some information for our loved ones, or post a reminder for ourselves personally. In this case, a panel will help you out, which must be hung in a place accessible for viewing. You will need a base on which you will glue the cortical elements. It can be made either in a regular rectangular shape or in the shape of a heart. Place a garland of light bulbs along the rim - the panel will become a complete decoration for your home.
Hanger
This interior element will be useful for those who have a dacha or a country house. Attach cork plugs to a planed board, pre-varnished and in your favorite color, using a screwdriver. Now you can hang oven mitts and many other things on it.
Skewers for canapés
To make your table look original when guests arrive, use this advice. Cut corks into circles, find toothpicks and twine, and look for interesting elements for decoration. On each toothpick, place a circle with a fabric heart, beads or twine bows glued to it. Guests will note such ingenuity!
Magnets
Who doesn’t like to decorate their refrigerator with beautiful magnets that “hold” notes, photographs, postcards. Cut the wine cork in half (make a cut lengthwise). Glue a piece of magnetic strip to it and hang it on the refrigerator. You can first paint or decorate a homemade magnet. If you cut them into circles, you can make interesting magnets for children in the form of letters of the alphabet.
Hot stand
Several dozen wine corks combined with glue and satin paper will create unique coasters for hot dishes. This is an indispensable attribute for every kitchen. Cut all the corks in half to create a cylindrical shape. Glue them together in the form of a circle or hexagon. The outer edge is completely covered with decorative fabric or tape. You can also glue a small loop.
Bird house
Take thick cardboard and cut out the components for the house: bottom, roof, walls. Cut the cortical elements lengthwise and cover all four walls with them. Next, cut the corks into circles and form them into neat tiles for the roof. Don't forget to leave a round hole for entry.
Jewelry organizer
A large number of earrings, bracelets and beads are very difficult to store. They constantly get confused, it takes a lot of time to search in the box. Make it easy for yourself by storing your jewelry with a unique wall organizer. The corks are tightly glued to a strong base - you can use both halves and circles. Then attach several small hooks to which you will hang your decorations.
Tabletop
This furniture design option is suitable for your country house. Renew an already damaged countertop with it. Using liquid nails, glue the corks to the surface, placing them tightly together. Top coat them with clear varnish. Definitely, such a countertop will look incredible!
Keychain
You will need to buy accessories that are sold in specialized stores, or use parts of already unnecessary key rings. Color or label each keychain and decorate them with beads. The result will be an original item that can be used as a gift.
Filament curtains
Prepare various beads, a large number of cork plugs, and fishing line. Using a needle, make holes and string them onto the fishing line alternately with beads.
Pen
You will need four standard holes, drill through holes in them, and insert ink paste inside. Your child’s classmates will be surprised by this innovation!
From champagne corks
Some people collect champagne corks, others throw them away immediately after the holidays. However, they can really come in handy and become an original addition to a familiar interior.
For example, an old chest of drawers or wardrobe can be decorated with designer handles.
To do this you need to prepare:
- champagne corks;
- pencil;
- Phillips screwdriver;
- screws.
You need to mark the middle of the cork and attach it to the drawer or door. On the other hand, you need to insert the screw with the tip forward and screw it into the plug with a screwdriver from the narrow side.
Champagne will also be useful for making an original necklace. It can become not only your unusual accessory, but a child’s favorite thing or a nice gift for a friend.
Materials you will need:
- champagne corks;
- needle;
- colored threads;
- pencil, ruler;
- thimble;
- glue;
- felt.
Make notes with a pencil and cut most of the cork into several thin pieces. A width of 4-5 millimeters will be sufficient. Select a color scheme; you can choose one shade for several circles.
Step back from the middle and begin tying the cortical circles with multi-colored threads in a circle. Use a thimble if you are afraid of hurting your fingers. The middle of the product should resemble an asterisk.
When you're done with the last circle, take a piece of felt and glue all the tied pieces of corks onto it. Trim the excess fabric and sew bead chains to the product.
Made from plastic caps
There are no limits to human imagination. There are many crafts made from plastic bottles, but no less interesting things can be made from the caps of such bottles. Finished products can be found quite rarely, since collecting a sufficient amount of material is not so easy.
However, if you set a goal, you can involve your whole family and friends in collecting plastic caps. For some it is ordinary garbage, for a creative person it is material for a future masterpiece. From such a plastic base you can build toys, decorations, and interior items.
Plastic crafts made from lids vary:
- color and size;
- shape;
- the amount of material used;
- final purpose;
- the method of connecting the covers to each other;
- ornament or design.
Fastening can be done in different ways. For example, to make children's toys or traffic jams or to create a picture, use Moment glue. They can be used to glue lids on three different sides - front, back, side.
To attach corks to a wooden base, use self-tapping screws or nails with a wide head. The durability of the item can be ensured by using the fishing line that connects all the elements. To do this, make two to six holes on each plug.
The two holes on the lid look like a button that needs to be sewn on. Four holes on the sides are made in order to securely connect all the elements together using fishing line and create a reliable structure.
This type of fastening is used when creating fences or gazebos.
Most often, plastic crafts are suitable for a summer house or bathhouse, but many of them are acceptable for an ordinary apartment. Small coasters for cups look impressive and unusual. It is no less interesting to make watches from caps of different sizes.
The rug can harm linoleum or natural wood flooring.
The main advantages of this type of material can be summarized as follows:
- economy;
- diversity;
- Possibility of coating with paint, spray, gel;
- same size;
- the ability to create a large number of crafts;
- ease of use.
From beer caps
Reusing lids is a good thing. Beer caps, which are thrown away in huge quantities every day, have never been in short supply. Even if you don’t drink this intoxicating drink, someone you know definitely should! As a last resort, you can ask the bartender for a favor to save a bag or two of corks.
Chinese bells
Talismans that are hung near a window or on the street are very popular among Americans. Not so long ago, fashion reached us - “Music of the Wind” is often hung in dachas. It is believed that such a talisman attracts good luck to the house. However, wind chimes purchased from the Feng Shui department will make a big difference on your wallet. And why, if you can use beer caps and make them yourself. You will need metal rings, a piece of a tin can (or any other base) on which the wires will be attached, and a large number of multi-colored lids. A melodious ringing will be heard from every breath of the breeze.
Panel for the kitchen
A decorative piece of beer caps will decorate your kitchen. It’s interesting not just to hang it on the wall, but also to attach it to the tap. A skillfully made panel will look no worse than designer tiles. You will need a base on which you will glue the tin lids.
Candles
Cute and neat candles are a great addition to your home decor. They can decorate a table for a romantic dinner, New Year's interior, as well as a wedding. Simply flip the lids over, install the wick and fill the mold with clear wax. You can use wax from old candles, which must first be melted in a saucepan over low heat.
Earrings
Purchase beads and fasteners from a craft store, and select beautiful beer caps. Homemade compositions will be an excellent gift and will add to your personal collection of earrings.
Organizer
Do you like to do handicrafts and make beadwork? Then you'll love the idea of making your work easier by creating a convenient, compact organizer. Glue the lids to a plastic rectangular base and fill them with small beads. It will be easy and convenient for you to collect beads!
Tab for books
Paint the inside of the lid to your taste, glue it to a large paper clip - you will enjoy a convenient bookmark and will never lose the place where you finished reading.
Decor
A great option for sharing crafts with children. Paint the lid as you please: you can make a ladybug or a sun. Use acrylic paints. When the product is dry, glue it onto a gift box or card.
Wreath
Select lids by color and try making a wreath to decorate your front door. To do this you will need glue, a strong base and accessories.
Crafts for the garden
It's hard to resist the desire to decorate your garden or vegetable garden with colorful crafts. In addition, such crafts can be very useful.


The skill of folk craftsmen knows no bounds. Some create masterpieces from plastic containers, while others' creativity is based on making paintings from plastic bottle caps. The places where original crafts are used are different: the walls of houses, fences and even paths. Various technologies for creating funny images will help you choose the appropriate option for your own needlework from corks.
Mosaic art
The everyday use of plastic bottles in everyday life serves as a source of ideas for their subsequent use. But assembling empty containers for crafts is much easier than finding the right number of corks. The process can take a long time, so most craftsmen involve their entire immediate circle in collecting plastic bottle caps, including family, friends, co-workers and neighbors.

Comment! It is better to select a pattern for the panel in advance in order to determine the need for the color scheme of the corks and their quantity before the collection begins.
For beginners, it is better to start with simple patterns, where a low level of complexity is combined with small size patterns. Having mastered one technology, you can try to design the next picture in a different way.

Making mosaics has several directions. Depending on the location of the design, the methods for forming pictures from corks also differ. Creating an independent mosaic that is not tied to a specific surface will require painstakingness and skill.

The main stages of creating a mosaic based on plastic bottle caps are as follows:
- As a sample, a diagram of the painting is drawn on cardboard of appropriate sizes. For these purposes, a ready-made cross stitch pattern may be useful.
- The corks are pre-sorted by color.
- Based on the sketch, the caps of plastic bottles are connected to each other with glue intended for plastic.
This technology is not widely used. It is much more practical to attach the plugs to the surface. Various simple paintings are demonstrated by the following photos:
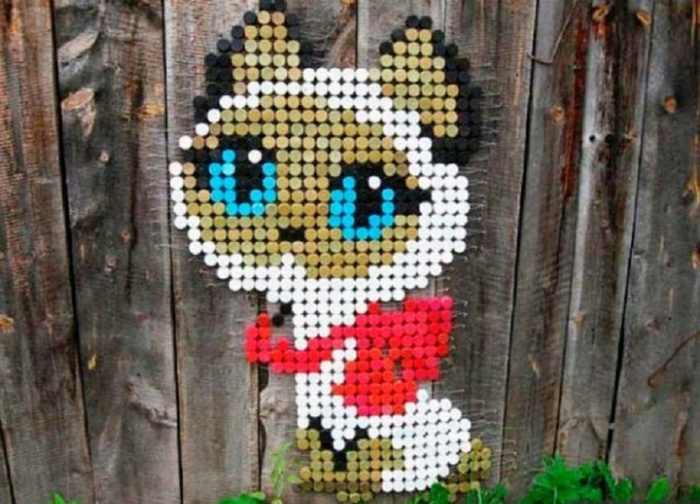
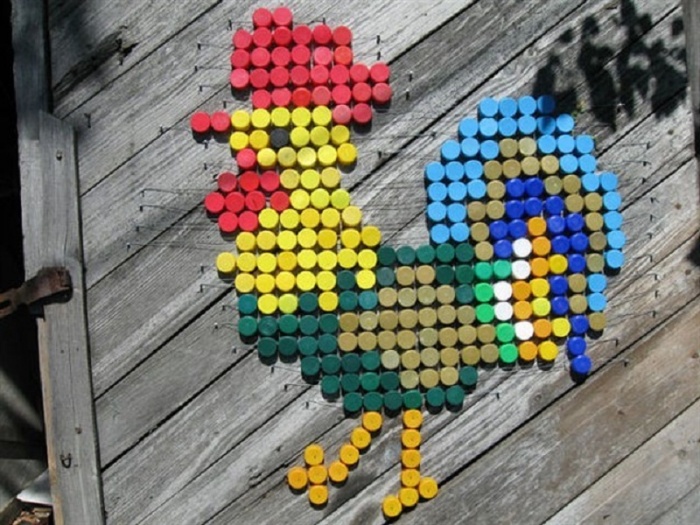
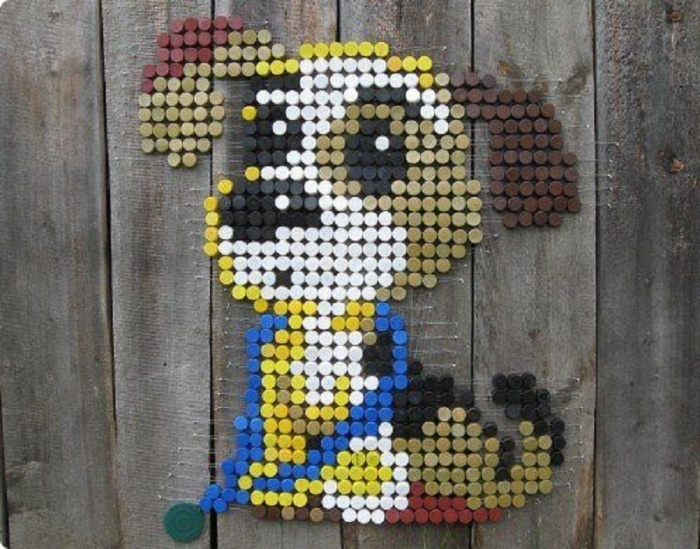
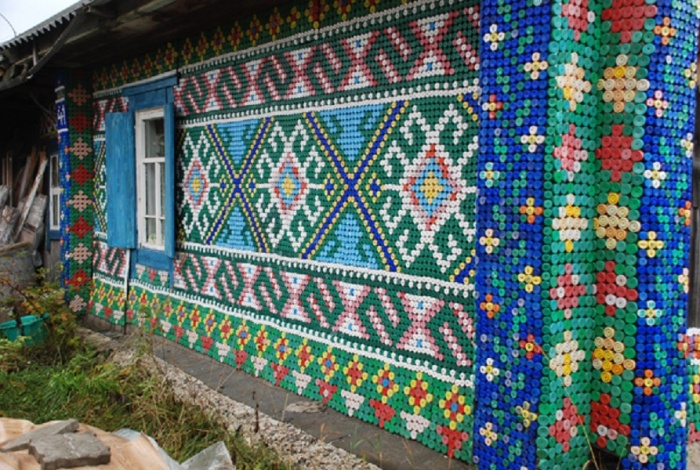
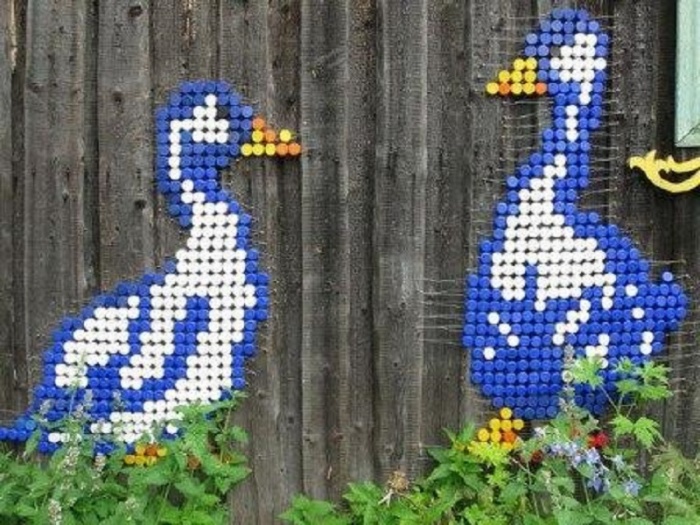
Wall or fence decoration
A wooden house or fence is an ideal surface for a painting of lids. If access to the place where the panel is planned to be placed is difficult, the mosaic is made out on plywood and then attached to the desired area. A striking example is the design of a balcony railing.

Summer cottages are the most popular for decorating with cork paintings. All images can be divided into two groups: an ornament repeating after a certain interval or full-fledged drawings. The process consists of the following steps:
- Depending on the size and complexity of the image, the diagram is drawn on cardboard or the sketch is applied directly to the surface to be designed. The outlines are made with colored paints that match the palette of the painting.
- Fastening is carried out with nails, the length of which corresponds to the height of the plugs and the thickness of the plywood or boards.
- Caps from plastic bottles can be fixed to the wall from the outside or inside.
Attention! If the corks are driven to the bottom, the recesses will quickly become clogged and ruin the attractiveness of the painting. Regular cleaning of the surface can be a solution to the problem, but it is much more practical to secure the caps of plastic bottles upside down.

There are several other reasons why plugs are fixed upside down:
- In case of reverse fixation, you will need to select a miniature hammer that can fit inside the lid, or the nails will remain sticking out, which will not add aesthetics to the picture.
- A correctly laid out picture can be further decorated by covering the seams and voids with tinted mortar. The appearance of the mosaic will improve significantly.

You can decorate not only a wooden surface with a picture of corks. If you want to decorate a brick wall, you turn to a different fixation technology. The most common option is to use an adhesive mixture to attach the tiles. A cement composition identical to plaster will help save money. The solution is applied to a small section of the wall, after which the plugs are attached in accordance with the existing sketch. It is important to maintain proportions and make the composition of the correct consistency, otherwise the caps from plastic bottles will move before the hardening process begins.

If your design plans include a large picture, you will have to wait an extremely long time for a complete set of caps to be assembled, so it is better to order new caps of the desired color from the base. Pictures of plastic bottle caps are shown below:


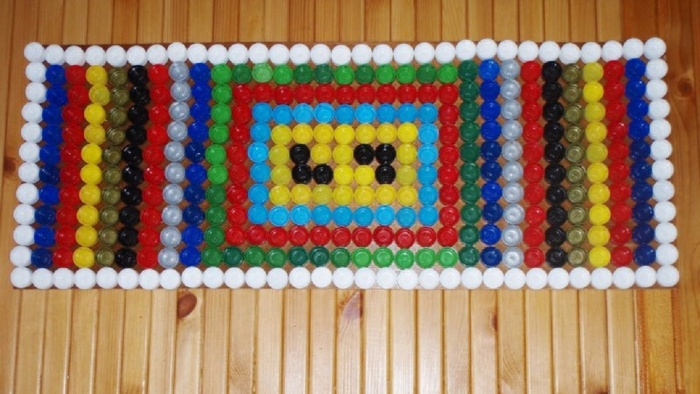
Useful rugs
You can build an original picture not only on the surface of the wall. Rugs woven from plastic bottle caps are practical. This craft perfectly massages a tired back, successfully relieving muscle tension. And stomping on a mat made from the corks of a plastic bottle with your feet will be good for your health. After all, the feet contain nerve endings leading to all internal organs. To work you will need:
- A simple diagram of the picture. Usually a geometric pattern is chosen.
- Corks from plastic bottles of the desired color scheme.
- Awl and fishing line.
Algorithm of actions:
- All lids are pierced at four points according to the principle of a cross.
- The pattern of the picture is laid out from the corks.
- Each row is strung on two rows of fishing line.
- You can collect rows separately or string them all sequentially onto a fishing line with a snake.
- Then the rows of plugs are pulled together, the excess ends of the fishing line are cut off.

Original tracks
Another non-traditional area of application for plastic plugs is the design of garden paths.
Attention! Paths made from bottle caps are characterized by slipping in winter. Therefore, it is better to decorate with original paintings those places in the summer cottage where movement in the cold is not expected.
Materials for creating floor paintings:
- multi-colored plastic bottle caps;
- sand and cement;
- construction adhesive;
- boards for formwork.
Design technology:
- The future path with the painting is marked on the site.
- If grass grows on the surface, the soil layer is removed. A trench 10 cm deep is being prepared.
- Formwork is installed along the perimeter of the trench, which is secured with pegs from the outside.
- Gravel or coarse sand is poured halfway up the trench height as a drainage cushion.
- In addition to sand and cement, glue is added to concrete. The resulting consistency of the solution for the picture made from plastic bottle caps should easily pour out of the container.
- Having filled a small area of the trench, the covers are pressed in a certain order to form the selected pattern of the picture. The plugs are recessed almost to the very bottom; their height should be the same.
- It remains to wait until the solution dries completely. The duration depends on weather conditions. Remains of cement are removed from the painting from the lids with a hard-bristled brush.
At the final stage of designing the track, the formwork is removed from the traffic jams. A photo will help you admire the results of other people’s work:

As you can see, there are many options for designing paintings from plastic bottle parts. By choosing the appropriate method, you can transform the design of your summer cottage with minimal investment.