Required foundation drainage for any monolithic underground structure. This drainage system eliminates the saturation of clay soils, frost heaving, and corrosion of reinforcing mesh and frames.
Why do you need drainage and which one to choose?
In a set of measures to eliminate frost swelling foundation drainage occupies the top position. If clay soil cannot absorb moisture, it will not swell when it freezes. The following waters are usually present on the site, reducing the comfort of operation:
1 Surface:
They arise as a result of irrigation, precipitation, flooding, snow melting, they come from the streets, roadside ditches, and are discharged by stormwater, which has nothing to do with drainage. However, if there is no storm drain integrated into the blind area of the building, these drains penetrate to the underground structures.
2 Underground:
Found in layers or penetrating into them from above, they are divided into categories:


Groundwater is drained by several drainage systems:


Attention: Given the external similarity of the contours of the ring and wall drainage, do not confuse these two drainage systems.
Drains laid in the ground protect against flooding of basements, floating of polymer septic tanks, swelling of clay soils, and rotting of plant roots.
Manufacturing technology
The only alternative to drainage by drains is enhanced waterproofing of reinforced concrete underground structures. However, plaster waterproofing has a 20-year lifespan, coating waterproofing lasts 5–15 years, and lining waterproofing lasts 25–30 years. If you perform comprehensive insulation, you can double the performance.
Volumetric waterproofing with penetrating compounds provides an unlimited service life of structures. However, when Admix is added to concrete or impregnated with other products of this type, the foundation becomes three times more expensive. Therefore, a cheaper one is used foundation drainage one of the considered methods.
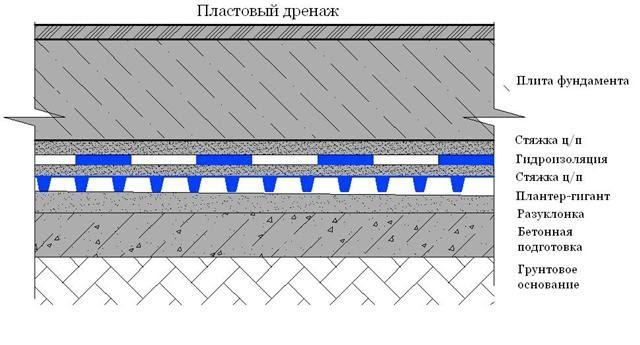
Formative drainage
Reservoir has the maximum operating experience foundation drainage, originally used for difficult operating conditions. The land drain in this option is slightly larger than the contours of the object; even pressure groundwater can be drained. The cheapest option is for reservoir drainage under slab foundations, since the underlying layer of crushed stone is already included in the project. For columnar and strip foundations, you will have to tear out the foundation pit, and after arranging the drainage, backfill inside the structure, which will increase the construction budget by 15 - 30%. 
The reservoir drainage technology is extremely simple:
- excavation of soil from a pit, the dimensions of which are 1.2 m larger than the dimensions of the house on each side
- creating slopes at the bottom of the pit from the center to the sides, corners (approximately 4 degrees or 1 cm/1 m length)
- a layer of geotextile that prevents siltation of the natural filter and mutual mixing of non-metallic materials with the soil
- 10 cm layer of sand + 30 cm layer of crushed stone, which is used to level the bottom of the pit
Attention: To prevent the crushed stone from tearing the carpet of the bottom waterproofing and from becoming saturated with cement laitance when laying concrete in the formwork, it is necessary to make a footing 5–7 cm thick. The screed is not included in the design of the drainage system, but protects it during the concreting process.
Ring drainage
To drain soils adjacent to underground structures of buildings, eliminate flooding of basements, and reduce the groundwater level, a ring foundation drainage closed circuit. This hydraulic structure requires accurate calculations and a complex of geological surveys. This is necessary to calculate:

- cross-section of drains along the inflow (reaches 15 l/sec)
- return filter load
- distances from the drain ring to the base of the foundation
It should be taken into account that along with the flow of water penetrating into the drains, soil is carried out from under the concrete structure. Therefore, special calculations are used to prevent the base from weakening and reducing the design resistance to prefabricated loads.
Attention: Ring drainage is a competitor to reservoir drainage, since much less crushed stone is consumed. This is relevant for strip, columnar foundations and bored piles.
The technology for constructing a ring drainage has several stages:

Ring drainage systems are much more powerful than wall contours, so they drain water and capillary liquid without problems.
Wall drainage
To combat “overwater”, wall drainage has been created, which is often confused with ring drainage. The difference lies in the depth of the drains and their distance from the foundation. The technology of the wall drainage system is as follows:

Attention: The level of the top backfill should be 5 - 10 cm below the base of the foundation. Perforation of pipes only in the upper part (180 or 270 degrees).
Thus, all rain and flood water that enters lenses made of non-metallic material is collected and drained by drains into an underground reservoir, the nearest reservoir or trench. The system is not designed to combat groundwater.
All remaining measures to reduce or completely eliminate frost heaving are carried out in full for all drainage system schemes. Therefore, it will be necessary to use non-metallic material (crushed stone or sand) in the underlying layer, backfill the sinuses, and insulate the blind area and the outer edge of the tape, slab, and pillars.
Blind area and storm drain
In order for underground drainage systems to be more efficient and have a long service life, it is necessary to make a blind area, integrate storm drainage trays into it, and point storm inlets for transporting liquid from the roof drainage. 
The width of the storm drain varies from 0.6 to 1.5 m depending on the intensity of traffic. This screed can be used as a garden path, saving working space on the site.
Attention: Insulating the blind area automatically moves the freezing zone; clay soils adjacent to the foundation do not swell in winter. The insulation is laid at a depth of 0.4 m or at the level of the sole of the MZLF tape.
Thus, the easiest way is to make sheet or wall drainage on your own. To design a ring drainage system, professional calculations and detailed geological surveys of the site will be required.
Excessive amounts of water negatively affect the quality and durability of foundation support structures, lead to flooding of basements and create significant inconvenience during various landscaping activities. In view of this, the construction of a drainage system is a mandatory stage in the development of any site.
The main function of drainage is to protect the supporting structure of a building from the harmful effects created by groundwater. The drainage system reduces the likelihood of basement flooding and reduces the risk of waterlogging and flooding of the area.


By neglecting the drainage system, the owner risks significantly increasing the likelihood of a decrease in the service life of the supporting structure due to waterlogging and exposure to frost heaving forces.

Water in the basement is a consequence of errors in design and construction, lack of a drainage system
Many developers are interested in: is it necessary to install drainage if the groundwater is quite low and the soil on the site is not subject to frost heaving to a high degree? The answer is: each case is subject to individual consideration. The unconditional need to create drainage arises in the following situations:
- if the basements are buried below the groundwater level or if the floor of the basement rises above the groundwater level by less than half a meter;
- if the basement is located in clay or loamy soil. The level of groundwater passage in this case does not matter;
- if technical undergrounds in an area with clay/loamy soil are buried more than 150 cm in relation to the horizon. The peculiarities of the passage of groundwater in this case are not taken into account;
- if the building is located in a zone of capillary humidification.
The conclusion from the above is as follows:
- a drainage system is needed if groundwater is critically close to the supporting structure of the building, or if it runs so high that the site area looks swampy and almost nothing grows on it;
- a drainage system is not needed if the site is dry and the groundwater level does not rise to a critical level during the rainy season and flood periods.
The best option for a drainage system
There are several types of drainage systems. It is advisable to use 2 of them in combination with the foundation structure.
First, ring drainage.


This system is designed to protect basements from groundwater flooding. It is based on tubular drains laid along the contour of the supporting structure.

The operating principle of ring drainage is based on reducing the groundwater level in the protected circuit, thereby reducing the risk of flooding of underground structures. The depth of the pipes in relation to groundwater directly determines how much the level of the latter will drop. Laying of ring drains is carried out at a certain distance from the building (usually 1.5 - 3 m from the foundation), which makes it possible to arrange drainage after the construction of the building.

Secondly, reservoir drainage. The disadvantage of such a system compared to the above-considered option is the possibility of its arrangement only at the stage of construction of the building, because it is installed under the base of the foundation at the level of the sand backfill. Excess moisture through perforated drains (pipes) enters the receiving well, from there to a place chosen by the developer (sewage system, reservoir, some depression in the terrain of the site, or it is pumped out and used for economic needs, for example, for watering plantings).
When arranging reservoir drainage, simultaneous protection of the foundation structure from groundwater and capillary moisture is ensured. Reservoir drainage is especially effective when constructing buildings with basements on low-permeability soils. Such drainage is also appropriate if the site is located in an area with a thick aquifer. Reservoir drainage must be installed if the building is located in a zone of capillary soil moisture and has a basement.

Reservoir drainage – innovations
To ensure that the drainage of your home is as efficient as possible, we will tell you about the procedure for arranging both the ring and stratum systems. If the building has already been erected, you will have to be content with only the ring drainage - no one will destroy the building for the sake of constructing a reservoir drainage system.
What does drainage consist of?

The main elements of the drainage system are pipes, inspection wells and a well for collecting water. The installation of the latter is carried out if the building is located on a flat area in the absence of the possibility of draining water outside the site.

Drainage pipes
Previously, mainly metal, asbestos-cement and ceramic pipes were used to equip the drainage system.

Such products were used solely due to their wide availability and had a number of disadvantages, including:
- frequent blockages and siltation;
- relatively short service life;
- the need to independently prepare holes for water inlet.
A much more effective, convenient and modern solution is plastic pipes - we recommend using them when arranging a drainage system.


The drainage system is best assembled from perforated pipes with stiffeners that ensure uniform distribution of loads on the products.

The advantages of plastic pipes are obvious:
- long service life;
- high strength indicators. The presence of stiffeners, as noted, contributes to the uniform distribution of loads, which allows the pipes to effectively withstand the resulting pressure;
- resistance to rotting, corrosion and various adverse effects;
- ease of transportation and installation. Plastic pipes for drainage installations weigh little and bend well, which allows them to be installed without the use of additional compensating elements;
- ability to self-clean. The internal walls of the pipes in question, unlike the external ones, are smooth, which eliminates the possibility of accumulation of contaminants;
- optimal ratio of cost and quality indicators.

Plastic pipes are the best ratio of quality and price
Plastic pipes can be laid at a depth of up to 5-6 m, i.e. with their help it will be possible to arrange drainage for any foundation.
Helpful advice! Perforated plastic pipes with pre-installed filters are available for sale. When choosing these, it is necessary, first of all, to focus on the characteristics of the soil on the site. Recommendations are given in the table.
Table. Selection of filters depending on soil type
| Soil type | Recommendations for arranging filtration |
|---|---|
| Perforated plastic pipes are suitable for arranging drainage in such soils without the use of additional filters. | |
| In this case, filtration is provided by the forces of geotextiles and crushed stone backfill. | |
| In this case, it is possible to arrange drainage without using additional filter material, but after laying the pipes, a minimum of 20 cm of crushed stone backfill must be carried out. | |
| In order to prevent siltation of pipes, geotextile filtration is installed. |
When choosing the diameter of drainage pipes, they are guided, first of all, by the degree of soil moisture. According to the technology, an extensive hydrological calculation must be performed, but in practice, in the conditions of private land, everything is usually limited to standard values, namely:
- for high water – 10-centimeter pipes;
- for ring and reservoir drainage - 16.5 cm pipes.
The depth of laying pipes is determined in accordance with the level of soil freezing - drainage should be below this point.

When arranging a drainage system, 2 types of wells are used.
Firstly, inspection (revision) wells. Installed to monitor the condition of the system and clean it from blockages. When these form, a pump is lowered into the well and the pipe is cleaned. Installation of inspection wells is carried out at the intersection of pipes, at every 2nd turn and in 50-meter increments on straight pipelines. The standard diameter of such products is 60 cm. Additionally, inspection wells take on the function of sand catchers. To do this, the lower part of the structure is equipped with a special catching mesh, and the product is installed so that its bottom is 10-30 cm deeper than the pipes (the specific value is selected in accordance with the height of the outlet fittings for connecting the pipes).

Secondly, a collector well. It is the final reservoir of the system - this is where the collected moisture flows. The sealed design is equipped with a solid bottom. The collected water can be used for irrigation or taken to a pond, ravine or other suitable place.

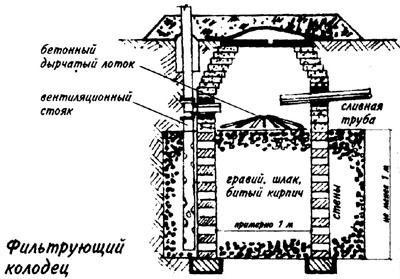
If the land plot is located on sandy soil or other soil with good water permeability, instead of a collector well, you can install the so-called. filter well. This container does not have a solid bottom. Instead, a layer of permeable material, usually crushed stone, is backfilled. The water entering the filter well through the pipes of the drainage system is discharged into the ground.

Additionally, the system includes plugs, adapters, fittings and elbows. The connection is made through the sealing gaskets included in the kit. The range of available components is shown in the photo.

Preliminary calculations
When arranging a private drainage system on your own, calculations come down to determining the depth of pipes and wells, as well as the optimal slopes of pipelines.
The depth of laying the drainage is determined by the depth of the supporting foundation. The principle is simple: drainage is installed 0.3-0.5 m below the foundation base.

The slope of the pipelines must be such that water moving through them can be drained quickly and efficiently into the receiving tank. Traditionally, a slope of 20 mm per linear meter is maintained.
First find the highest and lowest points of the site. In the first, you will arrange a water collection area (most often this is the highest corner of the house), in the second, you will install a receiving well. Thanks to the natural slope, there is no need to buy additional pumping equipment for pumping groundwater.
For a better understanding of the situation, check out the example of calculating foundation drainage.

An example of a specification for a 6x6 m rectangular bathhouse, drainage wells - 3 pcs.
- building dimensions – 9x6 m;
- the distance between the collector well and the building is 10 m;
- the protrusion of the upper edge of the well above the ground is 0.3 m.
To determine the length of each individual section of the trench to the water intake, you need to add up the lengths of the sides of the building. In this example, the result will be 15 m. The total distance to the receiving well in this case will be 25 cm. The total slope of the system under consideration is 0.5 m (a couple of centimeters for each of the resulting 25 m).

Important! The distance between the foundation and the elements of the drainage system must be at least 3 m. Backfilling of sand and gravel is carried out at a depth below the freezing level of the soil.
Do-it-yourself reservoir drainage
The main function of such a system, as noted, is to protect the foundation from the harmful effects of groundwater and basements from flooding. Formative drainage can be used as an independent means or as part of a comprehensive drainage system. In the second case, pipelines are used to connect reservoir drainage with external drains.
The minimum thickness of the reservoir drainage layer installed under the foundation, taking into account backfill, is 30 cm. The dimensions are selected so that the perimeter of the drainage system extends 20-30 cm beyond the perimeter of the building.


Important note! In practice, a special need for the use of reservoir drainage arises only when building on clay soil. In other cases, a ring drainage system is usually more than sufficient.
Determine the depth of the pipes so that they are located below the clay ball of soil.
Important note! Information on preliminary marking, excavation and subsequent arrangement of the foundation after laying drainage pipes is not provided, because all this was previously discussed in detail in the corresponding publication on our website.
The work on arranging the reservoir drainage system comes down to the following.
- Having prepared the foundation pit for the supporting structure, you further deepen it by at least 20 cm. At this stage, as noted, you need to remove a wider layer of soil compared to where the foundation passes.
- Next, the bottom of the resulting pit is covered with a 20-centimeter layer of crushed stone. The backfill is carefully compacted and leveled in compliance with the slope (in this case, it is advisable to make a 3-centimeter slope for each meter of the site) in the direction of the receiving well.
- Next, flexible perforated plastic pipes with stiffeners are laid along the perimeter of the crushed stone base. The ends of the pipes are led to the location of the receiving well.

Further arrangement of the foundation is carried out in the standard manner.
As a result, moisture penetrating under the foundation base will penetrate into the pipes through perforated holes and be discharged through them into the receiving well.
As for the receiving well, in the case of reservoir drainage it is advisable to use its filtration variety. The dimensions of finished round filtration wells are on average 150 cm, rectangular - 280x200 cm. Height - more than 200 cm.

For a well, preferably at a distance of at least 3 m from the future foundation, a hole is dug of such a depth that the bottom of the receiving tank is located at least 1 m below the entry point of the drainage pipe. This is ideal. In practice, they make sure that there is at least a 1 m difference between the groundwater and the bottom of the well. Compliance with these rules will ensure the most efficient and correct operation of the drainage system.
The length and width of the pit are selected so that after installing the well, at least 200-300 mm of free space remains on each side. The well is installed in a pit. The bottom of the tank is covered with a 30-centimeter layer of crushed stone and compacted.

The space between the container and the walls of the pit is also filled with crushed stone to a height of at least 1 m. The drainage system pipes are inserted into the tank. From above, all this is covered with geotextiles and covered layer by layer with sand and soil with careful compaction.
Water from the well will be drained into the deeper layers of the soil.
Helpful advice! Do not fill the well completely - leave the possibility of carrying out inspection work. To do this, bring the backfill to the top edge of the well, install the seal, neck and hatch from the kit.
Important! To install the well, you will have to involve special equipment and/or several assistants - it is unlikely that you will be able to cope with a two-meter volumetric structure on your own.


DIY ring drainage
Such a system can be installed after the construction of the building is completed. Recommendations regarding setbacks between structures and drainage remain the same.
There are a couple of additional important notes to make first.
Firstly, regarding the depth of the drainage pipes. The dependence is simple: the pipes are laid half a meter below the foundation of the building.

Secondly, regarding the storage well. In the case of a collector system, it is more advisable to use a type with a solid bottom. The installation procedure differs from the instructions for the filtration well only in the absence of bottom crushed stone backfill.
Inspection wells are installed on the same principle as storage wells. Only the dimensional characteristics of the products change (selected depending on the conditions of a particular situation) and the location of the drainage pipes.


Thirdly, regarding the size of the trench. To determine the optimal indicator, add 200-300 mm to the outer diameter of the pipe. The remaining free space will be filled with crushed stone. The cross-section of the trench can be rectangular or trapezoidal - whichever is more convenient for you. Stones, bricks and other elements that could damage the integrity of the pipes being laid must be removed from the bottom of the pits.
The operating procedure is presented in the table.
For your own convenience, you can make markings in advance. To do this, step back 3 m from the walls of the house (ideally. In the absence of sufficient space, many developers reduce this figure to 1 m, be guided by the situation), drive a metal or wooden peg into the ground, step back from it further to the width of the trench, drive a second peg, then install similar landmarks opposite, at the opposite corner of the building. Stretch ropes between the pegs.
Table. DIY ring drainage
| Work stage | Description |
|---|---|
| Dig trenches around the perimeter of the foundation. Do not forget about the slope of the bottom - maintain it within 1-3 cm per meter. As a result, the highest point of the drainage system should be located lower in relation to the lowest point of the supporting structure. |
|
| Fill the bottom of the trench with a 10 cm layer of river sand. Compact thoroughly, maintaining the specified slope. Lay a layer of geotextile on top of the sand (if the soil is clean sandy) of such a width that you can subsequently cover the pipes, taking into account the thickness of the crushed stone backfill. Fill a 10-centimeter layer of crushed stone on top of the geotextile, remembering to maintain the specified slope. Lay the pipes on the crushed stone. The image shows ordinary orange sewer pipes - here the developer made the holes himself. It is more convenient to use the initially recommended flexible perforated pipes, but if you don’t have them, you can go the route of the developer from the photo. Maintain a 5-6 cm step between the holes. Recommendations for connecting pipes were given earlier. |
|
| Place a 15-20 cm layer of crushed stone on top of the pipe. Wrap the geotextile with an overlap. As a result, the pipes will be surrounded on all sides by crushed stone, separated from the soil and sand by geotextiles. |
Finally, all that remains is to install inspection and storage wells, connect pipes to them and backfill the soil.

Typical mistakes when installing foundation drainage
Check out the list of the most popular mistakes made by private developers, avoid them during the work process, and the drainage of your foundation will serve for as long as possible without any complaints.
- First of all, don’t put your hopes on a wall foundation. Its functions are reduced primarily to the removal of atmospheric precipitation, rather than groundwater.
- Secondly, do not use geotextiles as a filter if your site is located on loam or sandy loam - after a few years the filter will clog, which will worsen the efficiency of the drainage system.
- Thirdly, when controlling the angle of inclination of trenches for laying pipes, if possible, work with a theodolite and a level instead of a level - this is more correct.
- Fourthly, use drainage wells instead of storm water wells. The latter are designed to collect precipitation.
- Fifthly, do not place all your hopes on the drainage system alone. To ensure the most effective removal of moisture from the supporting structure and structure, a drainage system must be installed in the direction of the storm drain.


This point deserves separate consideration. First of all, remember: drainage and storm water are prohibited from being connected to the same pipe. In practice, with this solution, the effect will be the opposite of what was expected - during the rainy season, the drainage will not cope with the removal of moisture. As a result, the soil near the supporting structure will become waterlogged; in winter, excess moisture will freeze and the soil will swell. This can lead to deformation of the blind area, movement of the supporting structure and its further destruction.
In a private house there are several places that need to be protected from getting wet from the outside. These are the foundation and buried buildings. Rainwater, all kinds of drains and rising groundwater gradually destroy the monolithic foundations and walls of basements. A properly equipped drainage system around the house can prevent this process from occurring. It is capable of removing excess moisture from structures. Even a very good blind area cannot compare in terms of protection for a house with a installed drainage system. It is highly recommended to install such a system near every house, regardless of the presence of a basement or ground floor.
A high-quality drainage system around the house with your own hands can be made in several options:
Features of different foundation drainage systems
The choice of a specific type of drainage depends on the presence of buried rooms, the depth of groundwater, the composition of the soil on the site and the topography of the site itself. Let's consider what features the drainage system around the house has.
In total, there are 3 types of drainage, which differ in their location and design:

Important: Please note that reservoir drainage does not replace another type of drainage, but only complements it. Therefore, in addition to it, a main drainage system must be installed.
Please note that if you decide to make a ring drainage around the house with your own hands, the system should be located 0.5 m below the foundation level. This arrangement will ensure high-quality drainage of groundwater from the building at any time of the year.
And if you are thinking about this, then you may find our separate material on this topic useful.
Drainage installation
Let's look at how to make a drainage system around the house in two ways.
Manufacturing of wall drainage
Before carrying out the work, it is necessary to prepare the foundation, since the system will be directly adjacent to it.
To do this, the following work is carried out:
- The foundation from the outside is primed with a special bitumen primer.
- Bitumen mastic is applied to the dried surface.
- A reinforcing mesh with 2 x 2 mm cells is glued onto the mastic.
- The next day, after the mastic has hardened, a second layer of mastic is again applied to the mesh.
 The photo shows the drainage system around the house - a trench and inspection wells along the edges
 - A collector well is installed to which drainage pipes will be connected. It is located at the lowest point on the site;
- using a laser or building level, the slope of the trench running near the foundation is ensured towards the drainage basin;
- the bottom of the trenches is covered with a layer of sand of at least 5 cm;
- geotextiles are laid on the sand, the sides of which will subsequently be wrapped overlapping;
- a gravel backfill is created having a thickness of about 10 cm;
- Prepared perforated pipes are laid on the gravel layer. Their slope is ensured at 2 degrees;
- pipes are joined with adapters and corner connectors;
- at the corners of the building, all pipelines enter installed inspection wells;
- Pipes are laid from inspection wells to drain water into a collection well or drainage pit. These pipes are also located in trenches and have a slope;
- The pipes are filled with gravel (about 10 cm) and the entire contents are wrapped in geotextiles. Using synthetic ropes, geotextiles are firmly fixed;
- further backfilling of the trenches to the soil level is carried out with sand or turf soil.
We looked at how to make drainage around a wall-type foundation. Next, we will pay attention to the manufacture of trench drainage, which is even more popular.
Manufacturing of ring drainage
For this type of work you will also need perforated pipes, crushed stone, sand and geotextiles. When a ring drainage system is made around a house, the technology involves digging trenches at a distance of 5-8 m from the foundation of the building to eliminate the possibility of subsidence of the soil around it. The trenches are located around the structure and form a closed system. The depth of the trenches should be such that the drainage passes 50 cm below the foundation level.
Immediately draw a trench (or several trenches) towards the main drainage well. The slope of the trenches is ensured at least 2-3 cm per linear meter. The slope can be adjusted by adding sand in the right places.

- the bottom of the trenches is lined with a layer of sand, and then with geotextiles, the edges of which are wrapped on their walls;
- crushed stone is poured onto the geotextile in a layer of 10 cm;
- Pipes with holes drilled in them are laid out on the crushed stone. It is advisable to use a pipe diameter of at least 10 cm. It is advisable to first wrap all pipes with a layer of geotextile, which will prevent them from clogging;
Tip: Regular PVC pipes used for sewerage are quite suitable. You can drill holes of small diameter in them with a drill, arranging them in a certain order.
- the slope of the pipes is checked, which must be at least 2 degrees;
- At pipe bends, inspection wells are installed, covered with removable covers. The same wells should be installed on long straight sections, in increments of 12 m;
- crushed stone or gravel is poured over the laid pipes in a layer of 20-30 cm;
- the entire “pie” inside the trenches is wrapped with geotextile overlapping;
- the remaining space in the trenches is filled with river sand and covered with turf.

Features of drainage wells
Any drainage around a site or building must be constructed using several inspection wells located at pipe bends. It is in these places that drainage pipes become clogged most often. Through the inspection well, you can monitor the cleanliness of the drains and clean them if necessary. Wells can be purchased or made from any materials. They should have such a width that it is convenient to clean them by placing your hand there.

In addition to several inspection wells, at the lowest point of the site there is collector well, designed to collect all the water flowing through the channels. This is a wider and more voluminous structure, which can be concrete, plastic or metal. Its depth is chosen so that the pipes entering it are located at a considerable distance from the bottom. This makes it possible to periodically clean the well from sediments accumulated at its bottom and allows the well to fill with wastewater. Water can be pumped out from the collection tank by a pump or flow by gravity to designated areas.
By creating a drainage system around the house according to all the rules, you will get rid of the harmful effects of excessive dampness affecting the foundation and recessed areas of the house.
Heavy seasonal precipitation and the proximity of aquifers to the ground surface force owners of cottages and country houses to think about combating excess moisture. Its excess can spell serious trouble:
soils oversaturated with moisture become limp, which complicates work and creates difficulties for moving around the site;
due to hydrostatic pressure, moisture intensively penetrates into the pores of the foundation and other building structures, which leads to their partial destruction and reduced reliability, flooding of the basement floors, and deterioration of the indoor microclimate;
During the off-season period, when the air temperature drops below zero degrees at night, the moisture accumulated on the surface of the blind area and steps freezes and turns into ice - which not only contributes to the accelerated destruction of coatings, but most importantly can lead to injuries to people.
water that is not drained from the surface in the autumn-spring period hardens into an impenetrable crust in the upper fertile layer, which not only has a detrimental effect on the lawn and garden plants, but also contributes to the formation of the so-called perched water - water that forms on the surface of the soil, but is not able to percolate into the ground due to a layer of ice. Such waters disappear only after the top layer of the surface has completely thawed; in some cases, the soil does not thaw until the end of May.
The most effective method of control is the installation of a drainage system.
Main tasks of drainage
 In the modern understanding, drainage implies the removal of water from the surface or the drainage of groundwater on land plots.
The tasks that the drainage system solves are:
protection of buildings and structures, parts of structures from constant exposure to moisture;
preventing moisture penetration into residential and utility rooms;
ensuring the normal condition of sites and paths;
protection of planted plants from siltation;
elimination of the phenomenon of water erosion of the upper fertile layers.
The first 3 of them are solved by wall or ring drainage at home.
What is ring foundation drainage and its difference from wall drainage?
 Wall systems are highly efficient and allow for maximum protection of foundations and basements of buildings. They are installed, as a rule, during the construction of a house at the stage of laying buried structures (primarily foundations). Their main feature is their location in close proximity (at a distance of no more than 1 m) to foundations and walls. Most often they are designed in conjunction with waterproofing systems.
When the house has already been built and the construction of a wall drainage system is difficult or impossible, the best solution is ring foundation drainage.  This term refers to a trench system in which drains are laid along the entire perimeter of the building at a certain distance (from 1 to 3 m) from the foundation structures.
This design determines the main features of foundation ring drainage systems:
Ease of implementation - the system can be built on its own without the involvement of construction equipment and the use of expensive materials and components;
Specifics of application - ring drainage around the house in soils with high water permeability (for example, sandstones) is most often used;
Mandatory installation requirements - the system is effective only if the conditions for laying depth, etc. are met.
Basic conditions for ring foundation drainage
 To reliably protect foundation structures from moisture and basement rooms from flooding, when laying a ring drainage around the house, it is necessary to fulfill the following conditions:
Lowering the groundwater level within the serviced perimeter. It is determined by the depth of the drains, the height of the groundwater level and the height of the capillary rise of moisture in the soil. In practice, foundation ring drainage pipes are located slightly below the calculated reduced groundwater level, and, as a rule, below the base of the building.
Ensuring an effective drainage radius. It determines the permissible distance from the structures to the axis of the drains and depends on the nature of the soil, the size of the foundation, the depth of the drainage pipes and the width of the trench. It should be remembered that laying at a distance less than the calculated one can lead to leaching of soil from under the foundations, and at a greater distance - to a decrease in the efficiency of groundwater drainage.
The functioning of the system taking into account the climatic characteristics of the area. From this point, foundation ring drainage pipes are produced below the soil freezing level typical for the region.
In addition to these, there are other additional requirements, for example, those determined by sanitary rules, which must also be taken into account when designing the system.
Ring drainage device
 Ring foundation drainage is a system of buried perforated pipes (drains) laid along the perimeter of the protected building, usually parallel to the foundation structures.
When designing and installing it, the following should be provided:
Liquid moves through drains by gravity, which requires laying them with a slope of 2-5 mm per linear meter of the main line.
Connecting the branches of the system in such a way as to eliminate the danger of blockages and provide for the possibility of cleaning the pipes - as a rule, inspection wells (sections of a vertical pipe covered with covers) are installed in places where drains turn.
A drainage line for discharging the liquid collected by the system into a drainage well, natural reservoirs, sewer system collector or other special hydraulic structures.
How to build a ring drainage system at home
 The construction of a ring foundation drainage should begin by determining the characteristics of the site. For design, you will need information about groundwater levels and their seasonal rise, the distribution of precipitation in the region, the nature and level of soil freezing, and topography.
In addition, a diagram of the site and adjacent territories is required, indicating the location of neighboring sites, natural reservoirs and springs, sewers and other hydraulic structures (for example, drainage canals), roads and ditches, etc.
It is difficult to obtain all the necessary information on your own; you will have to turn to specialists from a land management organization or hydrogeologists.
Next, a project (plan) of a foundation ring drainage system is drawn up, indicating the places for laying pipes, installing wells, and pipelines for discharging collected moisture.
 Based on it, construction begins:
Trenches are dug to a depth corresponding to the estimated depth of the house drainage system pipes and the thickness of the cushion (the trench width is up to 0.5 m; for drainage efficiency and ease of installation, the trench slopes must have an angle of at least 30 degrees).
In places where the direction of pipes changes, wells are installed (the height must correspond to the blind area).
A cushion is placed at the bottom of the trench - a layer of compacted sand and/or coarse crushed stone up to 15 cm thick.
The rock layer is covered with geotextiles with high water permeability, leaving wings on the slopes of the trenches.
A layer of drainage rocks (washed crushed stone, expanded clay, gravel) is laid on the geotextile, and drains (PVC, polyethylene corrugated or metal perforated pipes) are laid.
Cover the pipes with a layer of drainage material.
The structure is covered with geotextile wings and backfilled with sand or crushed stone and backfilled with soil.
Cost of foundation ring drainage
The costs of constructing a ring foundation drainage system consist of the cost of purchasing materials, the cost of excavation and installation work (if they are carried out by contractors). When constructing a ring drainage around a house on your own, you will have to spend about 600-900 rubles per linear meter of construction. Additional costs will be required for hydrogeological analysis of the site, system design, etc.
Specialized construction organizations offer such services at a price of 1,000 to 3,000 rubles per linear meter (the cost of work increases especially significantly with increasing laying depth).
A particularly advantageous option would be to conclude an agreement with an organization that can undertake all types of work - from analysis and design to commissioning, such as Promstok. In this case, fulfillment of all requirements, including those determined by federal and local legislation, and high quality of materials and work are guaranteed.
The foundation is the basis of any structure. The integrity of the entire house will depend on the condition of the foundation. In addition to the fact that the foundation must be strong, with high load-bearing capacities, it also must be protected from negative atmospheric influences. To do this, thermal insulation and waterproofing are carried out. Increasing the insulation serves to create more warmth and comfort in the home. Waterproofing is designed to protect against moisture. But in most cases, a waterproofing system alone is not enough. Waterproofing copes well with surface water, but cannot control the aggressive behavior of groundwater. To deal with this, install ring foundation drainage. Using this method, depending on the type of soil, water will not gain access to the structure or will enter, but minimally and without harm, due to lowering the groundwater level.
If you ignore this action, the degree of humidity in the basement and outer walls of the foundation will increase. An increase in moisture will lead to the formation of mold, fungi and microbes, which will lead to rapid destruction of the foundation and harm to health. If the foundation collapses before the rest of the house, the building will become uninhabitable.
The basement is an integral part of most homes. The drainage system will allow you to use the basement for various purposes, as it protects it from leaks and mold.
Experts recommend designing a house immediately with a drainage system diagram. But it also provides for the installation of drainage during the operation of the structure. A ring system is perfect for this - a pipeline around the house to drain groundwater and precipitation. Storm drains are provided for rain and snow. Foundation ring drainage prolongs the life of the structure by preventing destruction of the base from corrosion and leaks of the basement.
Before starting drainage, build a foundation by drawing up a detailed design of the building and a pipe laying diagram. This must be agreed upon with the customer. This is where the client’s participation ends; all remaining responsibility falls on the shoulders of the company. The construction organization draws up a clear action plan that creates unity of work and speeds up the process. Deviation from the order can lead to consequences that will be very expensive to correct. Each stage is controlled by building codes and standards.
Next, the team digs a trench, which is compacted with sand. This is done to allow water to flow by gravity through the pipes into the well. Then, geotextile fabric is compacted to prevent siltation. A layer of crushed stone is laid and pipes are laid below the base base. And in the corners of the house, containers for draining water - wells - are installed. Such ring foundation drainage ensures reliability, durability and practicality of the design.
Build a foundation works with both special pipes and ordinary plastic sewer pipes. Typically, special pipes are already wrapped in filtration fabrics. Using them will significantly speed up the process.
To maintain external aesthetics, the company offers hidden drainage. The pipes are installed underground. You can plant flowers or lawn grass in place of the system.
Sprinkles
Sprinkles of different layers perform the function of filtration, compaction and strengthening.
- Single layer.
Gravel or crushed stone layer. Fall asleep in sandy soil. - Double layer.
Crushed stone and sand are used on medium and fine sand.
Also sprinkles for ring foundation drainage differ in shapes and cross-sectional outlines:
- rectangular;
- trapezoidal.
The drainage service is performed by experienced craftsmen, who will not have to redo it, spending extra money and effort. Professionals will be able to give practical advice, while leaving the right of choice to the client. The company works directly with manufacturers. These factors allow us to guarantee the quality of work, which is confirmed by relevant certificates. The company strictly ensures that all work is completed on time. Building regulations are also followed.
We work in all districts of Moscow and Moscow Region:
Aprelevka, Balashikha, Bronnitsy, Vereya, Vidnoye, Vlasikha, Volokolamsk, Voskresensk, Vysokovsk, Golitsyno, Dedovsk, Dzerzhinsky, Dmitrov, Dolgoprudny, Domodedovo, Drezna, Dubna, Yegoryevsk, Zheleznodorozhny, Zhukovsky, Zaraysk, Zvenigorod, Ivanteevka, Iksha, Istra, Kashira, Klimovsk, Klin, Kolomna, Korolev, Kotelniki, Kraskovo, Krasnoarmeysk, Krasnogorsk, Krasnozavodsk, Krasnoznamensk, Kubinka, Kurovskoye, Likino-Dulyovo, Lobnya, Lukhovitsy, Lytkarino, Lyubertsy, Malakhovka, Mozhaisk, Monino, Moskovsky, Mytishchi, Nar- Fominsk, Nakhabino, Noginsk, Odintsovo, Necklace, Lakes, Orekhovo-Zuevo, Pavlovsky Posad, Peresvet, Podolsk, Protvino, Pushkino, Pushchino, Ramenskoye, Reutov, Roshal, Ruza, Sergiev Posad, Serpukhov, Solnechnogorsk, Staraya Kupavna, Stupino, Skhodnya , Taldom, Tomilino, Troitsk, Fryazino, Khimki, Khotkovo, Chernogolovka, Chekhov, Shatura, Shchelkovo, Shcherbinka, Elektrogorsk, Elektrostal, Elektrougli, Yubileiny, Yakhroma, Losino-Petrovsky, full list of cities.