It is quite understandable that many homeowners want to improve or hide the utility lines that run through all the rooms of our homes. This is especially true for the heating system; its heating devices are located in all rooms. It’s good if the heaters are of a new type and have a more or less decent appearance, but when there are old cast iron “accordions” or steel plate monsters, then there is no question of any aesthetics. Therefore, in this material we will consider the question of how to make and install a screen on a battery with your own hands in order to successfully veneer it and at the same time add a little zest to the interior of the room.
A little about heat transfer from radiators
There are often cases when new aluminum or bimetallic radiators are knocked out of the interior, disrupting its harmony. The issue of finishing is quite relevant and requires a special approach, since installing a decorative casing on a heating radiator ensures its pleasant appearance, but disrupts the process of heat transfer from the device to the room. Let’s try to figure out why this happens and whether it can be avoided before we start making the screen.
The thermal energy released into the room by a heating radiator has 2 components: radiant and convective. The first is characterized by direct infrared radiation entering the room from the hot surfaces of the battery. At low coolant temperatures (up to 50 ºС), the share of radiant energy is small, but at 60 ºС and above it increases significantly. When a decorative box for a battery is installed, the path to the flow of this radiation is inevitably blocked, which means that part of the thermal energy does not enter the house.
The exception is convector-type water heaters; their front surfaces are not hot and there is practically no radiant component. But such heaters are rare.

The convective component is the transfer of thermal energy to the air environment. Battery panels also have an impact on it, as they create an obstacle to the air passing through the fins and other elements of the heating device. And in the case when the design of the screen is unsuccessful, part of the hot air simply accumulates inside the box, unable to escape outside.
The short conclusion is this: by installing decorative screens for radiators, we disrupt the heat exchange process and part of the energy is returned to the heating network through the return pipeline. This is not so scary in a private house, where the system is located throughout the house and this heat will not leave it anywhere, but will simply be transferred to another room. But in the case of an apartment, we simply give away the heat we paid for to our neighbors on the riser, this must be understood.
Depending on how the batteries are decorated, losses range from 3 to 7%. They cannot be completely avoided, but they can be reduced with the help of a successful screen design.
Choosing material
First you need to choose the right material from which the screen for the radiator will be made.  heating. The options are as follows:
- plastic;
- metal;
- tree;
- MDF panels;
- drywall.
Plastic is of little use for our purpose. Not only does it conduct heat poorly, but over time it warps under its influence. In addition, the cost of plastic panels is quite high. The only advantage - ease of processing - is completely negated by significant disadvantages.
From the point of view of heat transfer, metal screens on radiators are the best option; by installing such a casing, you can easily keep the losses within 3%, which is almost imperceptible. To do this, you can purchase thin sheet metal with a polymer coating of the desired color and fix it, for example, on profiles for plasterboard systems. However, metal processing is not an easy task and at home, and even without the skills, it is unlikely that you will be able to assemble a decent product.

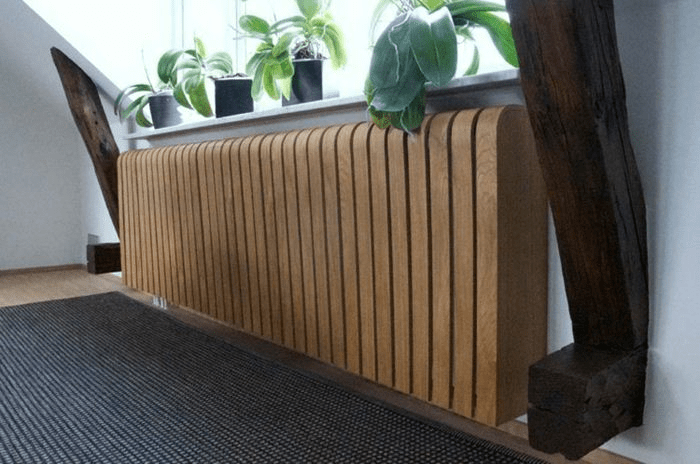
A good option is battery screens made of wood. Even though wood does not conduct heat well and requires maintenance, there is still room for imagination and the opportunity to create a simple and successful design. It is quite possible to assemble it yourself, and it will serve for a long time.
The same should be said about such material as laminated MDF panels. They are easy to process, strong and durable, and the external pattern can be successfully matched to the interior of the room. Another advantage is that MDF screens do not require maintenance like wooden screens. The cost of the material is quite affordable, so wood and MDF products are the most common options for upgrading heating devices.

A little about plasterboard sheets as one of the most popular finishing materials. It is also quite suitable for our purpose, but making a homemade screen from plasterboard is more difficult, it requires initial skills in working with this material, and the cost will be more expensive.
First of all, it is recommended to stick a special reflective screen made of foil on the inner surface of the wall located behind the battery; these are available for sale at any building materials store and are inexpensive. This will increase our radiant component, which under standard conditions is spent on heating the outer wall. Next, we’ll look at making a do-it-yourself box from MDF panels on a wooden frame.

Scheme of laying a reflective foil screen behind the radiator
First, you need to clearly measure the area to be covered and the depth of the radiator protrusion. Then, using these dimensions, we make a simple wooden frame and carefully process it, as shown in the figure.

The next stage is the most labor-intensive. We need a front grille for the MDF radiator with many air holes. The more there are, the better; it’s up to you to give the cutouts a beautiful shape. Here you will have to work hard with an electric jigsaw and other tools to cut out the pattern. Its design and location depend only on your imagination and willingness to spend your time. One recommendation: Do not make the top part of the front panel blank so that the heated air does not stand under the box cover.

Wooden grill for battery
Next, we cut the side panels to size (they can be made blank, just cut openings for the pipes) and the top part, in which it is also very desirable to make shaped holes for air to escape out. After which the decorative battery box can be assembled and installed in place. For a better understanding of the process, here is an assembly drawing as an example:
Conclusion
If you do not have enough time, then it is easier to purchase a ready-made kit for finishing various heating elements and quickly assemble and install it. But a person with hands and a good imagination will make his own exclusive decorative screen, which cannot be found on sale. The main difficulty is processing the front panel; everything else is done quite simply.
Cast iron radiators rarely fit well into the interior. Bimetallic or aluminum batteries meet the requirements of modern design, but they are no longer suitable for classic styles. To remove this dissonance, they use a decorative screen for the battery, which you can make yourself.
What you need to do to improve battery efficiency with a screen
The screen to some extent reduces heat removal from the surface of the battery. That is, the difference in coolant temperature between direct supply and return will be less.
It is impossible to talk about a clear deterioration in the convection rate due to the presence of a screen. It is enough to give an example of electric convectors, in which the heating element is located in a housing in the form of a box with an inlet at the bottom and an outlet at the top. This device even improves convection, since the box acts as a vertical air duct, which increases the flow rate.

But what is good for convectors is not suitable for radiators. The battery works on both convection and radiation (radiation). And the screen absorbs some part of the infrared radiation, and reflects some back. And if the thermal energy absorbed by the screen creates conditions for secondary convection, then the reflected energy heats the facade. This heat can be made to work to heat the room. Even under normal conditions (without a screen), it is recommended to install a reflective plane behind the radiator, which returns infrared radiation from the inner surface of the battery into the room. Typically, foil foam (or similar material) is used. When installing a screen, this recommendation is doubly relevant.

Types of structures and materials
The main element of the screen is a facade in the form of a flat decorative panel with holes that provide natural air convection. The top and side panels are not always used - it depends on the location where the battery is installed. For example, the presence of a wide window sill and a niche make them optional.
The following screen mounting methods can be distinguished.
1. Mounted. The screen, alone or together with the box, is hung with emphasis on the battery or on the wall with hooks.

2. Floor. The screen acts as a facade on the box in the form of a kind of narrow bedside table.

3. Installed. The battery is hidden inside a niche, and the screen is a decorative part of the overall surface of the wall.

The supporting structure of the box can be made of wooden beams or aluminum corners - it depends on the materials of the decorative panel and its frame. The panel itself can be made from different materials: wooden slats, plywood, laminated fiberboard or chipboard, metal mesh.
During installation, a frame made of galvanized steel profile or wooden beams is usually used as a supporting structure (similar to the technology for installing plasterboard partitions).

Decorative glass screens can be distinguished as a separate type. This is the only type of material that is used in pure sheet form, without holes. And in order not to disrupt convection, the panel is installed without the top and side walls. Installation takes place using special fastenings on load-bearing elements made of cold-rolled decorative pipe, which provide the necessary ventilation gap between the battery and the panel.

Wooden screens
The simplest screen to make is a panel in the form of a lattice made of wooden slats mounted on a wooden frame. The position of the slats can be any - vertical, horizontal, diagonal.

If desired, you can make a cellular lattice by placing the slats at an angle to each other, and using two opposite directions of the layout. Moreover, the angle between them does not have to be right. But in order for the lattice to be flat, you will have to make grooves at the connection points, and, given the thickness of the slats and the manual manufacturing method, it will definitely not be easy to do everything.

Another type is a screen-blind. This screen is reminiscent of classic wooden window shutters. In order for the slats in the frame to be at the same angle to the plane, identical parallel cuts are made on the side posts using a miter box. Since the thickness of the wood hacksaw blade is less than the thickness of the slats, two cuts are needed for each of them, and the excess must be removed with a narrow chisel.

Both the timber for the frame and the slats must be dry. Considering the proximity of the screen to the battery, it is necessary that their own humidity should not exceed 12% (these are general requirements for wood intended for carpentry). There is a simple home way to check - if you try to tie thin shavings into a knot, it should break.
When making both types of screens, each rail must be carefully sanded before attaching it to the frame. After they are fixed in place, the grille is primed and coated with two layers of varnish, paint or enamel.
As a decorative finish, you can attach platbands made of wood or MDF around the perimeter of the frame. If these are wooden platbands, then they must be treated in the same way as the grille, but their finishing coating does not have to be the same - the perimeter may be of a different shade.

When the battery is in a niche, the screen can either completely cover it or hang on hooks, leaving small gaps at the top, bottom and sides.
When attaching the screen to the frame, the side surfaces are sheathed with laminated fiberboard or chipboard. The ends of the sheathing do not need to be trimmed with a decorative edge if the screen trims will cover them.
Another common type of wooden screen is using plywood as a panel. If you know how to work with a jigsaw, you can cut out an openwork lattice with any pattern transferred to the surface of the plywood using a stencil. The finishing process for such a panel is no different from a grille: sanding, priming and painting.

Important! When choosing chipboard or plywood for a screen, you need to pay attention to their class. For plywood it should be E1, for chipboard - E0.
DIY metal screen
You can use a perforated metal sheet or expanded mesh as a panel for the screen. There are ready-made expanded metal mesh with anti-corrosion treatment (for steel) and enamel decorative coating. Such a mesh can be fixed to a wooden frame and used in the structures described above.

But metal has a serious advantage over wood - a high thermal conductivity coefficient. This property allows you to make screens that rest directly on the battery. They even increase its heat transfer by increasing the surface area. Moreover, a battery with such a screen works better not only for radiation, but also for convection - just look at the ribbed heating elements of convectors.
It is better to choose an aluminum corner for the frame, and an aluminum sheet or expanded mesh for the screen panel. They are easier to work with, and the thermal conductivity of aluminum is almost 5 times higher than that of steel.

A hanging metal screen is quite simple to make:
- Take two corners with a length equal to the sum of the height of the screen and the depth of the battery.
- Along the fold line on one of the walls of each corner, two counter cuts are made with a total angle of 90° (45° for each relative to the edge of the corner). Moreover, the cuts must be made so that the uncut walls of the corners face each other.
- Bend the corners in the shape of the letter G.
- Prepare a blank for the screen from a perforated sheet or expanded mesh. Its length is equal to the total length of the L-shaped corner.
- Three corners are made with a size equal to the width of the screen.
- Bend the screen blank and attach it to the L-shaped corners using screws and nuts with washers (in holes specially drilled in the corners). It is better to drill holes in place so that they fit into the perforation of the sheet or into the mesh cell.
- On the inside of the mesh, three corners are attached in the corner and along the edges, which serve as stiffening ribs.
- Paint the outer part of the L-shaped corners.

To ensure that such a screen is in a stable position, you can fix a pair of dowels with straight hooks in the wall, and drill holes for them in the short parts of the L-shaped corners.
Glass screen
If wooden screens are well suited for traditional and rustic styles, and metal ones for industrial ones, then glass ones look great in modern interiors, such as hi-tech, minimalism, fusion, pop art. It all depends on the decorative processing of the glass.
In principle, you can order self-adhesive film with large format printing for a glass screen. You can also make a design on a matte or transparent surface using sandblasting or paste for chemical etching of glass.

If you don’t want to bother with decorative processing, then glass with a matte surface or painted in bulk is available for sale - you just need to order the desired size, and you can process the edge yourself. The only condition is that the glass must be tempered.
The simplest option for installing a screen is to point-mount the glass to the wall in four places. To do this, use special fittings with remote fastening.

But there is one drawback - you need to drill holes in tempered glass, and this is difficult to do at home.
Therefore, it is better to use a cold-rolled thin-walled pipe as the supporting structure of the screen. It (and fastenings for it and glass) are sold in stores that sell everything necessary for making furniture. As a rule, such pipes and fasteners are made chrome, but you can order them to be painted in any shade from the RAL palette. The screen stands are attached to the floor.

As an additional support for the racks, two remote adjustable fasteners of a closed type (with a plug for the pipe) can be attached to the wall. The glass is secured between the posts using clamps.
Screens for radiators are used for decorative purposes when it is necessary to “hide” unsightly radiators and pipes, creating an organic interior, and also for safety purposes so that you cannot get burned on the hot surface of the radiator. You can make a decorative screen yourself or purchase a ready-made one.
According to their design, screens are divided into the following types:
Whatever the design of the screen, it must meet the following requirements:
- Ensure unimpeded heat radiation into the room.
- Provide free access to shut-off valves and various valves on pipes.
- Should be easy to remove to replace the radiator.
In addition to dividing types depending on the design, decorative panels for radiators are made from various materials. In this case, wood is used (including rattan, MDF, HDF), metal, glass, plastic, and plasterboard.
How to install and which heating radiators to choose.
Material of manufacture and features
Each of the materials used to make screens has its own advantages and disadvantages. To make or buy a durable, durable and aesthetically pleasing screen for your radiator, you need to consider the features of each material:
- Tree.
When making screens from wood, they can use either expensive materials such as oak, beech, rattan, or cheaper options - MDF, slatted fabric. Wooden panels are made in the form of grilles or blinds, and are installed at a certain height above the floor so that they do not interfere with the passage of heat from the radiator. Holes are also made on the top of the box. It is very easy to make a wooden screen yourself, giving it any shape, but wood has poor thermal conductivity, so it will absorb some of the heat from the radiator.
To prevent the wooden screen from deforming over time from exposure to high temperature, temperature changes and moisture, it is necessary to use only high-quality wood.
- Metal.
Screens made of metal or aluminum mesh transmit heat well and are inexpensive. Metal is a good conductor of heat, so a properly made grille creates good thermal radiation. There is a large selection of purchased metal screens, but making one yourself will be quite difficult without special tools and skills. 
- Plastic
Apart from light weight, ease of design and installation, plastic grilles have no other advantages. When heated, they are capable of releasing harmful substances, do not have thermal conductivity, and are also not mechanically strong.
- Glass
Glass decorative panels can only be purchased. They are made of tempered glass, have a variety of designs, and are durable. Glass panels have maximum heat transfer, providing good convection due to the passage of cold air from below, which heats up and rises. In addition, there are screens made of acrylic - they are thinner and lighter than glass, have a wide range of colors and a variety of shapes. 
- Drywall
Affordable material for home-made decorative grilles. With proper preparation of drywall, you can make a durable and high-quality panel for the battery.
Step-by-step making of a screen for a battery with your own hands
To produce a simple decorative screen at home you will need:
- Hand saw or jigsaw;
- Metal or wooden mesh;
- Drywall sheet;
- Wood glue, for furniture;
- Staples for construction staplers, nails;
- Self-tapping screws or self-tapping screws;
- Panel legs.
Before making the panel, the drywall must be properly prepared so that the sheet does not deform or crumble under the influence of heat. To do this, roll the inside of the sheet with a needle roller, then apply about two liters of an aqueous PVA solution to the surface. This procedure will increase the thermal conductivity of the material, giving it strength. When the drywall is dry, it needs to be sanded and painted.
The screen manufacturing procedure is as follows:

Purchased screens: installation
The fastening for a decorative box is done as follows: using a building level, mark the upper horizontal line for mounting fasteners, then mark the lower line along this line. After this, the distance between the left and right holes and the installation locations of the fasteners are measured. Now you can drill holes and screw screws into them.
If the panel is installed with its bottom on the floor, adjustable legs are provided for this purpose, which are included in the kit. The upper part is attached with small hooks, which are located on the sides.
Hinged screens are simply hung on screws or anchors that hold the radiator itself. This type of screen is considered the easiest to install and maintain. They can be quickly removed, taken to the bathroom and washed, and then hung back just as easily.
In order to ensure effective heating of the room through the decorative panel, it is necessary to follow some recommendations:

- A heat shield-reflector attached to the wall inside the box behind the radiator will reflect heat rays from the back of the radiator, which will increase the overall flow of IR rays onto the decorative grille. This reflector should be made of heat-insulating mat with a shiny surface.
- To increase heat transfer through the screen, it is recommended to equip it with an aerodynamic visor made of any metal. It is installed under the window sill or the top of the box at an angle, preventing the formation of an air cushion that blocks convection.
Thus, not every decorative screen is capable of providing aesthetic pleasure and efficient operation at the same time. In order for convection to occur most efficiently, it is necessary to choose the right material for the manufacture of the panel, as well as use methods to improve the absorption of thermal rays.
Making a decorative box for a radiator and heating pipes by cutting out a niche in the wall and masking it with plasterboard.
Heating radiators play an important role in the apartment. It depends on them how comfortable it will be indoors in cold weather. But there is one problem - sometimes they look so unsightly that they spoil the overall appearance of the room. Special devices - screens - will help solve this problem. You can buy them in a store or make them yourself. How to make a battery screen with your own hands? Are there any features or nuances to this process?
What is the screen for?
Why install a radiator screen? There are three reasons:
- They perform a decorative function. An unsightly place in the room can be instantly transformed thanks to an original designed screen.
- Protect from contact with hot metal. This is especially true for families with small children.
- Makes it easier to maintain the radiator itself.
Types of devices
All existing screens are divided into several types. The design of the product and the material used for its manufacture serve as the basis for separation.
Based on the type of design, screens are divided into 3 types:
- Lattices. Used to cover the radiator in a niche.
- Mounted. May be with or without a lid.
- Attached. Can be installed on the floor, while covering the entire radiator.

Based on the materials used, screens are also divided into several types:
- Plastic. They cost less than others. They are practical. A significant drawback is the release of harmful substances upon strong heating.
- Made from MDF or fiberboard. These materials are the easiest to process. Allows you to make a protective grill quickly and easily.
- Metal. Can be solid steel or forged.
- Wooden. It is advisable that high-quality wood be used. Cheap material will quickly deteriorate.
- Glass. This material allows you to make original and unusual screens.
Of all the listed types, the most popular are wooden, metal and decorative screens in the form of a box.
Hardware
In most cases they are made of thin steel. Painted using a special powder. They have the most simple design and low price. Stainless steel products are a little more expensive. Thanks to perforation, they can become a real interior decoration.
Advantages of metal screens:
- They do not need to be painted or repaired.
- Excellent heat transfer.
- Absolutely safe for others.
- Installation is simple.
- Do not change shape when heated strongly.
- To clean, just rinse under running water.
Wooden models
They are considered the most attractive and environmentally friendly. Most often made to order. Such structures cost much more than metal ones. The price depends on the model and type of wood.
You should not save on products of this type. Cheap wood and poor manufacturing technology significantly reduce its service life.
Wooden screens will look harmonious in a room in a country or classic style. They can be carved or have a wicker lattice.
Box
Usually installed on the floor. They have a more complex design. They completely hide the radiator, allowing you to give an attractive look to a niche or space under the window. Such products can be decorated with decorative elements, for example, legs, baseboards or figurines.
A few rules
Before you make a screen for a heating battery with your own hands, you need to get acquainted with some nuances:
- A protective grille or panel will reduce the heat output level of the heating device. The minimum will be 5%. The fewer holes there are in the product, the greater this indicator.
- The screen should not obstruct air movement.
- Foil material placed behind the radiator will help increase heat transfer. Another option is to paint the inside of the screen with black paint.
- The product must be easily dismantled and taken apart.

Manufacturing example
How to make a decorative grille for a radiator yourself can be seen using the example of a product made from fiberboard.
First you need to prepare tools and materials:
- Fiberboard sheet. It is important that the color matches the rest of the interior details perfectly.
- Lattice or mesh for making side panels or front parts.
- A foil or metal sheet that will serve as a reflector.
- Screws and staples.
- Wood glue.
- Nails.

The whole process consists of 3 main stages:
- markings;
- manufacturing of parts;
- installation
Marking
This stage involves taking basic measurements and marking the fiberboard sheet:
- First of all, the two sides of the radiator are measured. Add 10 cm to the width and 5 cm to the height. These dimensions will be needed to make the front part of the screen.
- Now you need to measure the depth. Add 2.5 cm to the result obtained. This results in the width of the side slats.
- All that remains is to measure the cover. It is important that it is 1.2-1.5 cm larger than the side bars.
Trimming
Now you need to do all the listed details. To make the front profile, you need to cut out several blanks 11 cm wide. In the places where they will be attached to each other, use a hacksaw to make an angle of 45°.
Assembly
So, all the parts are assembled. You can begin the assembly and installation process:
- First, the front window is designed. It will require a mesh. You can cut it with a hacksaw.
- A fiberboard profile is used to finish each edge. It should be placed around the entire perimeter on the inside of each front corner. The side strips are designed in a similar way.
- Making the frame is one of the main stages of the work. It must be strong and stable. You need to cut holes on the sides for the pipes.
- It is recommended to install a metal or foil sheet on the back wall. It will reflect heat.
- There are several ways to secure the screen. One of them is the frame mentioned above. The second way to secure the structure is with anchor collets. It involves purchasing expensive additional elements. And finally, the third method is legs. They can be regular or adjustable. The legs are attached to the bottom of the screen.
The screen for a heating radiator performs several functions at once. One of them (probably the most important) is protection against contact with hot metal. In addition, this element can be an interior decoration. It can be purchased in specialized stores, or you can make it yourself.